Send Invoice: Xero Customer Invoices
The purpose of this document is to outline to new and existing staff how to use of this SOP is to establish the responsibilities, internal controls,
Overview#
Purpose: The purpose of this document is to outline to new and existing staff how to use XERO to create and send invoices to customers to prompt timely collection. The
Purpose: of this SOP is to establish the responsibilities, internal controls, authorizations and procedures for the accurate and timely preparation of customer invoices for goods and services rendered by and the management of the accounts receivable created by these invoices. This includes ensuring adequate support for all amounts billed, timely collection of amounts outstanding, recording of transactions, and reporting of outstanding accounts.
Scope: This procedure applies to staff that has the responsibility for creating and sending invoices.
Responsibility: The collection of accounts receivable is a shared responsibility between the operating departments and Accounts. All staff will make every effort to collect outstanding accounts receivable as efficiently and effectively as possible. This section includes general responsibilities in relation to accounts receivable and collection. Responsibilities specific to Xero software will be listed. It is the responsibility of the below users to create and send invoices as part of daily workflow. Accounts Leader or those with approver and authorized use role should see to it the invoices are properly approved before it is sent out to customers.
To approve and send an invoice, you will need one of the below user roles:
Adviser Standard Invoice only – approve and pay (sales and purchases) Invoice only – purchases (purchase orders and bills) Invoice only – sales (quoting and invoicing)
Objective: The objective of this SOP is to standardize the use of XERO in ensuring timely payment by customers and minimize write-offs.
- Procedure for invoices, billing, and sales (including invoicing in Xero software, digital documentation, and electronic billing & payment)
- Procedure for maintaining customer data, including customer acknowledgment.
- Tracking accounts receivable data, and tallying it with balance sheet numbers
- Familiarize with Online Invoicing, approving and sending invoices in Xero

1 Use the Sales Overview
Please see following video to assist with SOP:
View the status of invoices and quotes.
Go to Business and use the Sales overview to view the status of invoices and quotes.
- Use Search button to search for customer name, invoice/quote number, transaction amount or reference. Narrow down the search to a timeframe based on due date or transaction date
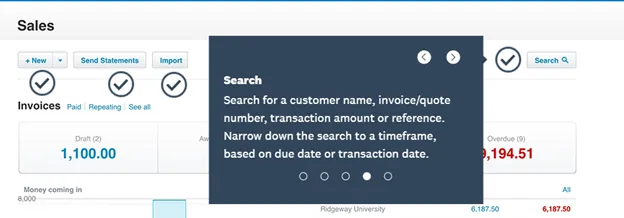
Search function
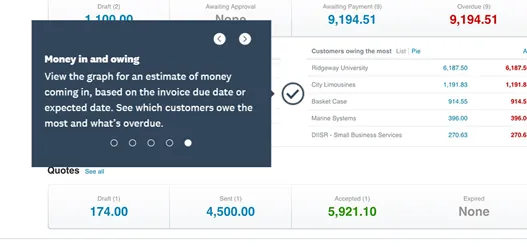
- View the graph for an estimate of money coming in based on the invoice due date of expected date. See which customers owe the most and what’s overdue.
2 Create and Send Invoices
Create invoices and send them to customers with files attached.
2.1 Process
Step 1 of 6 Go to Business and select Invoices[1].

Step 2 of 6 Click New Invoice[1] or click the plus icon[2] to create an invoice from anywhere in Xero.
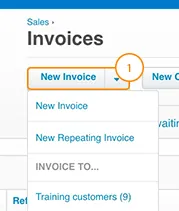
New Invoice
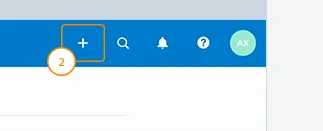
Plus Icon
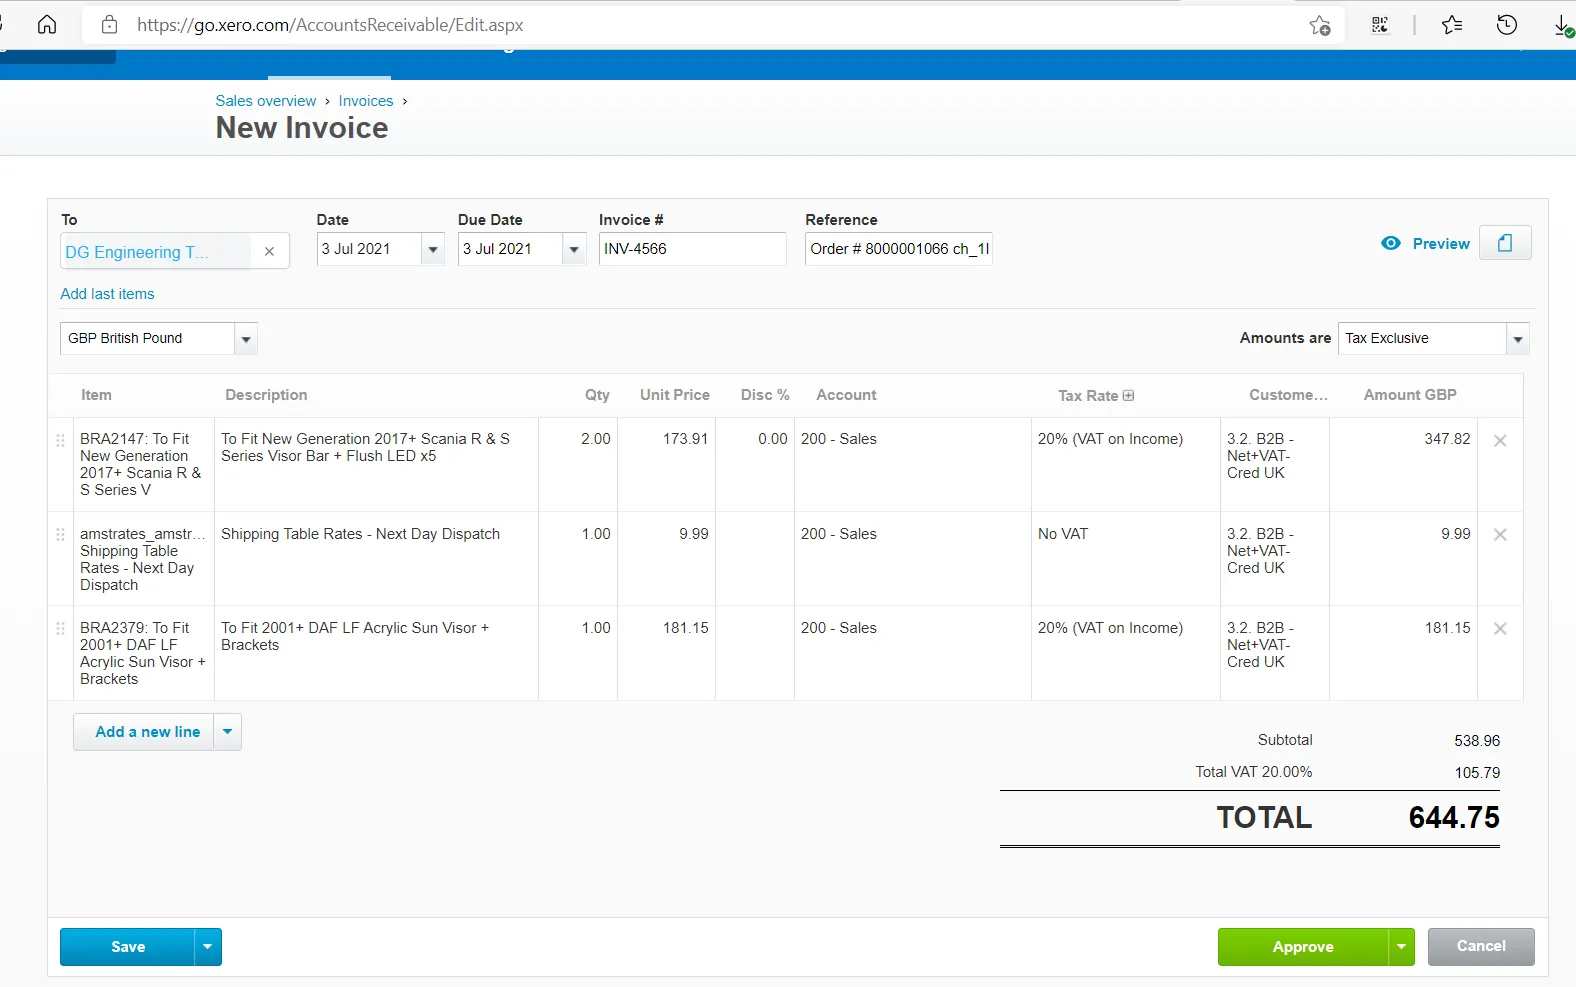
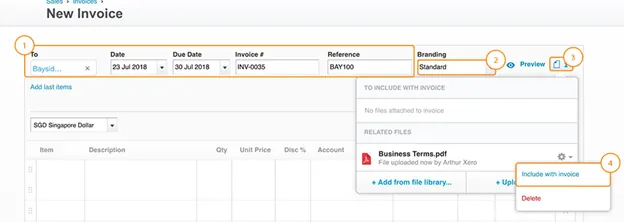
Step 3 of 6 Enter a contact, due date, and add a reference[1]. Reference format will be Order Number/ID Source _External Reference. example
“Order # 8000001066 _ Magento _ ch_1IvdW9A2L3aJOLAGoKEQxOoC"
Xero populates the due date if you’ve set a default in the contact record or Invoice settings. Due Date is Same as Invoice Date for those invoices paid direct debit. Select a Branding theme[2] to use an alternative to the default theme. Click the files icon[3] to add attachments, such as business terms or warranty information. Once uploaded, select Include with invoice[4].
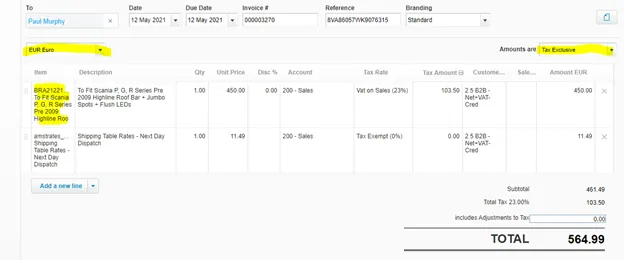
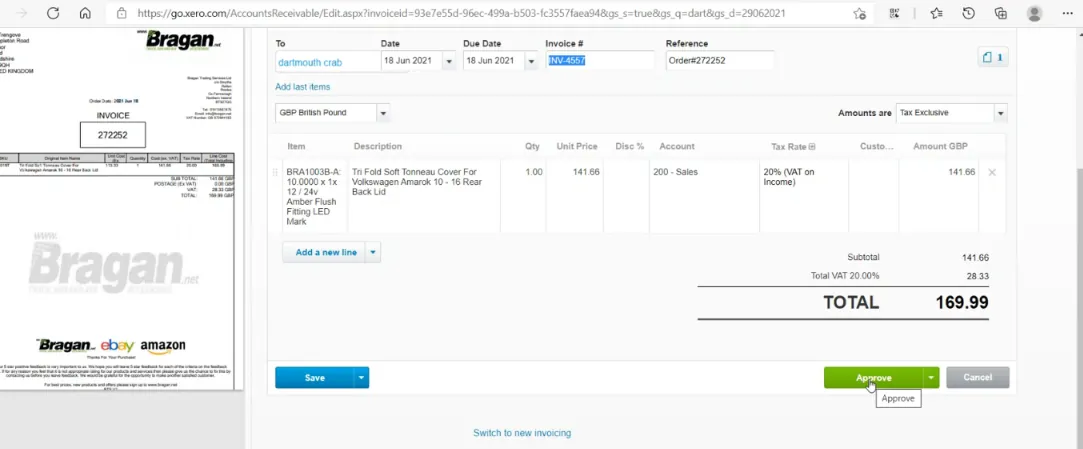
Step 4 of 6 Confirm the invoice currency[1], and set the tax treatment[2]. Select the item(s)[3] you’re invoicing for, or create a new item. You must enter a Description, Account and Tax Rate before you can approve an invoice.
Step 5 of 6 Click Save[1] to submit for approval or to save as draft. If you are the approver, Click Approve[2] to confirm the invoice details and move to the next step. You can access approved invoices from the Awaiting Payment tab in the Invoices screen.
Step 6 of 6 Preview[1] the invoice, and choose how you want to send the invoice to the customer, Email[2] or Print PDF[3]. Confirm the attachments and use Invoice Options[4] to make changes.

3 Online Invoicing
Send online invoices to improve visibility to customers.
Send invoices online to encourage customers to view and pay them faster.
Use the Sent column to know when a customer opens the invoice online.
3.1 Process
3.1.1 Email an invoice:
Email an invoice to encourage faster customer payments.
- Open the invoice you want to email.
- Click Email[1] on an approved invoice, or from the Invoices screen.
- Update the information in the Send window.
- If you’re sending the invoice to multiple email addresses, separate each address with a comma or semicolon.
- Tick
Include files as attachments to email any additional files attached to the invoice. Include PDF attachment to include a PDF copy of the invoice. Mark as sent to mark the invoice as being sent. Send me a copy to send yourself a copy of the email.
- Review the email message and click Send[2].
The customer can open the online invoice by clicking the View Invoice button or link within the email. The customer can click Pay now[1] to pay using a payment service. Once paid, Xero moves the invoice to the Paid tab on the Invoices screen.

Pay Now Button
3.1.2 Sent/Viewed
Track whether customers have opened the online invoice by checking the Sent column under the Awaiting Payment[1] tab.

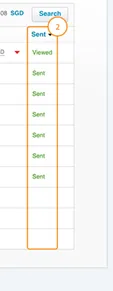
Xero changes Sent to Viewed[2] and adds a date and time stamp to the invoice, when the customer views the online invoice. PDF invoices can’t be tracked under the Sent column.
4 Approve and Send Invoices
Approve an invoice that's been submitted by a staff member using new or classic invoicing. You can also print the invoice, sent it as an email or mark it as done.
Approving Invoices
4.1 Process
Using New Invoicing
If an invoice has been submitted for approval and you have the appropriate user role, you can approve the invoice by:
- In the Business menu, select Invoices.
- Select the Draft or Awaiting Approval tab, then find and open the invoice you want to approve.
- (Optional) If the invoice opens in classic invoicing, click Switch to new invoicing at the bottom of the invoice.
- Check the details of the invoice are correct and make any changes as needed. Xero will automatically save any changes.
Open Zendesk directed to bragan.net and get the information of the Linnworks order
Search for order in Linnworks or Magento ensure the VAT is correct and that the order has no 'notes' to be added on when entering for Xero.
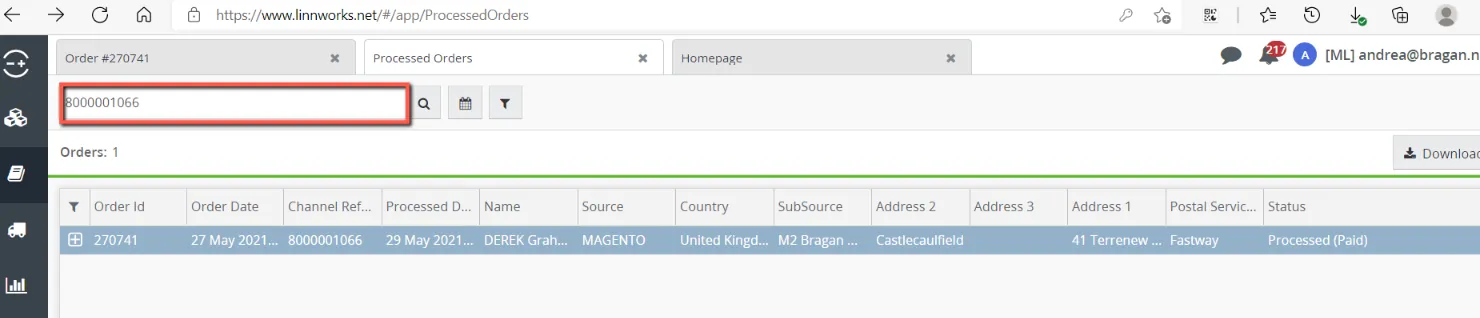
Search Processed Order in LW
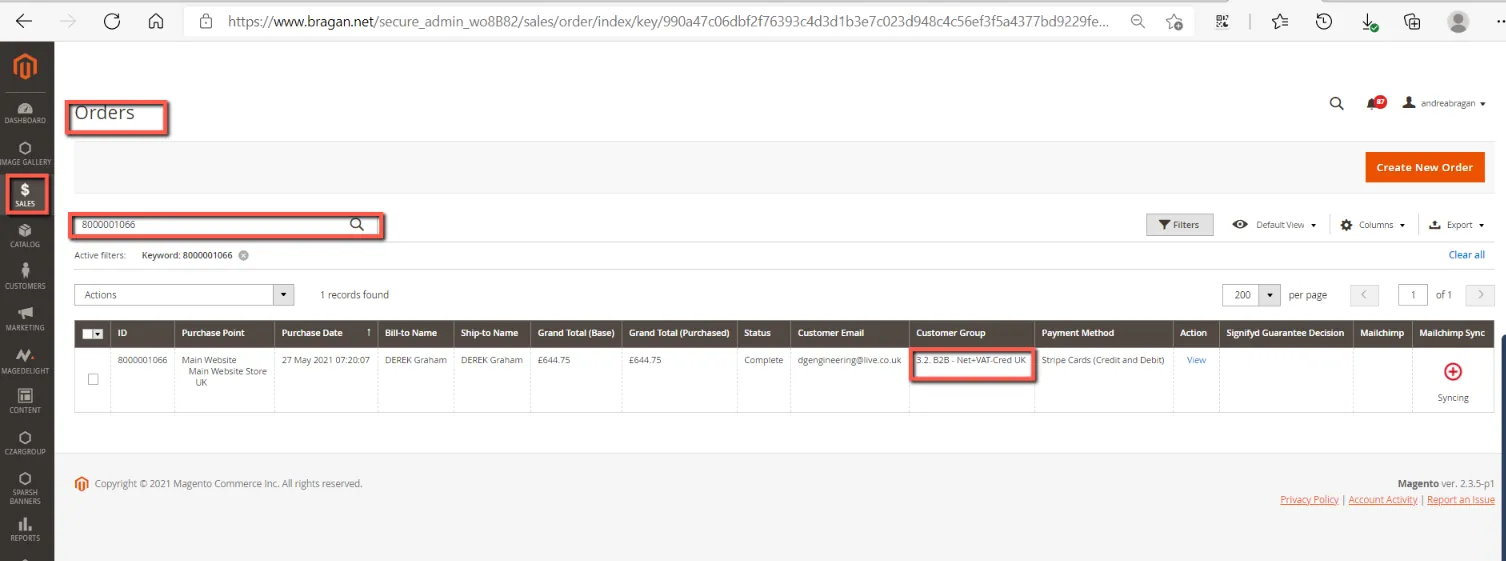
Magento Order Details
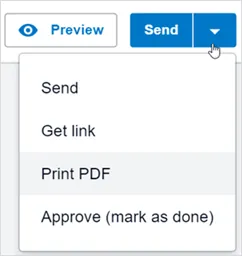
- Click Send to approve the invoice and email a copy to your customer. Or click the arrow next to Send and select:
Get link – To copy a link to the online invoice.
Print PDF – To create a PDF copy for printing.
Approve (mark as done) – To simply approve the invoice. You can go back to the invoice at a later time to send, share an online link or print a PDF copy.
- (Optional) If your customer has remaining credit, click Apply credit to allocate it to the invoice, or click Skip for now to use the credit another time. Then click Send.
- (Optional) If you chose to send the invoice, complete the fields in the Send invoice window, and select Attach PDF or Send me a copy, if needed. Then click Send.
Using Classic Invoicing
- In the Business menu, select Invoices.
- Select the Draft or Awaiting Approval tab, then find and open the invoice you want approved.
- (Optional) If the invoice opens in new invoicing, click Switch back to classic invoicing at the bottom of your invoice.
- Check the details of the invoice are correct, and make any changes as needed. You will need to manually save any changes, as Xero won't automatically save them for you.
- Either:
Click Approve while you’re in the invoice to approve it individually.
Or, from the list of invoices, select the checkbox next to each invoice, then click Approve.
- Click Email to send Invoice. For A copy of paid invoice Select the Email Template of Sales Invoice: Re Send Customer paid invoice (Similar to Zendesk Macro #307)
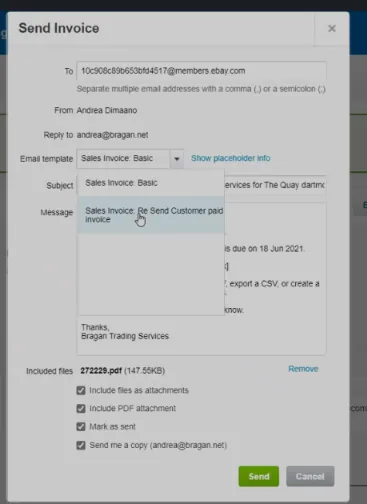
Email to Send Invoice Copy of paid/sent orders
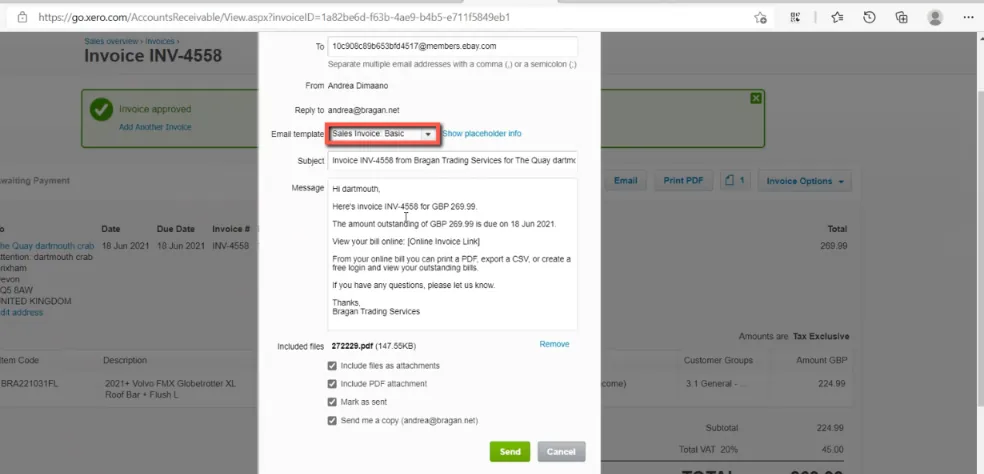
Send Invoice for Collection
5 Share an Online Invoice Link with your
Customer#
Send an online invoice link to your customer so that they can access invoices online and view changes made in real time.
You can share the online invoice link with your customer, using either new or classic invoicing, or the mobile app.
Copying the link in new invoicing automatically approves draft or awaiting approval invoices.
5.1 Process
5.1.1 Using New Invoicing
- In the Business menu, select Invoices.
- Find and open the invoice you want by clicking Search or click into the relevant status tab.
- If the invoice is:

- Click Copy to copy the invoice link.
- Paste the link into an email for your customer or into your web browser. If you do view the invoice yourself, this will mark the invoice as being viewed.
5.1.2 Using Classic invoicing
- In the Business menu, select Invoices.
- Find and open the invoice you want by clicking Search or click into the relevant status tab.
- If the invoice is:
In a draft or awaiting approval status, click Email. Check that you’ve inserted the online invoice link, then click Send.
In an awaiting payment or paid status, click Invoice Options and select Share invoice. Click Copy to copy the link, or click the link to take you to the online invoice.
Edit your email template to include the [Online Invoice Link] placeholder if you’d like to include the link for invoices you send going forward.
5.1.3 Using iOS Mobile app
Share an invoice with your customer using any messaging or email app you have on your mobile device.
- From the Dashboard, tap + to create an invoice, or tap Sales to open an existing invoice.
- Tap Options, then tap Share.
- Select either a messaging or email app to create a new message with the online invoice URL in the message body.
If you choose iMessage or an email app, the primary contacts mobile phone number or email address will automatically populate, if saved in Xero.
When using the iOS Mail app, the contents of the default email set up for sales invoices will be copied into the email body.
5.1.4 Using Android Mobile app
Share an invoice with your customer using any messaging or email app you have on your mobile device.
- From the Dashboard, tap + to create an invoice, or tap Sales to open an existing invoice.
- Tap the menu icon, then tap Share.
- Select either a messaging or email app to create a new message with the online invoice URL in the message body.
6 Zendesk Email
Action:
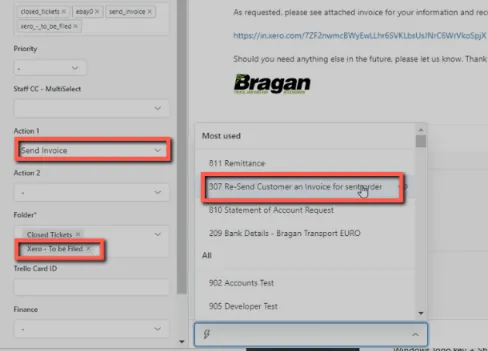
Once the invoice is successfully sent via either method go back into the original trade customer invoice email in Zendesk along the left side of the screen in the Action drop down select 'send invoice'
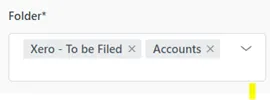
Folder:
Next in the folder drop down select the Accounts and Xero-To be Filed. This files the email into this folder when you hit 'solve' so that you can always go back and check if needed.
Macro:
You can use Macro Usage 307 'Re-Send Customer an invoice for sent order'
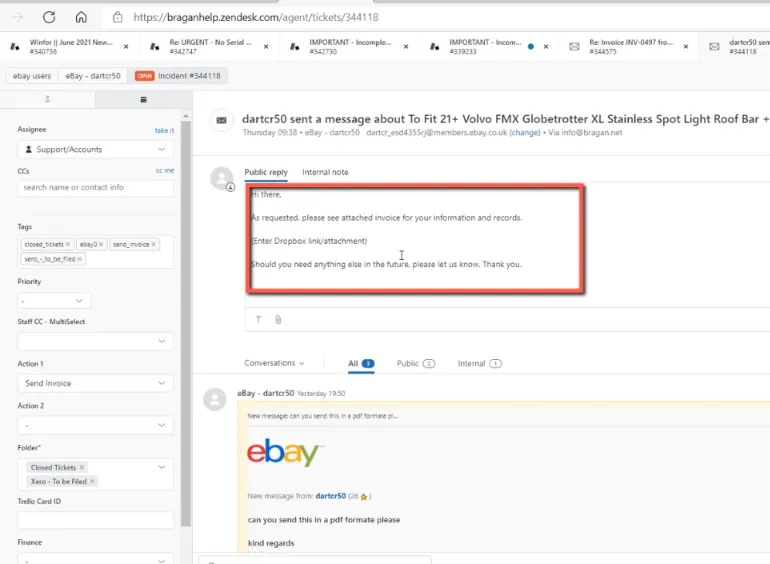
Reply to customer Zendesk
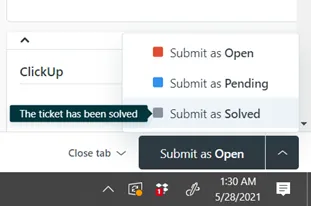
Submit as Solved:
As mentioned once both drop down choices have been selected you can solve the email by clicking the 'submit as box on the bottom right of the screen and choosing 'submit as solved' from the options given.
Video & Media#
🎥 Xero invoices SOP part 2 🎥 Xero Invoices SOP part 1
Notes#
This section is important so Adhoc points and issues can be logged. Also, Q&A can be logged for suggestions for potential issues encountered. Also, log important notes needed for this system. Potential Issues:
1 - ISSUE ENCOUNTERED: Stuck on Loading RESOLUTION: Refresh Browser
2 - ISSUE ENCOUNTERED: Broken Links RESOLUTION: Get the external link as this will allow other people to access the SOP without the need for login credentials and avoid broken links.