Team IRL Payroll
The purpose of this procedure is to provide guidance to authorized users responsible
Overview#
Purpose: The purpose of this procedure is to provide guidance to authorized users responsible for payroll on the steps to be taken to process Bragan’s Team Ireland (IRL) Payroll. Clear and easy to follow instructions are created to ensure that pay details of employees are correct and that employees receive their salaries in a timely manner.
Scope: This procedure applies to the Payroll Department and those authorized to process payroll. This only covers the payroll process for Team IRL, we have a separate one for Team PH.
Responsibility: Roles and Responsibilities:
- Employees are responsible for providing all required documentation, such as clock-in cards from the clocking machine ZKTime.net.
- The Payroll Department is responsible for the verification of payroll details of each employee and making correct payments
- Authorized users is in charge of Smart Card Authorization
Objective: The important objectives of this Payroll SOP are:
- To learn the detailed procedure on the Payroll Process for Team IRL
- To record correct salary details of all the employees in the organization
- To learn how to use and generate Pay Slips through Bright Pay
- To learn how to make payments through Ulster Bank

Procedure#
As of 2026 Payroll is no longer done on Brightpay desktop instead it is done on Brightpay cloud, system is the same and th SOP is still relevant but to login you must go to uk-25-26.brightpay.com and use [email protected] credentials from Lastpass.
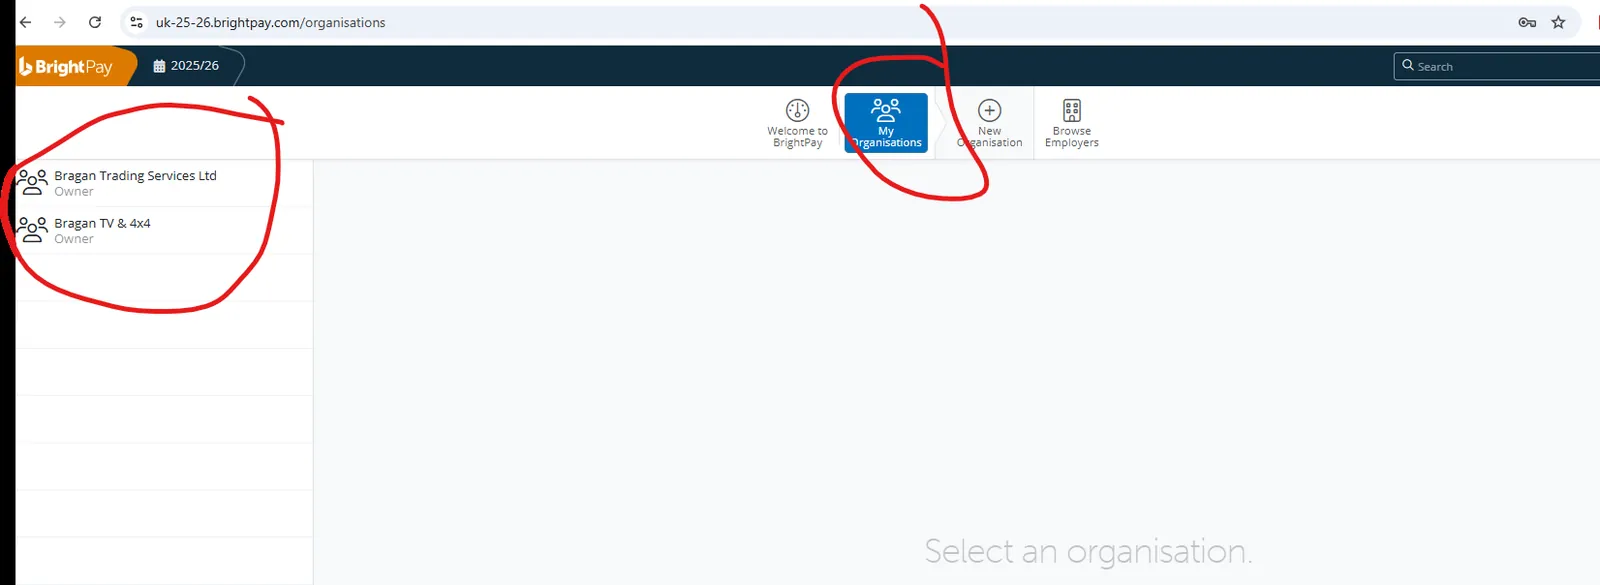
Both the UK and Irish company now have payroll on Brightpay, to switch between the two companies Click on My Organisations and select the relevant company
Generate Employees Total Time Card#
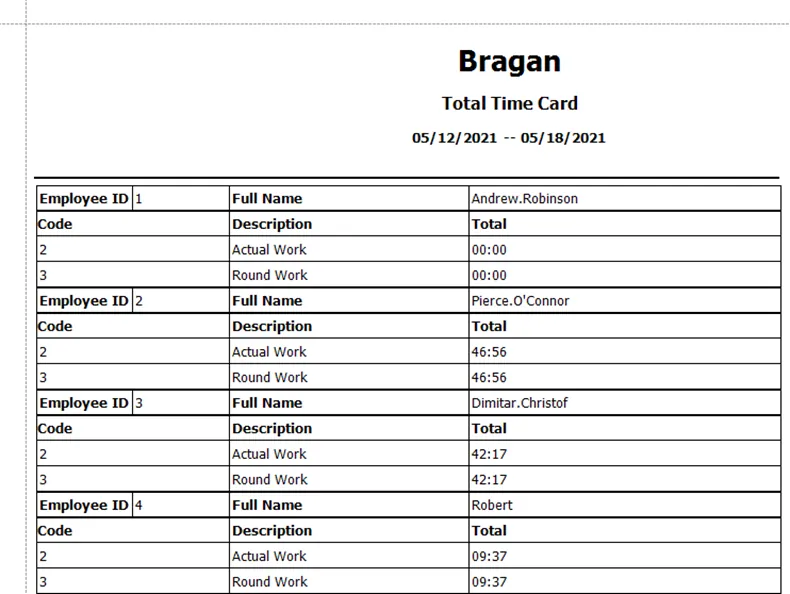
- Generate the total working hours of each employee for the week using the clocking machine ZKTime.net. Check SOP for Clocking Machine ZKTime.net to know how to generate the total time card for employees. The snipe below shows an example of the total time card from ZKTime with a duration of one week. Take note of the week ending and the total worked hours.
Check Payroll Folder#
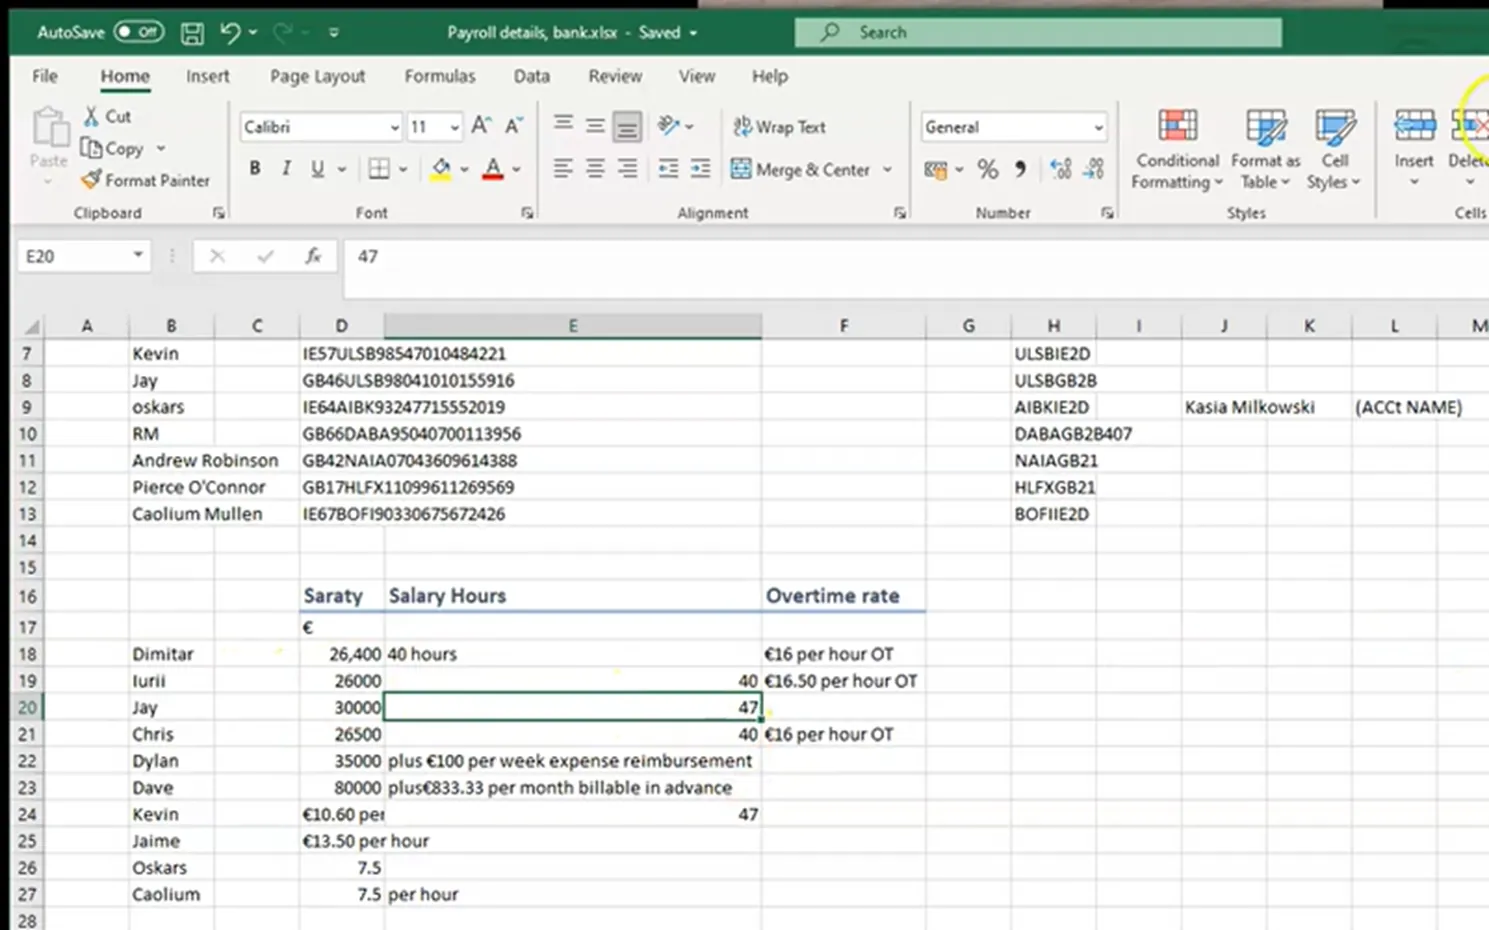
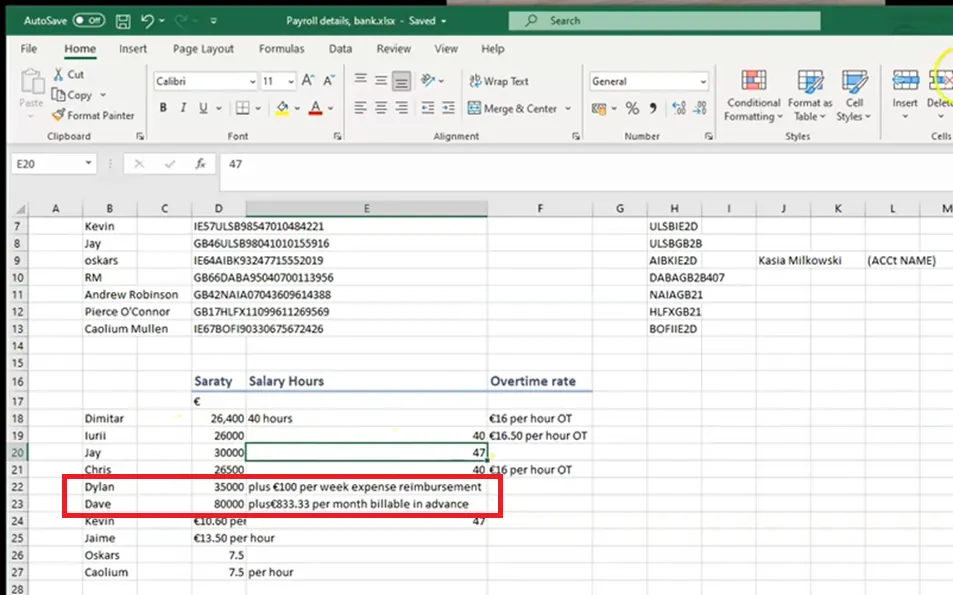
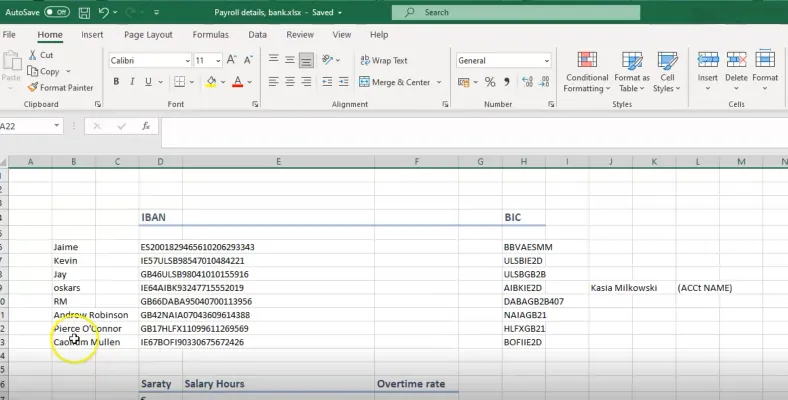
- Get access to the Payroll Dropbox Folder and open Payroll details, bank excel file. Request for an invite to management to access this file. Make sure to refer to this file when creating payroll because of the important details found here.
The Payroll Folder file will help you determine the standard contract hours for each employee. It also includes bank details of the employee such as the IBAN and BIC numbers. It consists of other information such as full name of the employee, salary, salary hours and overtime rate,
In the clock-in card above, an employee's contract hours per week is only 40 hours, but in their total work hours they exceeds 40. Any excess to this is credited to their
overtime hours. It is important therefore to know the contract hours of each employee so overtime pay is calculated correctly.
Compute Holiday Pay (if applicable)#
- Record holiday pay on Trello Payment Card (this card is only accessible by Accounts Personnel in charge with payroll). List out days that were taken for the month per employee + accumulated statutory holiday entitlements. What OT was paid how many hours + rate. Any bonus paid out + rate
BrightPay#
BrightPay is a payroll software that makes managing payroll quick and easy. The desktop-based payroll software is available for both Microsoft Windows and Apple Mac OS X and can be installed on up to 10 PCs. BrightPay caters for the processing of payroll on a weekly, monthly, fortnightly, 4-weekly, quarterly or annual basis. More than one pay frequency can be operated at any time within the same company dataset.
- If you still do not have BrightPay installed in your computer then go to this link and click on Download. Follow the steps in downloading and then installing the software in your computer.

- Open the downloaded BrightPay software, you should have the latest version of it on your desktop. Log in to BrightPay account. Please request management for the credentials. This should also be linked to Revenue.
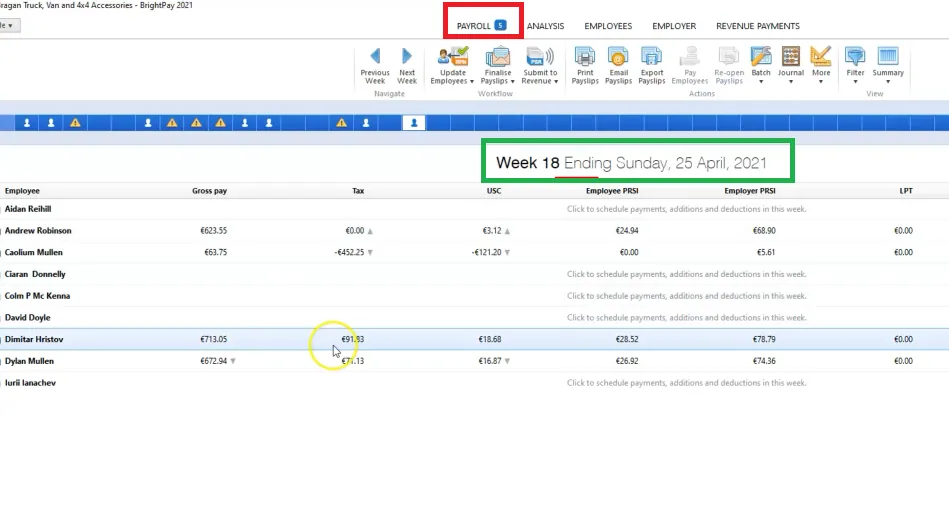
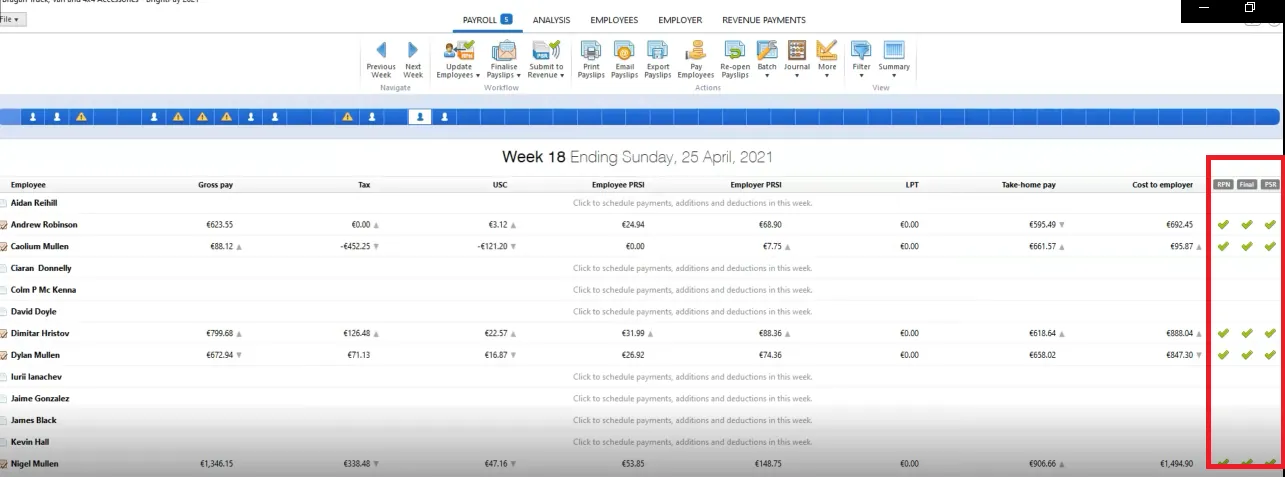
- Click Payroll on the menu bar (red box). Pay is done weekly. Set up your Weekly Schedule as required and click 'Continue'. Week ending is usually Sundays. Working week is Monday to Sunday, although there is no work in the warehouse during Sundays.
Check if you’re on the right week endings, it is displayed at the top of the screen.
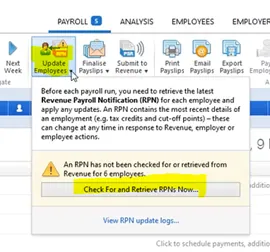
- Click Update Employees. Before Each Payroll run, you need to retrieve the latest Revenue Payroll Notification (RPN for each employee and apply any updates. An RPN contains the most recent details of an employment (e.g tax credits and cut-off points)—these can change at any time in response to Revenue, Employer or employee actions.
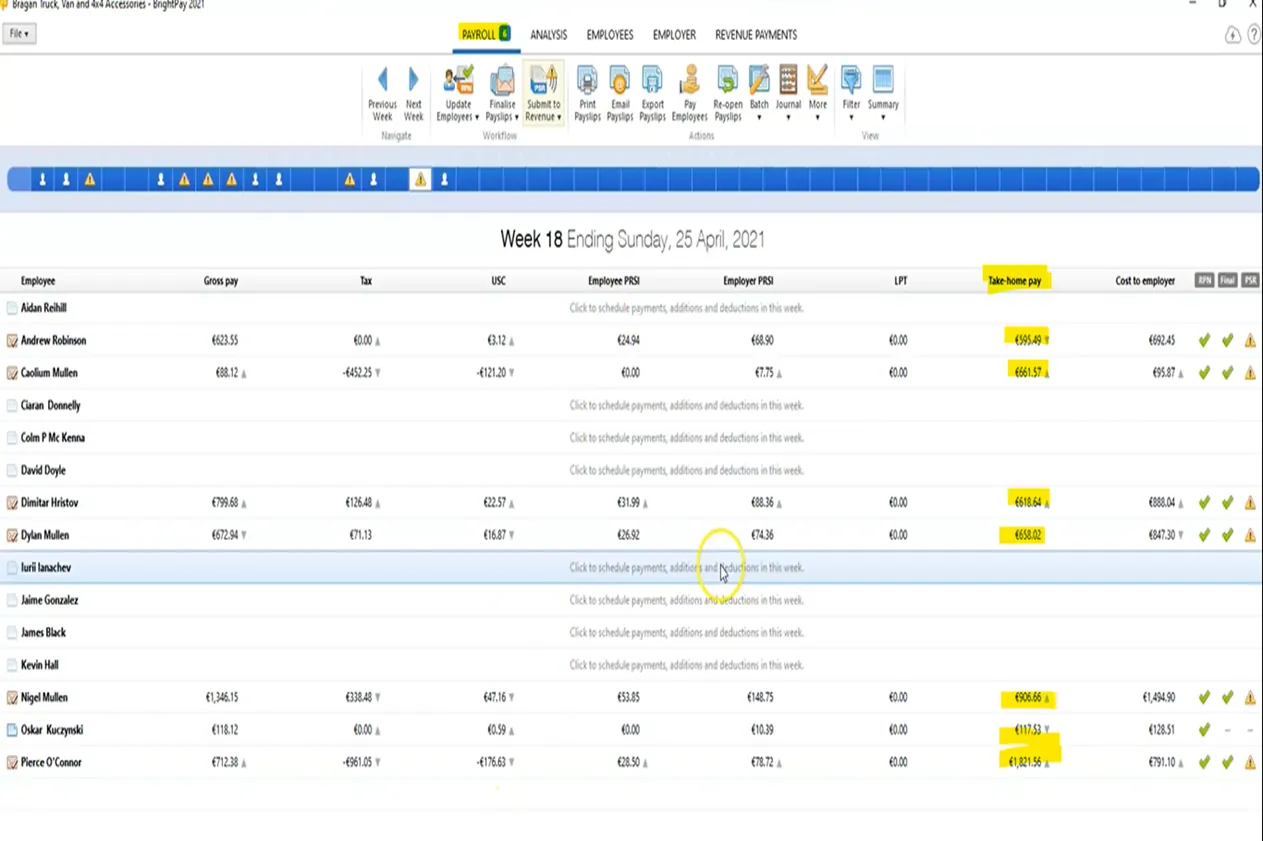
Then click Check For and Retrieve RPNs Now. Your weekly paid employees will be listed in a summary view (Figure 6).
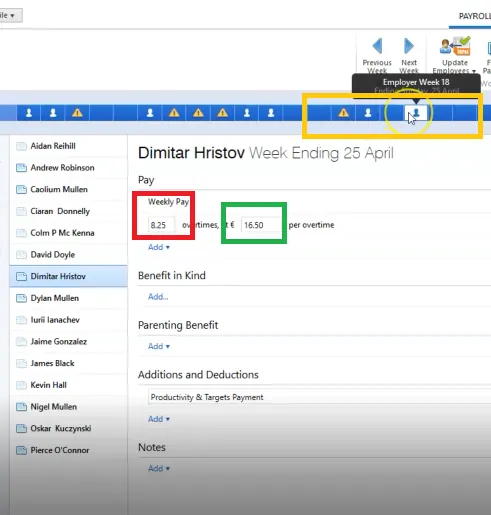
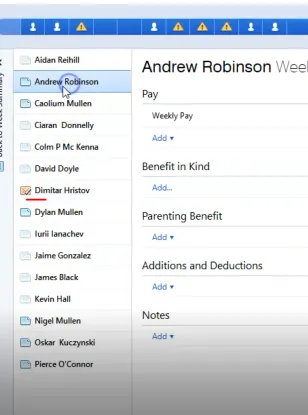
- To process the payroll of the employee, click on the employee name (see Figure 6 above). The employee’s payslip view will be displayed on screen. Take note of the overtime hours of employees. Put the total OT hours in the weekly pay (red box). Overtime rate is also indicated in the green box (Figure 7). You can also check the week endings by hovering in the boxes (yellow box).
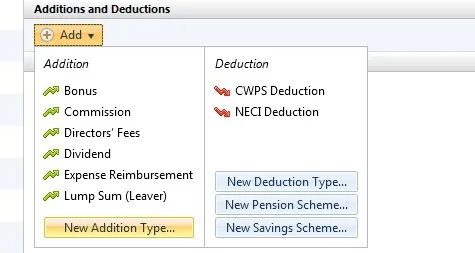
- If there are Additions and Deductions for the employee, add it also in here. Usually the Additions for employees are also found in the Payroll Folder File see
Additions - To set up an addition, click on the ‘Add’ button within the ‘Additions & Deductions’ section. If applicable, select Expense reimbursement from the list and enter the desired amount. To add a further addition repeat this process. If you wish to add an addition which is not available in the preset list, simply choose ‘New Addition Type’. Enter a description of your choice and the amount required. Set whether the addition is to be subject to PAYE/USC/PRSI etc.

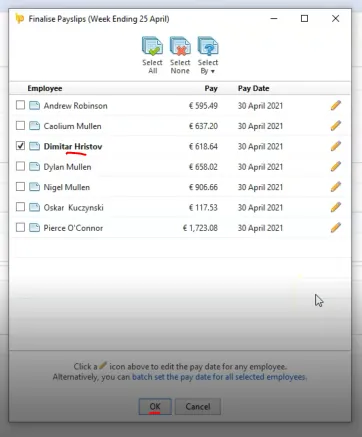
- If everything is added already such as overtime pay, additions & deductions if there's any, click Finalise payslip (red box Figure 11). Then click OK when prompt to finalise paycheck, make sure that only the name of the person you are creating the payroll is checked (Figure 12). The check mark before the name of the employee indicates that the finalized payslips is approved and when you click OK it will send this information to Revenue.
- You can now see that the name of the person has a check, this means that you already finished his payroll. Click again the name of another employee to process his payroll, follow steps 7-9.
Note:
There are employees that are on a Salary basis - this means that they do not have a required number of work hours per week and their salary is fixed (no overtime pay too). For these employees there is no need to edit anything in this page, you can just click the Finalise payslip immediately.
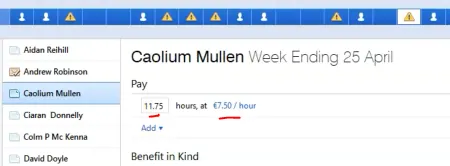
There are also part time employees, you just need to input their total work hours and their rate per hour and click on Finalise payslip.
For Nigel he is on a standing order payment, you also do not need to edit anything and just simply click on the finalise payslip.
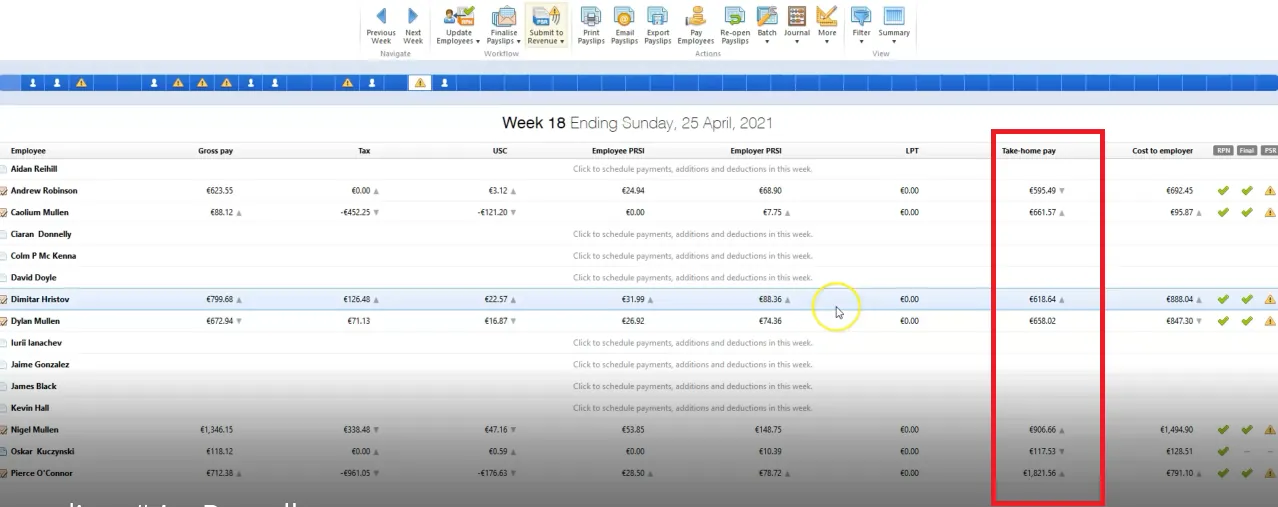
There are cases wherein the take home pay (blue box Figure 16) is higher than the actual payment from employer (red box Figure 15) this is because BrightPay automatically add emergency tax returns if there are any.
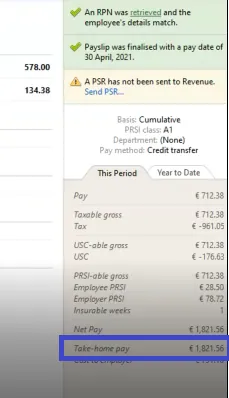
- The highlighted part below is the take home pay of each employee under payroll. You’re gonna use these details when making payments in Ulster Bank.
Send Payslip to Employees#
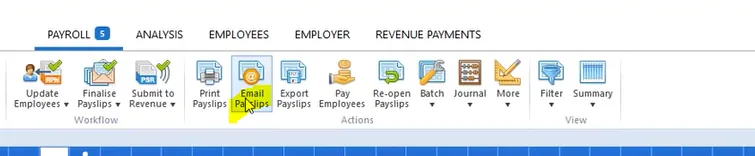
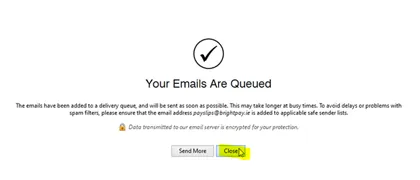
- Click Email Payslips
- Click Send Email(s). Tick the names of the employees you are sending the payslip.
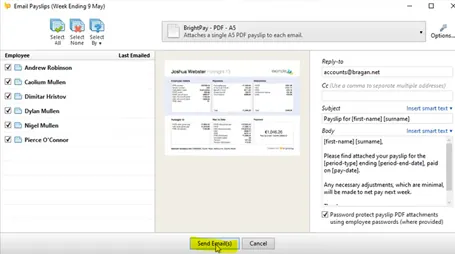
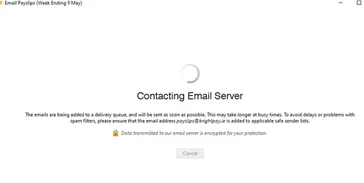
- Click Close.
Make Payments with Ulster Bank#
Ulster Bank is the main bank of Bragan. Ulster Bank helps personal, small business, private and commercial customers with their banking needs.
Since Bragan has two companies, one in Ireland and one in the United Kingdom. They have two Ulster bank accounts too (one for IRL and another for UK). It's important to consider what kind of payments you’re making to determine what account you’re
going to use. The United Kingdom uses ulsterbank.co.uk, on the other hand, Ireland uses ulsterbank.ie.
For Team IRL payroll, use the Ireland Account.
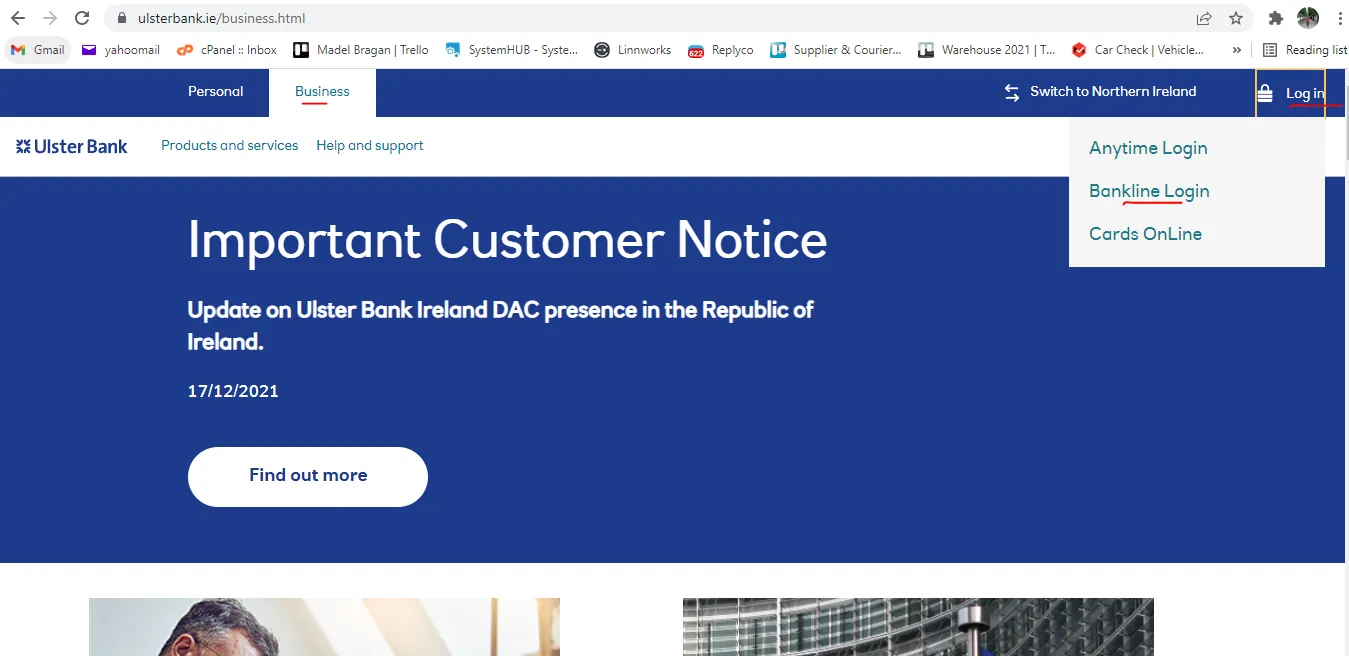
- Go to Ireland Ulster Account website then click on Business then Login > Bankline login.
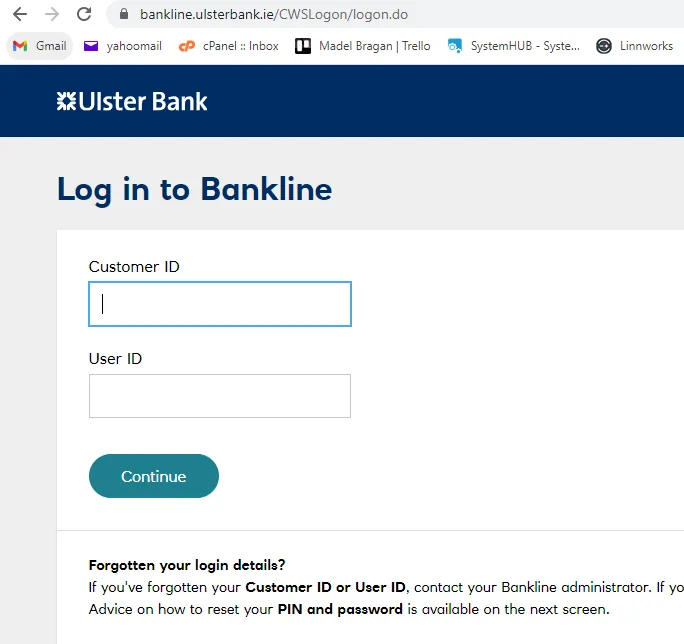
- Log-in to account. Provide your Customer ID and User ID given by management.
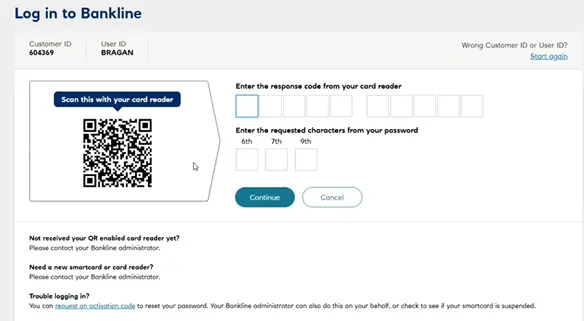
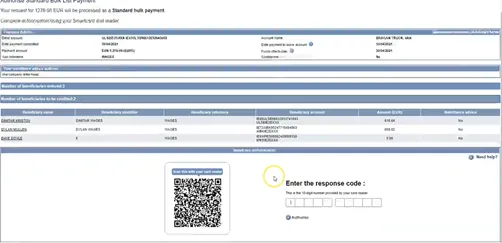
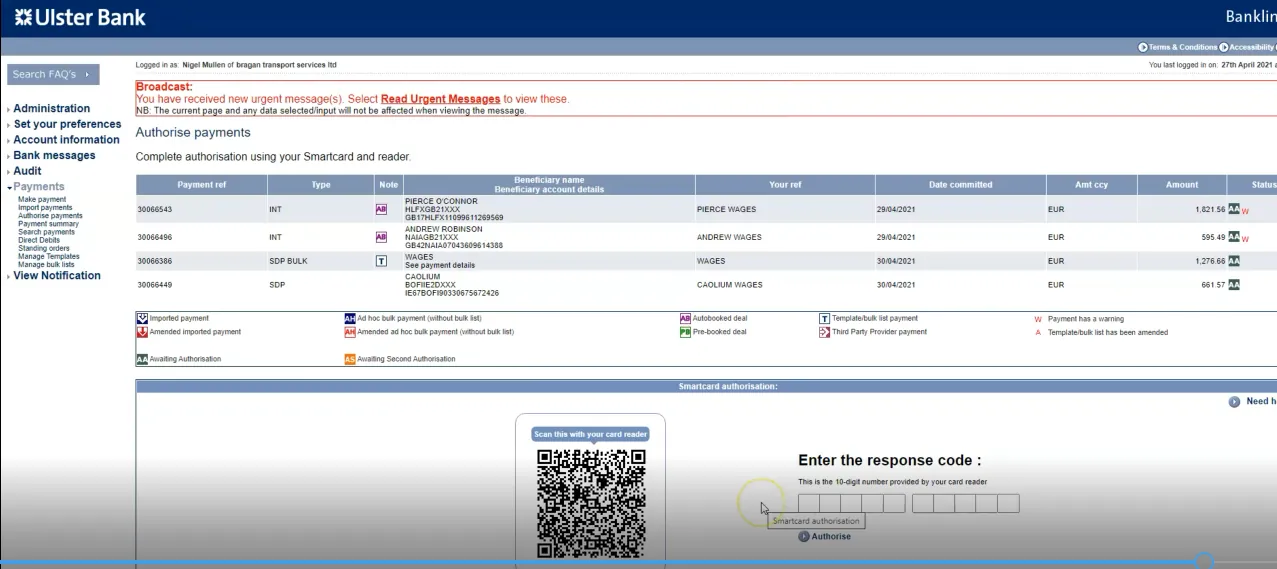
- Smart Card Authorization.
You have to use a scanner to enter the response code from Bragan’s card reader and the requested characters from the password of Bragan. Management is the only one authorized to use the scanner. Contact management to get an authorization. Make sure you send a clear screenshot of the QR code and the response code screen, exactly like the one below.
Enter the correct response code from the card reader and the requested characters from password then click confirm.
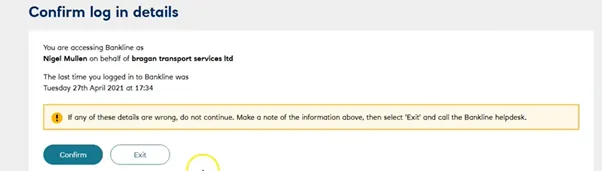
- Click Confirm again in the Confirm log in details page.
Note: If the card-reader displays the message 'WRONG PIN' it means the PIN for the card has been entered incorrectly. You have three attempts in total to get your PIN number correct. After getting the 'WRONG PIN' message you will have two attempts left before the PIN is locked for use with the card-reader. Make sure you're using the PIN for the card you have put into the card-reader and try again.
If your first attempt resulted in a wrong pin, please contact management of Bragan to avoid the bank account to be blocked. It would take months for the bank account to be unblocked so be very careful.
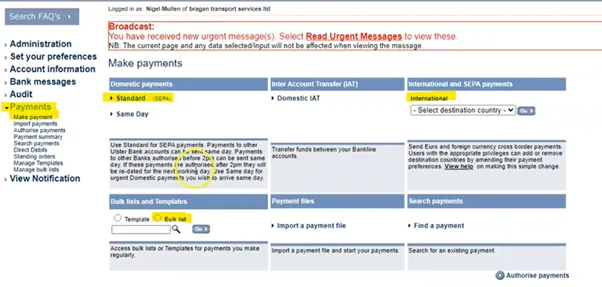
- Under Payment, click Make Payments. There are three types of payments we are gonna use: Bulk Payments, Domestic Payments and International Payments (for employees outside of Ireland such as UK). The type of payments depends on the employee.
Note: Nigel has a Standard Operating Payment. His payment is automatically paid by the bank, so you don’t have to do something on his payments.
Making Bulk Payment#
A bulk list is a pre-specified list of beneficiaries or credit accounts you want to pay from a single debit account. There are two types: standard domestic and domestic euro Inter Account Transfer (IAT).
- From the Bulk List and Templates, click Bulk Lists then click on the Search icon (magnifying glass). You can now see the employees under this type of payment. It is already set-up.
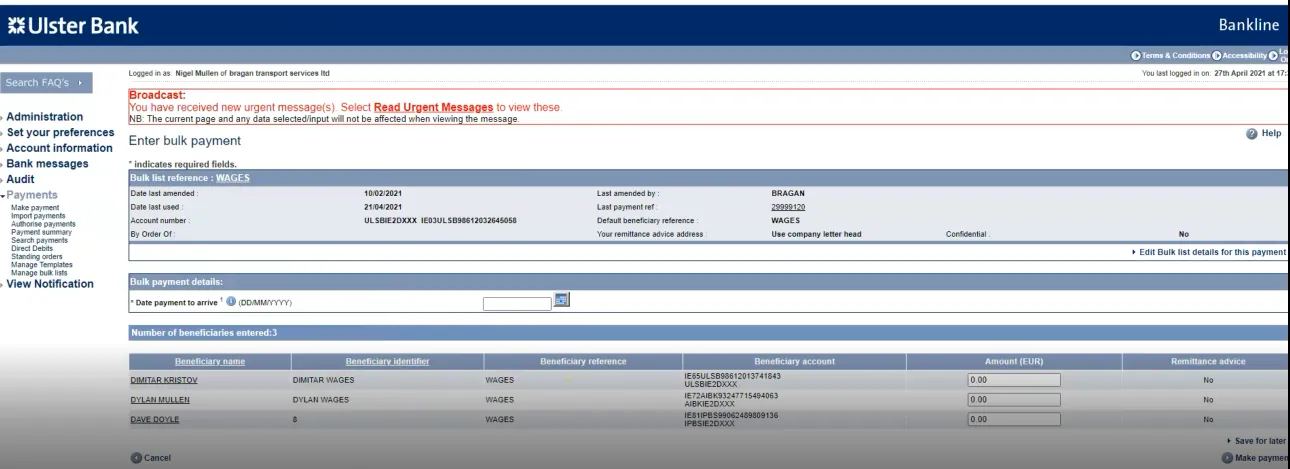
- For the Date payment to arrive, select the date which falls on a Friday (green box of Figure 28).
- Set the amount (red box Figure 28), you can check in BrightPay the correct take home pay of each employee (see Figure 29). Make sure that you enter the correct amount. Then click Make Payment (yellow box Figure 28).
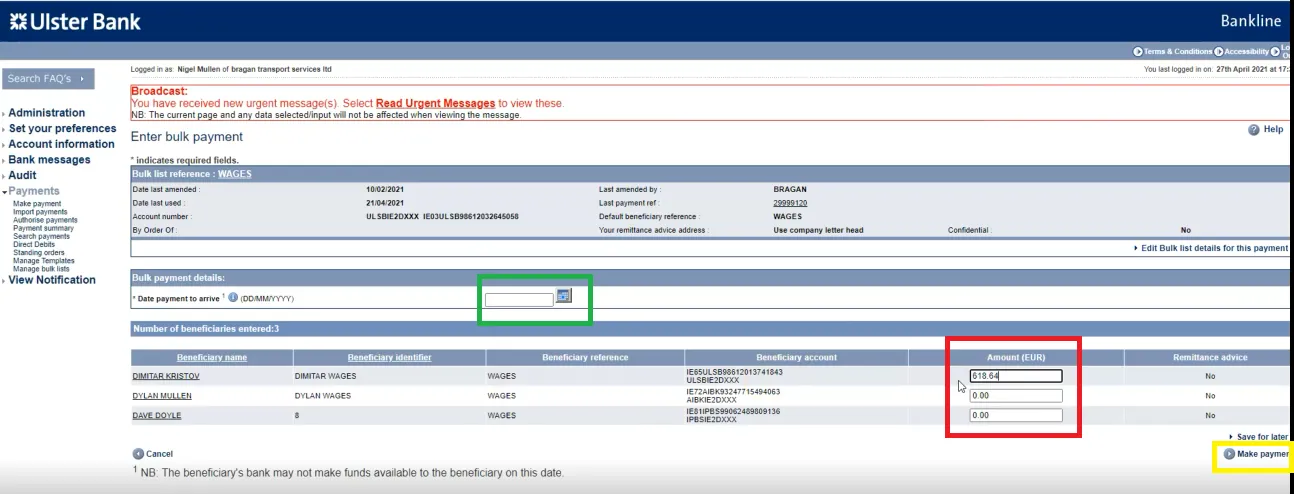
-
Then just Confirm Payment
-
You will then ask again to Authorize Standard Bulk List Payment by using Smart Card Authorization. Or you can skip this step and do it at the end after doing other payments (Standard and International). If you do not have other payments to do then make sure to authorise this payment.
Note: If you need to make other payments then it is advisable to authorise it at the end of all payments.
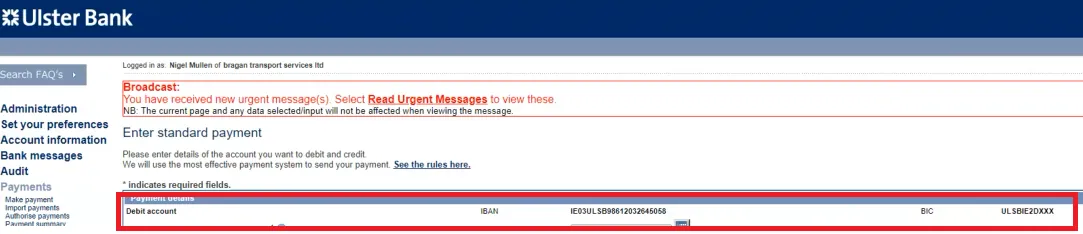
Standard Payment#
- Once you finish the bulk payments and you need to do standard payment next, click again on Payments > Make a Payment and select Standard. Usually standard payment are for those employees that are part time and not full-time in the company and is residing in Ireland.

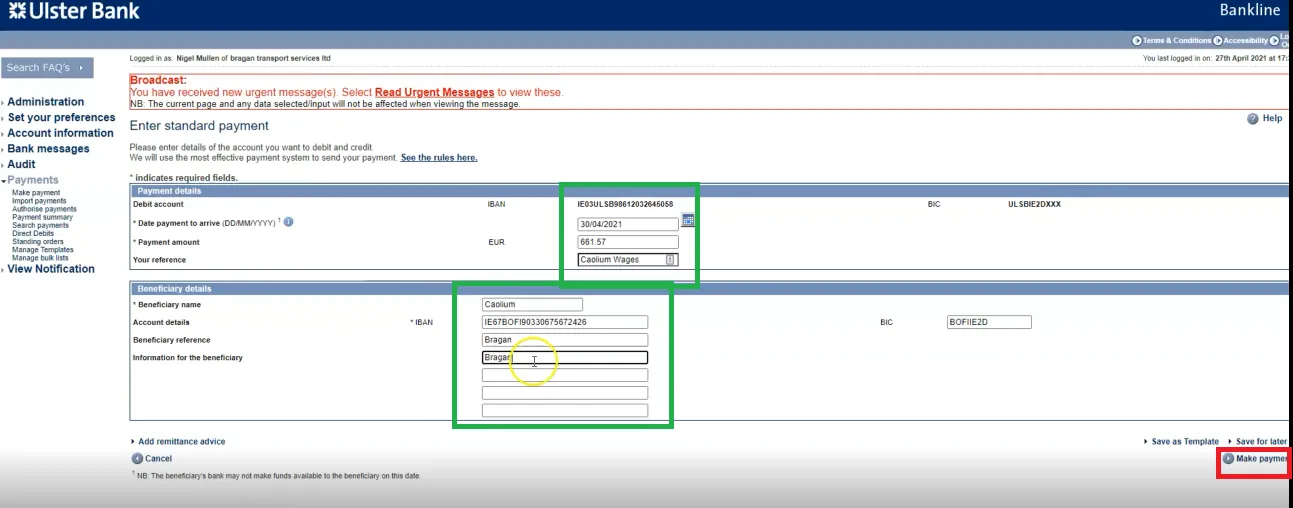
- Input data in the payment details. Select the account you want to pay from
- Select the date you want the payment to arrive. Still choose the date that falls on a Friday.
- Enter the amount of the payment. Check again the home pay in BrightPay to make sure that you input the correct amount.
- Enter the reference you want to appear on your statement. Format is the Name of the Employee + Wages (ex. John Wages). This is for easy bank reconciliation and will appear to Xero Bank feeds, for accounting purposes.
- Enter the name of the beneficiary (the employee name), their IBAN/BIC which is found in the Payroll Folder File.
- For the Beneficiary Reference and Information for Beneficiary always put Bragan. This is for the benefit of the employee so they will know where the payment came from. This would also appear in the employees invoice.
- Once all the fields are completed, click Make payment.
-
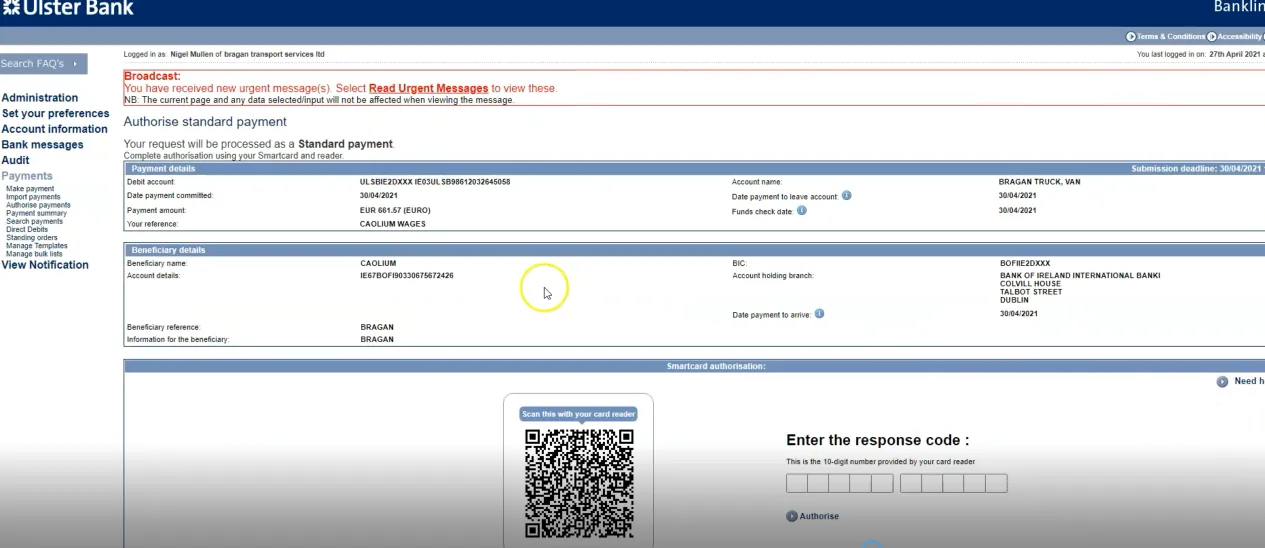
Check all the information is correct and click Confirm once you're done.
-
Again you can authorise this payment if you do not have more payments to do but if you still have to do another payment then you can skip this step.
- If you have another employee that you need to make a standard payment then repeat steps 11-19.
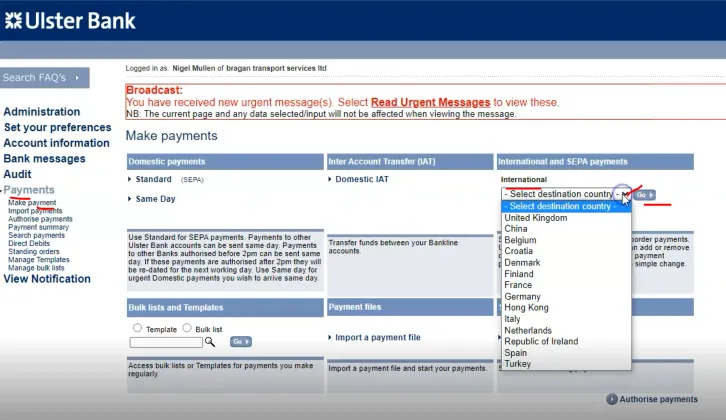
International and SEPA Payments#
Note: These are for employees outside Ireland but from the United Kingdom that needs to be paid. Example: Andrew and Pierce.
- Select again Payments > Make a Payment then click the dropdown menu under Internation and SEPA payments and select the country of origin of the employee. In this case, select United Kingdom then click Go.
- Select the date you want the payment to arrive. Still choose the date that falls on a Friday.
- Enter the payment currency, since he is from UK choose Euro and then input amount based on BrightPay take home pay.
- In the currency payment to be sent in, select default currency which is GB Sterling/GBP.
- Enter the reference you want to appear on your statement. Enter the name of the employee then add wages in the end. Example: Andrew Wages
- In the Priority button choose Standard. Payment method is Electronic.
- Enter the name of the beneficiary (name of employee), their IBAN/BIC which is again found in the Payroll Folder File.
- For the Beneficiary Reference and Information for Beneficiary always put Bragan. This is for the benefit of the employee so they will know where the payment came from. This would also appear in the employees invoice.
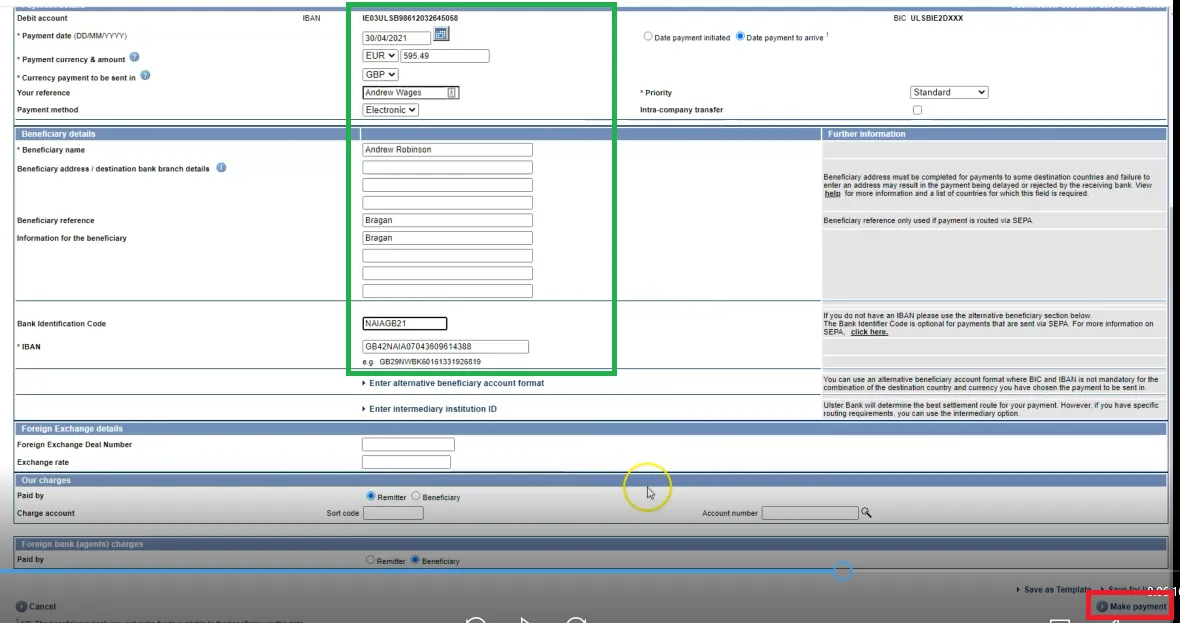
- Once all the fields are completed, click Make payment. Note: Other fields not mentioned here, leave it blank.
- Warning Message will appear that says payment going international just click again Make payment.
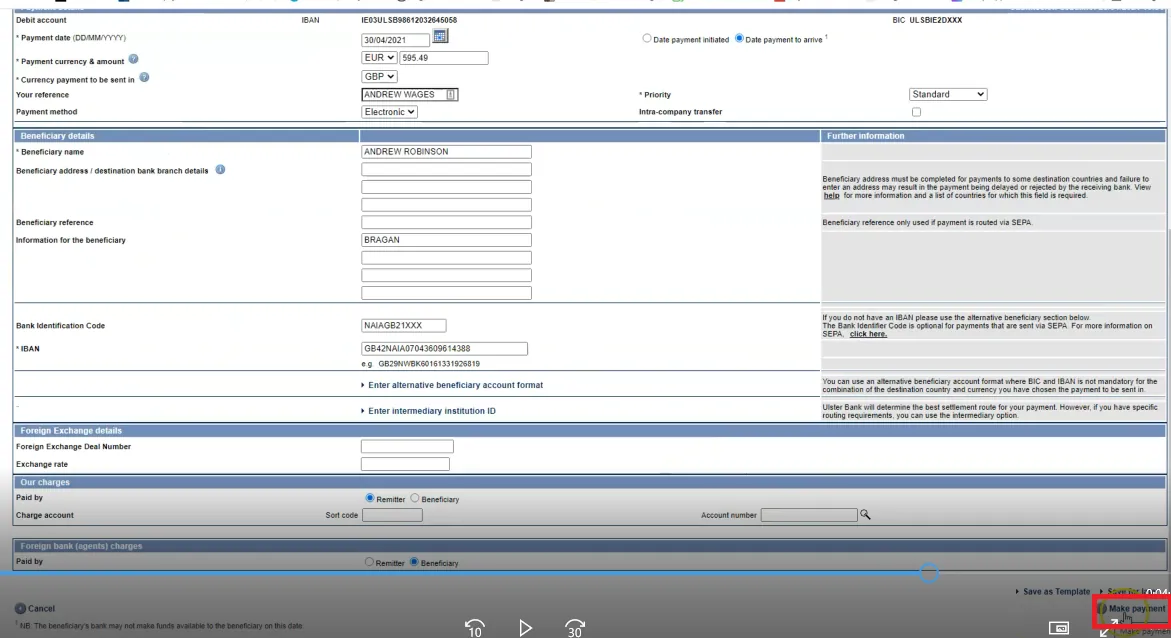
- The click Confirm Payment

- If you have another international employee then repeat steps 22-32.
Authorise the Payments Made#
As mentioned, you can authorise all payments after you do the bulk, standard and the internal payments. One Authorization for all the payments you made.
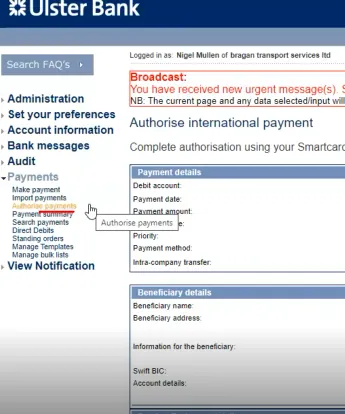
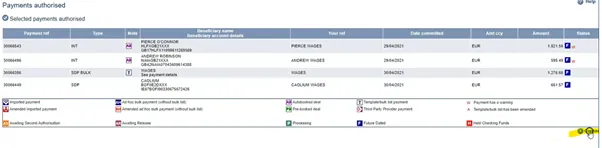
- From Payments click Authorize Payments.
- Select All in Payment Amount Currency (red box), make sure to check all payments (yellow box) and then click Authorise (green box).
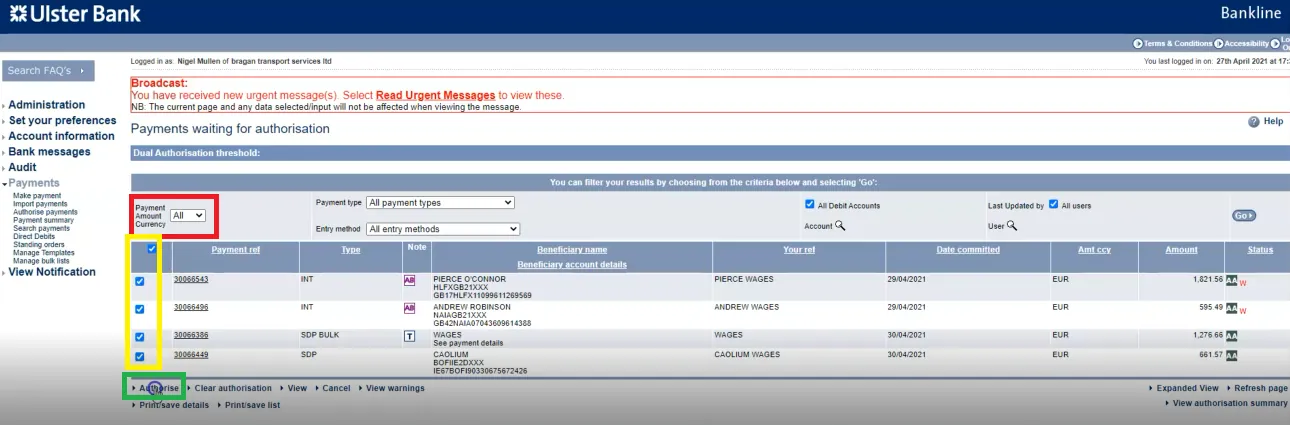
-
Click Confirm Payments.
-
Smart Card Authorization.
Management are the one authorized for this step. Request to them the response code. You can send a snipe of this page to management for their review then they will provide you with the code. Then just click Authorise after putting in the code.
- Click Continue
Send Payroll Submission Request (PSR) to Revenue#
After making your payments, go back to BrightPay to send now the PSR to Revenue.
Starting 1st January 2019, employers will be required to submit their payroll data to Revenue every time they perform a pay run – most importantly, this periodic submission will need to be received by Revenue on or before payment is made to the employees.
This periodic submission of your payroll data to Revenue is known as the Payroll Submission Request (PSR).
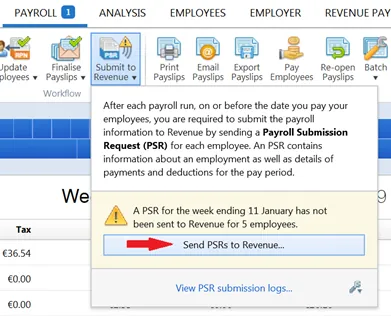
After finalising a pay period, BrightPay will automatically create the Payroll Submission Request required by Revenue and it will be brought to your attention on the menu bar that the submission is outstanding:

- To submit your pay data to Revenue, click Submit to Revenue on the menu bar. Then click Send PSRs to Revenue...
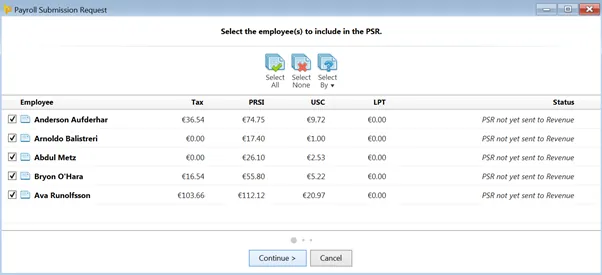
By default, all finalised employees will be marked for inclusion in the submission to Revenue. If you wish to include all employees in the PSR, simply click on ‘Continue’.
Alternatively, if you only wish to submit a PSR at this point for some of your employees, untick any employees who you do not wish to include and click ‘Continue’. These employees can subsequently be included in a separate PSR for the same pay period (always ensuring submission to Revenue is performed ‘on or before’ payment is made to the employees).
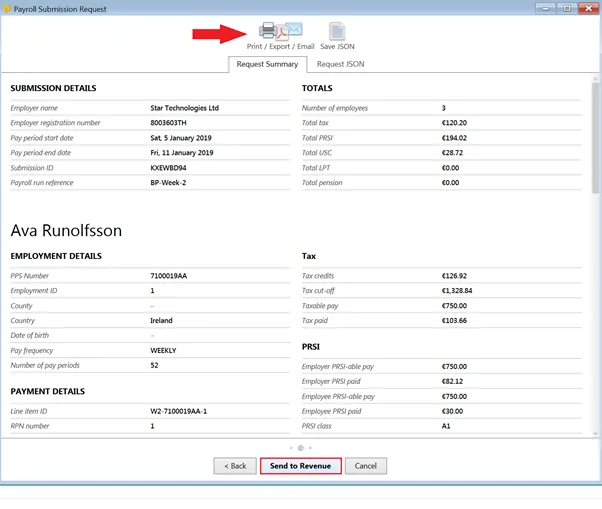
- A summary of your pending submission to Revenue will now be displayed on screen. Submission details as well as an individual breakdown for each employee included in the PSR will be provided.
Should you wish to print/export or email the summary, simply click the Print/Export/Email button provided When ready to do so, click Send to Revenue to submit your PSR to Revenue
On successful submission to Revenue, confirmation will be provided on screen:
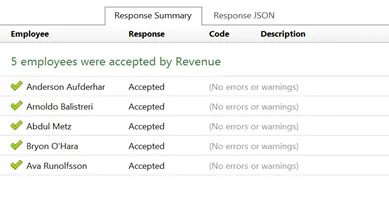
- You know that everyone is done if all those columns (red box) are checked for each employee.
Upload BrightPay Payroll Journal to Xero#
After submitting PSR to revenue proceed to this SOP on How to Upload BrightPay Payroll Journal to Xero SOP. Make sure to proceed with this immediately after you do payroll.
Video & Media#
🎥 Payroll-Training-29-01-2025 🎥 Recording #4 - Payroll
Notes#
This section is important so Adhoc points and issues can be logged. Also, Q&A can be logged for suggestions for potential issues encountered. Also, log important notes needed for this system. Potential Issues:
1 - ISSUE ENCOUNTERED: Stuck on Loading RESOLUTION: Refresh Browser
2 - ISSUE ENCOUNTERED: Broken Links RESOLUTION: Get the external link as this will allow other people to access the
SOP without the need for login credentials and avoid broken links.