Zendesk SOP
This material is made for you to have a quick overview of what Zendesk is all about
Overview#
Purpose: This material is made for you to have a quick overview of what Zendesk is all about and how simple tasks are being done using this tool. This also contains a comprehensive set of best practices for using the Zendesk.
Scope: This procedure applies to all Bragan Team Members who use Zendesk as means of communication to customers and suppliers.
Responsibility: It is the responsibility of each employee to ensure the process set out in this procedure is followed.
Objective: Zendesk is one of the most popular and user-friendly service desk tools on the market. Therefore, the objective of this procedure is to ensure that Zendesk is utilized effectively and in the best way possible in order to achieve our desired result.
Process#
As mentioned above, all support requests, from all channels, become Zendesk Support tickets.
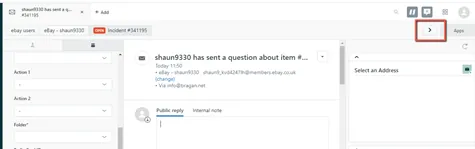
- How to answer a Ticket
The main purpose of Zendesk is for employees to be able to communicate with customers, suppliers, or any other people that are not Bragan employees. Emails come in as tickets in Zendesk and we are making a reply by answering the ticket.
Step 1. Log in to your Zendesk account and open the ticket that you want to answer. You can do this by searching for the ticket number or browsing through the folders where you will answer the tickets
Step 2. Input the reply that you are going to send in the message box. Images can also be attached in this box. Only 5 images maximum can be sent at a time
Step 3. Make sure that the ticket has the appropriate Tags, Action, and Folder. All tickets should have the correct Tags, Action, and Folder. Assignee: You can assign this to another team member by choosing an Assignee.
Tags: Tag or let other multiple team members see and edit this ticket number.
Action: Action 1&2 you can add an action for this email on where it is related to.
Folder: Please enter the correct Folder.
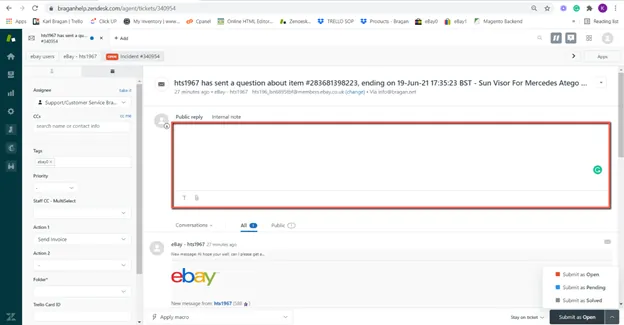
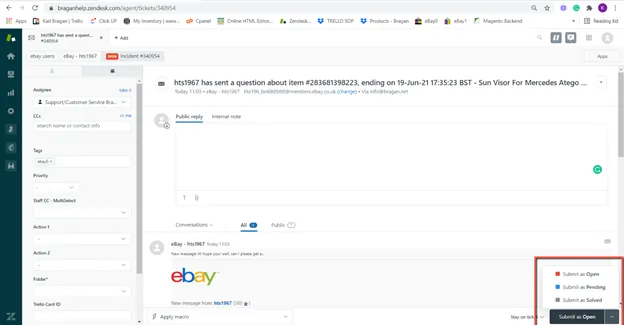
Step 4. Once everything is set. The answer can be submitted in three different ways. Open: Used when the issue is not solved yet and we are expecting replies in the thread.
Pending: Used when the issue is URGENT. Usually for cases where there is potential negative feedback or loss of sales.
Solved: Used when we have confirmed that the issue is indeed solved. Usually done alongside the closing spiel. This will close the ticket and remove it from the view it is currently in and be moved to Closed Tickets. Do not close as Solved unless it is sure that the ticket does not need to stay open
Answering tickets can also be done using Macros. Here is the link on how to use Macros.
- How to Create a New Ticket
In the event that we are the one who needs to send an email to the customer, we need to create a new ticket. When we send the email, a new ticket will be created. Here’s the process on how to create a new ticket.
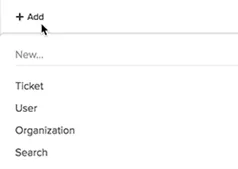
Step 1. Log in to your Zendesk account. Hover over the +Add tab in the top toolbar, then select Ticket.
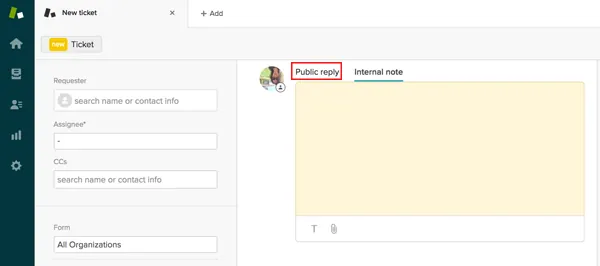
Step 2. If private ticket creation is enabled, click Public Reply so the end-user can access the ticket immediately. If private ticket creation is not enabled, the ticket is accessible by default, and no action is necessary.
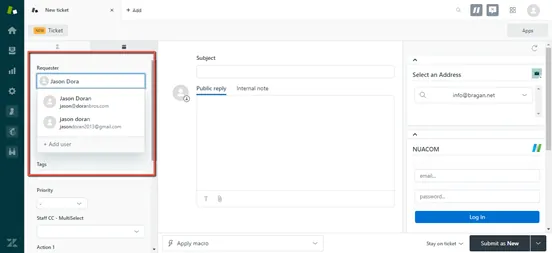
Step 3. If the requester is an existing user, begin entering the user's name, email domain, or organization name in the Requester field and the relevant results appear. Select a user.
Alternatively, you can open the user's profile, then click User options in the bottom toolbar and select New ticket. The user's name automatically appears in the Requester field. If the requester does not yet have an account, add them by clicking +Add user at the bottom of the search results.
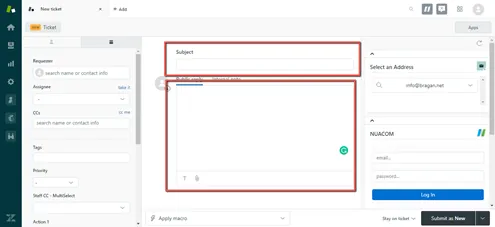
Step 4. In the main body of the ticket, you can see that the ticket includes the subject and description of the support request you sent by email. The support request you submitted earlier is the first comment in the ticket and the email subject becomes the title of the ticket. The comment area includes a text toolbar you can use to format your response, add attachments, and so on.
By default, a comment you enter as a Public reply will be public and visible to everyone who views this ticket, including the person who requested support. The ticket also includes a CC field, you can use to copy other external users on your reply.
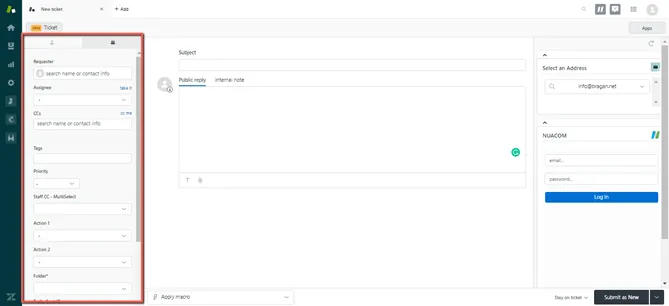
Step 5. To the left of the ticket conversation, you'll see the ticket properties, including ticket fields, which include the person or group assigned to the ticket and any internal users (followers) who will receive ticket updates. Ensure to assign correct information to each ticket field especially the Folder.
Step 6. At the bottom of the ticket, you see a Submit button. When you finish adding a comment to the ticket, click this button to save your comments and submit the changes you’ve made. By default, any public replies you add to a ticket are sent to the ticket requester when you click Submit.
When you submit a ticket, you can also change the ticket status. Ticket status can be New, Open, Pending, or Solved.
The bottom of the ticket also includes an Apply macros button. You can use macros to reply to support requests that can be answered with a single, standard response.
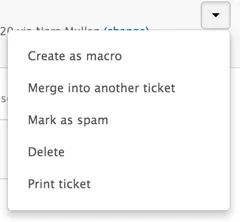
- Merging Tickets
3.1. Ticket merging rules:
The tickets must be less than Solved. You can however merge an unsolved ticket into a Solved ticket. Doing this will not reopen the Solved ticket. If you have ticket CCs enabled: You can merge two tickets with different requesters. The requester of the ticket you close with the merge is added as a CC to the new ticket. If anyone was CC'd on an original ticket, they are also added as a CC on the merged ticket. If you don't have ticket CCs enabled, you can only merge two tickets if they are from the same requester. The most recent public comment from the ticket being closed with the merge appears in the new ticket's comment thread with a link to the closed ticket, where you can review previous comments. No other comments appear directly in the new ticket. Ticket fields, including Tags, Type, Priority, and Status, aren't carried over from the ticket being closed with the merge. Only fields that are filled out in the new ticket are saved. Merges are permanent and can't be undone.
The ticket that's closed with the merge has the tag closed_by_merge added. You should not merge eBay tickets with non-eBay tickets.
3.2 How to merge one ticket into another ticket
Step 1. Open the ticket that you want to merge into another ticket.
Step 2. Click the Ticket options menu in the upper right, then select Merge into another ticket.
Step 3. You can enter a ticket number, select one of the ticket requester's open tickets, or select one of your recently viewed tickets.
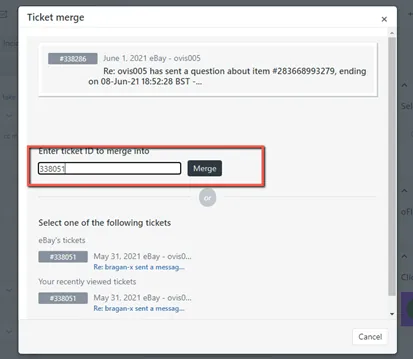
Step 4. When you select a ticket to merge into, you'll be prompted to confirm the merge.
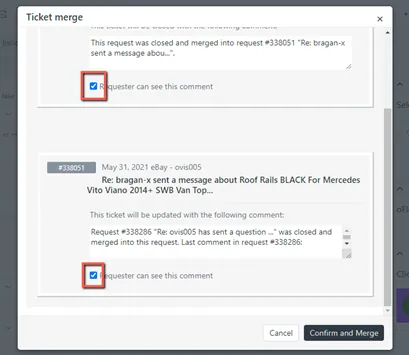
Step 5. You can edit the merge comments that are added to each ticket and choose whether you want the requester can see the comments. Ensure to untick the checkbox as this will also be visible to the customer’s end.
To hide merge comments from requesters, deselect Requester can see this comment for both merge comments. If you remove all text from the comment box, the most recent comment from the merged ticket will appear as the updated ticket comment.
Step 6. Select Confirm and Merge.
Be sure that you merge the correct tickets. Ticket merges are final; you cannot undo or revert a ticket merge.
The ticket that was merged into another ticket is closed.
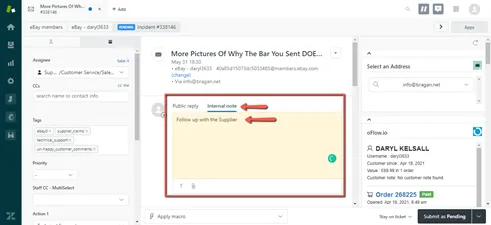
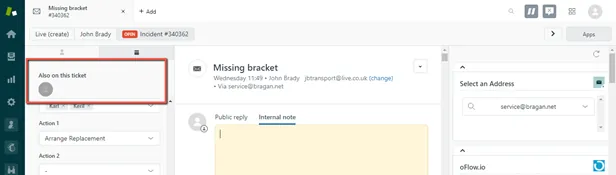
- Adding Internal Notes
You can add private comments (referred to as an Internal Note). The requester never sees these notes, they are used for internal communication only (relay comments, instructions, etc. with other Team members without the customer seeing it). For example, an agent may need to get advice from Team IRL to solve the requester's support issue.
All users (agents, admins, and end-users) can create private comments. However, Support handles attachments to private comments differently depending on certain factors.
If you want to add an internal note, see the process below.
Step 1. Select a ticket.
Step 2. Click Internal Note to enter your comment.
Step 3. Click Submit to update the ticket. You cannot delete a comment after it is added to the ticket.
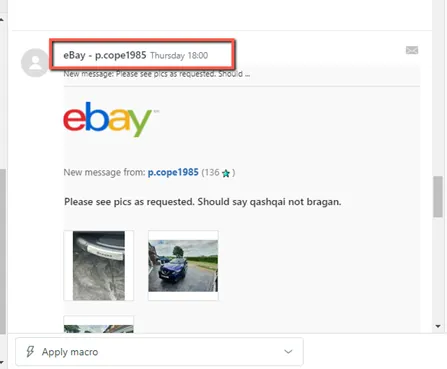
Internal Notes will also be used as reference when Management is pulled in to help with the issue. All details should be logged in internal notes like what the issue is, actions taken thus far, and all relevant pictures. There is a metric that is being followed before asking management to step in. If the thread has four (4) email replies and the issue is still not resolved, Management should be asked to step in.
When referencing a product, SKU Code AND SKU Title should be included to provide easy reference for other team members.
- Ticket Events
Ticket events show all the ticket updates and notifications, whether it's by a person or by a business rule, such as a trigger. By looking at the ticket events, you can see the complete history of a ticket. Events include ticket properties that are added, removed, or changed, as well as any external notifications associated with the ticket update.
Ticket events show all the updates and notifications that have occurred to that ticket. Events are not shown by default. You have the option to show ticket events alongside the ticket comments.
Reviewing ticket events can help you trace the path of a ticket and troubleshoot any issues. For example, you can see whether the ticket has been assigned to the correct assignee and assigned a correct folder, or who has deleted the ticket or has closed it.
5.1 To view ticket events
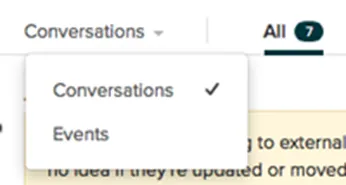
Step 1. Open a ticket and click Conversations under the active comment area, then select Events.
Step 2. Review the ticket events displayed. The events for each ticket update appear separately.

If a field's value was changed, the new value appears along with the crossed-out previous value, allowing you to easily see what changed.
For example, if an agent changed a ticket status from Open to Pending, the update appears in Show all events like this:
Step 3. When you finish viewing ticket events, click Events, then select Conversations.
5.2 Understanding what is shown in ticket events
Ticket events show ticket properties, notifications, and user information. When you view ticket events, some or all of the following might appear, depending on what was changed or added to the ticket for that ticket update.
| Properties | |
|---|---|
| Subject | The subject of the ticket |
| Group | The group responsible for the ticket |
| Type | The type of the ticket (Incident, question, problem, or task) |
| Status | The status of the ticket (new, open, pending, on-hold, solved, or closed) |
| Requester | The person who created the ticket |
| Priority | The priority of the ticket (low, normal, high, or urgent) |
| Assignee | The agent assigned to the ticket |
| Action | The action taken on the ticket |
| CCs | Anyone who was CC'd on the ticket |
| Folder | The folder to which the ticket was assigned |
- Assigning Tickets to Agents
Depending upon how you manage incoming support requests, tickets may be automatically assigned to you, to other agents, and to groups. If you manually evaluate and assign tickets, then assigning yourself, another agent, or a group to a ticket is as simple as selecting the ticket assignee.
6.1 To manually assign a ticket to a group or another agent
Step 1. Open a ticket from one of your views.
Step 2. You can assign the ticket to a group or to an agent and a group. When you click the Assignee field, all of your groups are listed alphabetically.
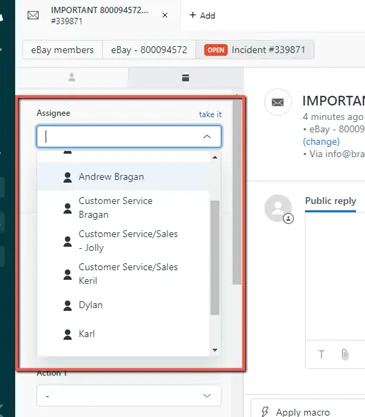
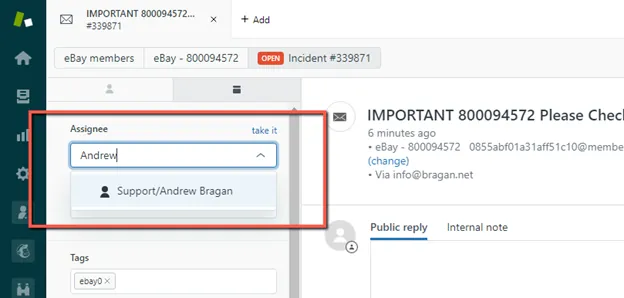
Step 3. You can either scroll the list or select the group and then the agent or you can just enter the group or agent's name to filter the list. For example, to find an agent named Andrew, enter that name and you'll see the following:
Step 4. Select a group or another agent as the Assignee.
Step 5. Click Submit to update the ticket.
You can change a ticket assignee at any time. You can also bulk assign tickets using a view. For example, you can open a view, pick and choose the tickets you want to assign to a single group or agent, and then assign all the tickets in a single step. See the next article below.
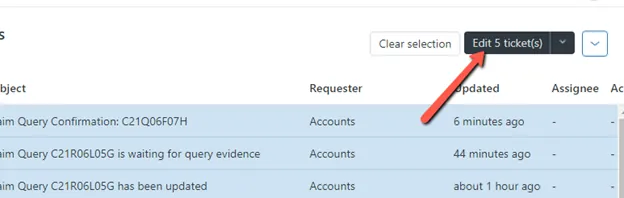
- Managing Tickets in Bulk
Using your views, you can make ticket updates to many tickets at the same time. For example, if you want to assign yourself to a number of tickets, you just select them in a view and then set yourself as the assignee. You can also delete, merge, or mark as spam the selected tickets. If you navigate to different pages, your tickets will remain selected.
7.1 Bulk Updating Tickets
The maximum number of tickets you can update at one time is 100 tickets. You cannot bulk update closed tickets. You can bulk update most of the same properties as an individual ticket, including ticket status, fields, subject, and comments.
Step 1. Open one of your views and select the tickets you want to update.
You can pick and choose the tickets you want to update or select the entire list by clicking the check box at the top left of the view.
Step 2. Click Edit tickets.
Step 3. In Update tickets, you can update ticket properties and add a comment for all of the tickets you selected. To help with accessibility, you can use keyboard
navigation to select toolbar menu items and apply formatting before submitting the comment.
You can also apply a macro to all the tickets by selecting it from the Apply Macro menu. If you want to cancel the bulk update, click the X in the upper-right corner.
Ensure to assign this to the correct person and appropriate ticket fields.
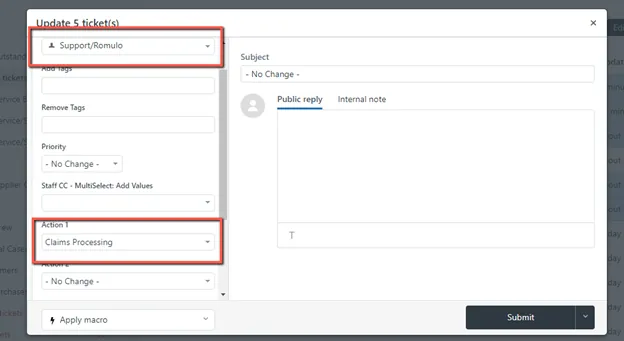

Step 4. Click Submit to save your ticket updates. Ensure to Submit as Open as this needs to be review by the Assignee.
- Integration Facebook
All Zendesk Suite and Zendesk Support customers can add at least one Facebook account so that public messages, such as Facebook Wall posts and comments, become tickets. You will be able to see and respond to these tickets from the Support interface, just like any other ticket. You must be an administrator to add a Facebook account to Support.
After you add a Facebook account to Support, Support monitors messaging activity on the Facebook account. Each new Wall post (a public message) on the Facebook account becomes a ticket in Support. On Zendesk Suite plans, private messages sent to the Facebook account through Facebook Messenger will also become tickets.
Facebook limits how Pages can communicate publicly and privately with users. For example, if you receive a ticket from a Wall post when you reply to the ticket, your response is added as a comment to that Wall post. If you receive a ticket from a private message, when you reply to the ticket, your response is a private message. You cannot respond to a Wall post with a private message on the ticket. And likewise, you cannot respond to a private message with a Wall post on the ticket.
When a user posts to your wall, a ticket is created and the following happens:
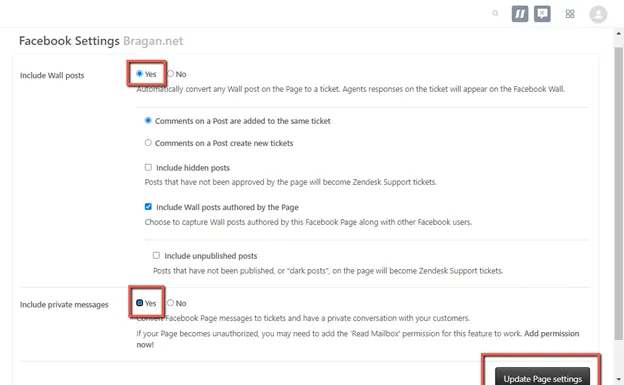
For standard wall posts, only comments received in the first week after the post will be added to the ticket. If you would like comments to create new tickets, you can enable that setting (see Editing your Facebook channel).
Comments received after the first week are not added to the ticket and no new ticket is created.
If you post an ad to your wall, a ticket is created. Comments are recorded in the ticket for one year after the posting. However, if you close the ticket, comments will no longer be recorded.
If the posting user is not already a user in your account, they become a new user in your account. If your channel has multiple Facebook Pages and new user posts on more than one page, a separate user account is created for each page on which that user posts.
An agent can respond to a Wall post by adding a public comment to the ticket in Support. The agent's response is added as a comment to the Facebook post. In the following Wall post, for example, an agent answered the user's question in the Support agent interface.
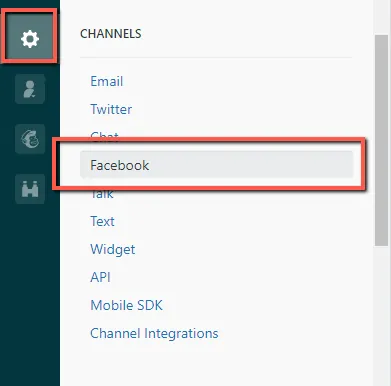
8.1 To set up your Facebook channel to monitor a
Facebook account#
Step 1. Click the Admin icon () in the sidebar, then select Channels > Facebook.
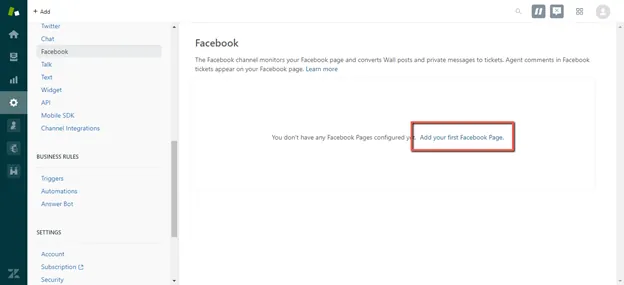
Step 2. Click the Add your first Facebook Page link.
Step 3. Enter your Facebook credentials, if you are not already logged in.
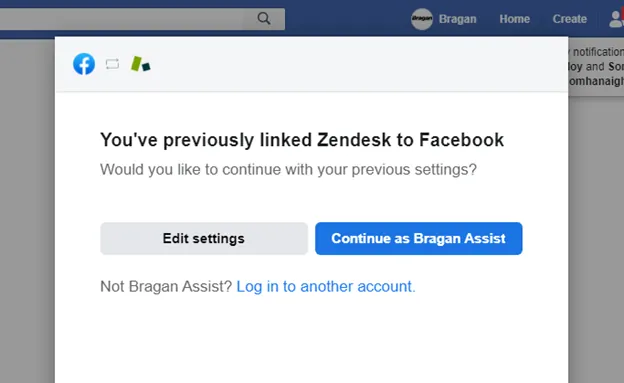
Step 4. When asked, be sure you grant Zendesk access to your account.
Step 5. In the Add Facebook Pages to your account window, locate the page you want to add, and choose the default permissions that Zendesk has to your Facebook page. If you change any of these permissions, the connection between Facebook and Zendesk might not work properly.
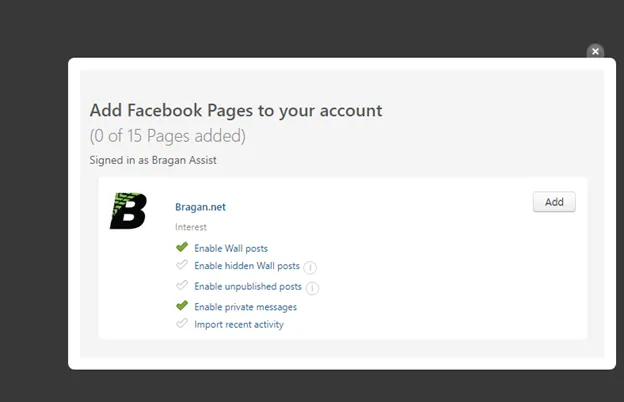
Step 6. Click Add for the Facebook Page you'd like to link to your Zendesk.
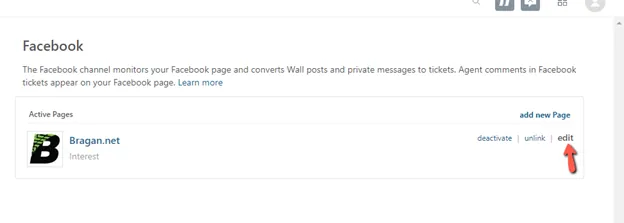
Step 7. The Facebook Page you added appears on your Facebook Channel page. If you are using Agent Workspace and Facebook private messaging is supported for your account, you need to take an additional step to enable private messages.
- Zendesk Best Practices
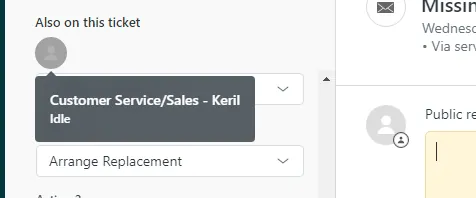
9.1 Avoiding agent collision
You can tell if another agent is working on a ticket from views or directly in the ticket. This makes it easier to avoid potentially conflicting updates to tickets.
In views, an eye icon appears next to tickets that are being viewed by another agent.
In tickets, collision details appear in the upper left corner:
You can tell how each agent is interacting with the ticket from the formatting of their picture or by hovering over it with your mouse:
Editing Viewing Idle
9.2 Using Play mode
The Play button guides you through the available tickets in a view automatically. Press the Play button or icon to open the first ticket in the view. After addressing the ticket, click Submit to update it and move to the next available ticket.
The next available ticket is the next ticket in the view according to the view's sort order that you haven't already skipped.
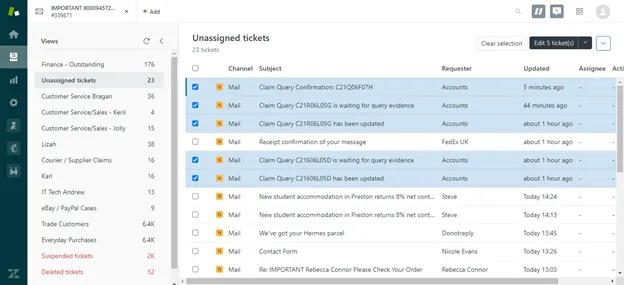
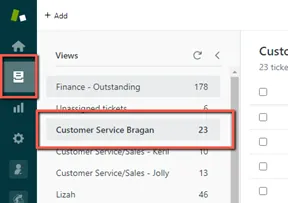
To open a view in Play mode
Click the Views icon in the sidebar and select a view. An example is the Main Customer Service Folder. See fig below.
Click Updated to arrange the email from the oldest to Newest.
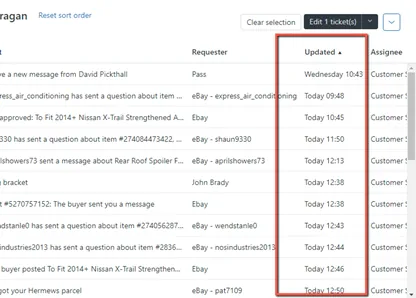
Open the first ticket and click the Play button. See fig below.
To update a ticket and move to the next one
Click Submit. The next available ticket opens automatically.
To keep a ticket open after you submit it
By default, the next available ticket opens when you click Submit. To stay on the ticket after submitting changes, click the menu from the left of the Submit button and select Stay on the ticket.
9.3 Manage Duplicate Emails from Sender
Customer sometimes sends their emails more than once. For you to identify multiple emails sent you may click the sender name. See fig below.
This will show you all the email threads for this customer.
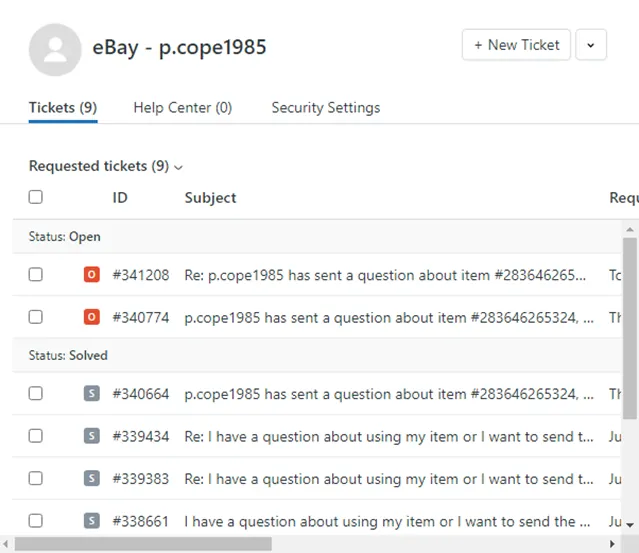
This will help you with:
Check the previous conversation Identify if the macro to use was already been used. Check duplicate emails to merge
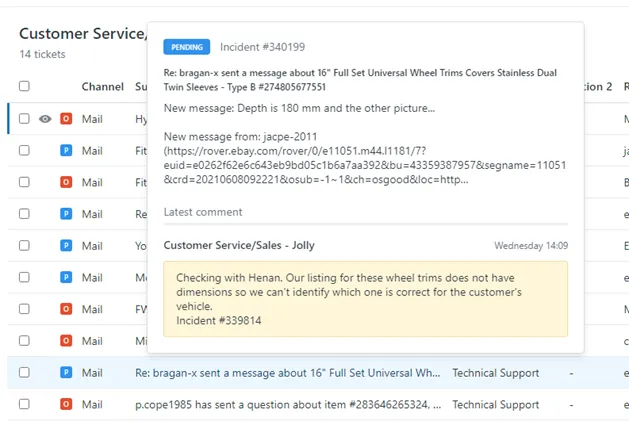
9.4 Preview Email Content
To preview email content, you can hover your mouse to the ticket number and it will give you a quick view of its content. You would also be able to see if there’s an internal note added to the ticket. See fig below.
9.5 Zendesk Functionalities and Tips Video
Please see the video attachment below for reference.
Video & Media#
🎥 Zendesk Tips for Efficiency 🎥 Zendesk Functionalities and Tips
Notes#
This section is important so Adhoc points and issues can be logged. Also, Q&A can be logged for suggestions for potential issues encountered. Also, log important notes needed for this system. Additional Notes:
Regardless of the type of customer support we provide, the one constant for all support organizations is that customers seek us out to help them resolve their issues.
Here are some of the options that our customers have for contacting us:
Send an email Fill out a support request form on your own website Call you on the telephone Text chat with you Send you a Tweet Post on your Facebook wall
All of these communication options are referred to as channels. We decide what channels we want to enable in our Zendesk account and how our customers can reach us.
All support requests, from all channels, become Zendesk Support tickets.
Tickets capture our customer's initial requests for support and all the conversations our team members have with the customer along the way to solving their support issues.
Here's how the email workflow works:
- When an end-user sends an email to your support address, it creates a ticket.
- If an agent updates the ticket in Zendesk Support, a notification email is sent to the person who sent the original email.
- If the person replies to the notification email, the reply creates a comment in the ticket.
- The conversation between user and agent continues until the issue is resolved.
Potential Issues:
1 - ISSUE ENCOUNTERED: Stuck on Loading
RESOLUTION: Refresh Browser
2 - ISSUE ENCOUNTERED: Broken Links
RESOLUTION: Get the external link as this will allow other people to access the SOP without the need for login credentials and avoid broken links.
Attachments#
Zendesk_SOP_June_2021_WIP… 16/12/2025