Picking - Packing - Wrapping Process
This SOP aims to show the correct way of picking, packing and wrapping process.
Overview#
Purpose: This SOP aims to show the correct way of picking, packing and wrapping process.
Scope: This SOP shows the videos on how to do the picking, packing and wrapping process
Responsibility: It is the responsibility of the all warehouse personnel to follow the steps in the videos.
Objective: The objective of this procedure is for warehouse personnel to have a guide on how to do the picking, packing and wrapping process
Index#
(1A) Warehouse Opening Procedure 1.A.1 Language (1B) Picking Process Main Warehouse and Containers 1.1 - Pick List 1.2 - Courier Identification 1.3 Collecting the Pick 1.4 Coloured Racks (1C) Picking Process Warehouse. 1.5 Courier Example on Pick List 1.6 Courier Protocols 1.7 Map of Location 1.8 Locations on Pick List (1C) Second Pick
- Packing Process. 2.2 ePicklist Pick Settings 2.3 ePicklist Courier Selection 2.4 ePicklist Order Screen 2.5 ePicklist Order Completion Screen 2.6 Barcode Folder 2.7 Example of Pack List 2.8 Example of Check Marks on Pack List 2.13 Delay Process 2.14 Packing Process - Alteration Process 2.15 Procedure for Packing Orders 2.16 Overriding orders 2.9 Customer collection / Van Run
- Wrapping Procedure 3.1 The Customer 3.2 Packing 3.3 Packing Images 3.3 Couriers - Scanning
- Preparation for Second Pick / Next Day Pick
- Packing Station Preparation
- Reference Videos
- Break times
The rule for the order processing is all hands on deck until all orders are processed - then we move on as per the operator flow chart. If there are difficult orders left
over at the end, these can be completed by experienced operators - new operators can move on to project tasks in this case.
1A1 Language
Employees are expected to communicate in English in the following circumstances.
When communicating with customers, co-workers and other affiliates during working hours. When English is necessary for safety reasons or emergency response When engaged in team-related work efforts such as picking, packing, Trello cards etc. When job performance is being monitored by a supervisor that only speaks English
Employees are free to communicate in another language when using English is not a business necessity such as during break and lunch.
Employees having concerns or questions regarding this policy should contact their immediate supervisor or HR
(1B) Picking Process Main Warehouse
Picks are to happen at set times only - Once in the morning and once for the second pick - no exceptions. No random orders are to be picked unless requested by management.
1.1 - Pick List
Each pick list must have the operators name wrote on the top of the page as soon as it is printed, it is each operators responsibility to do this.
Note: Sunvisor's need to be picked carefully and placed on the workstation in that specific area and not put on the floor at any stage.
Any items that are unable to be found during each operator's pick must be circles on their own pick list with a red pen, you must stick to the 3-minute rule of finding an item.
Yellow - Not Picked Red - Picked Green - Current Item Indicator
An additional pick list is printed and hanging on the board each morning, once all operators come back from picking they then must go and highlight all items they have not been able to find on the spare pick list then place your pick list on the team leads desk, the most experienced operator will then prioritise the FedEx Pack and then go and locate these items after the 11 o'clock break.
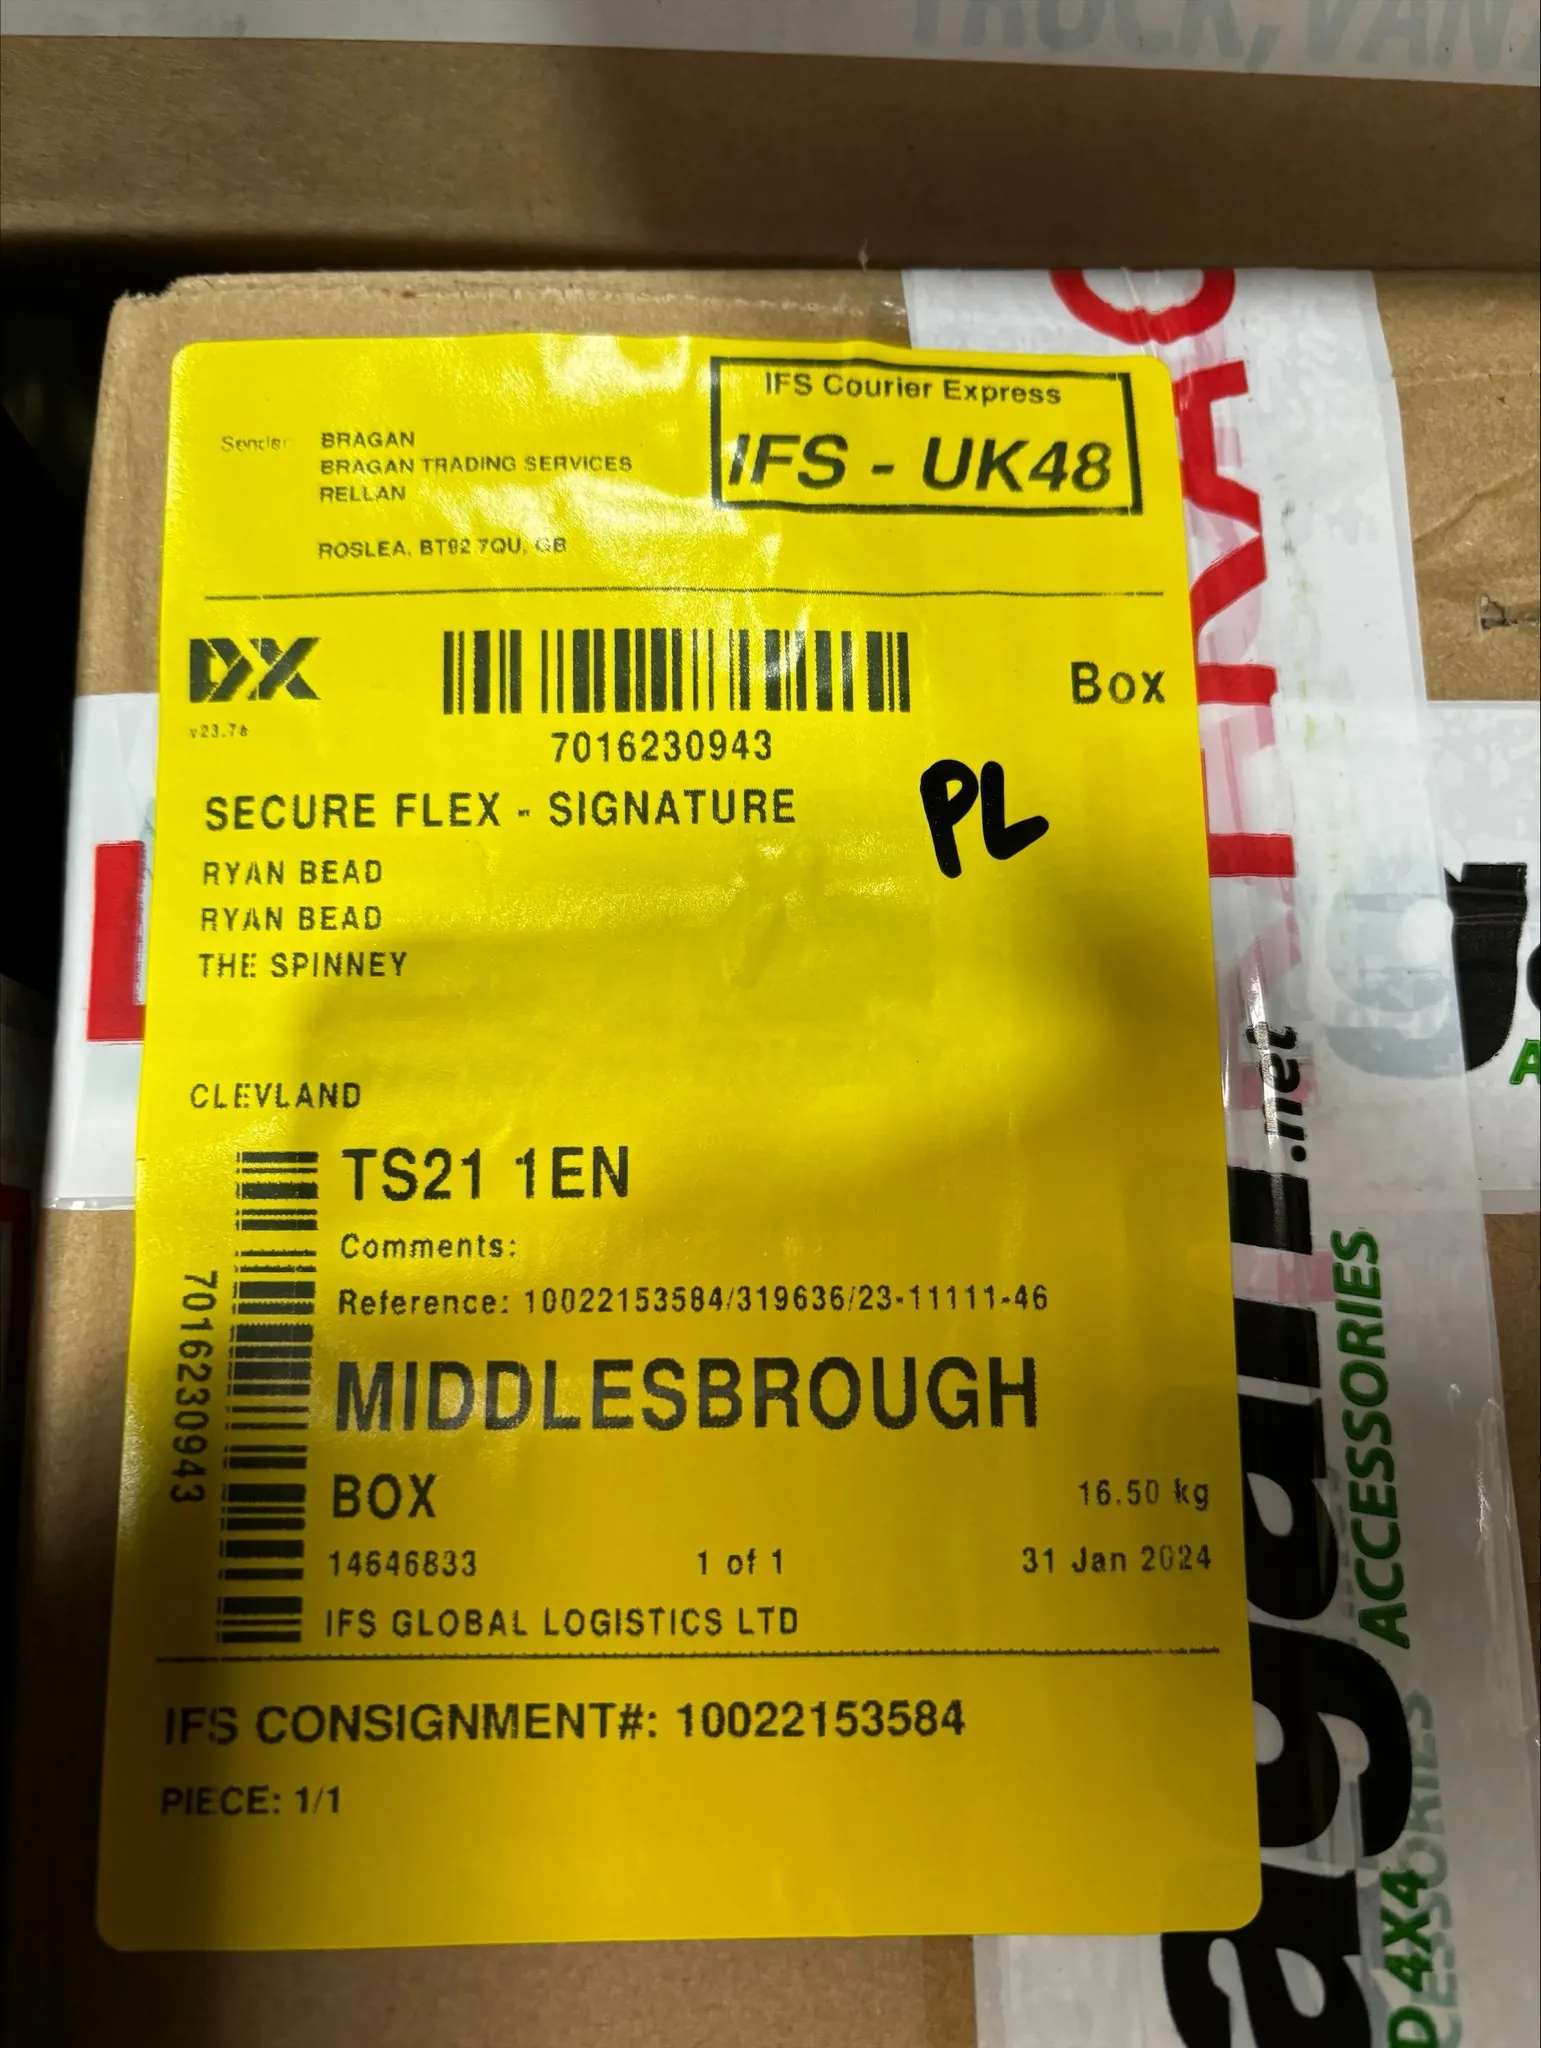
1.2 - Courier Identification
Using the picklist courier column, the picker will determine what courier each item is going with and apply the appropriate coloured sticker (should be attached to pick clipboard) (see colour index below for courier colour you should be looking for)
| RED | IFS |
|---|---|
| YELLOW | Fastway |
| BLUE | FedEx |
| White | Bragan Van Run |
It is important to strictly place the coloured sticker at the box/bar end so they can be easily identified when on the racks. Always double check if the stickers are correct. If multiple couriers are appearing for an item during the pick, the operator will place all appropriate coloured courier stickers on the end of the item.
PLEASE ENSURE PICK CLIPBOARD AND LABELS ARE KEPT TIDY.
1.3 Collecting the Pick
Once the items have been picked, Assigned operator should collect the items using the forklift and the stillage (Fig 1.3)
PICKED ITEMS ARE NOT TO BE LEFT OUT IN THE RAIN UNDER ANY CIRCUMSTANCES. YOU MUST NOT ATTEMPT TO OPERATE THE FORKLIFT WITHOUT ALL RELEVANT SAFETY EQUIPMENT AND LICENCE.
The pick must be on the rack by 8:20AM every morning, any reason for this not being on the rack for 8:20AM must be raised to management so the issue can be addressed.
1.5 Courier Example on Pick List
Each courier service will only allow items up to a certain size to be shipped with them. It is important that each operator is aware of the protocols when packing to
ensure all items are delivered without any problems. If the operator is unsure whether the item they are packing should be with the courier they are packing for they should ask the question to the warehouse manager. Each courier's protocols are laid out in the table below. (FIG 1.7) Details are also at every work station for easy reference
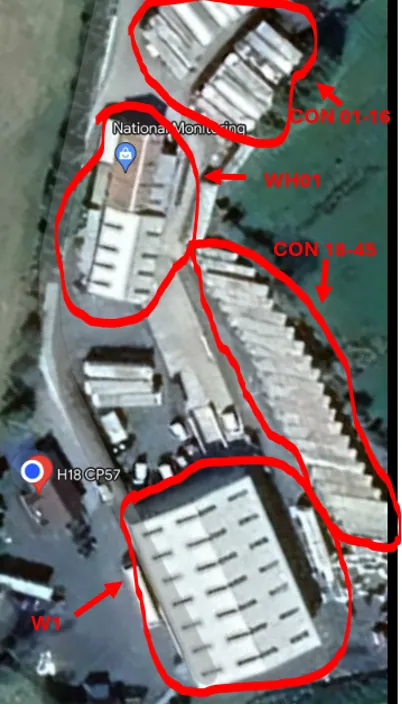
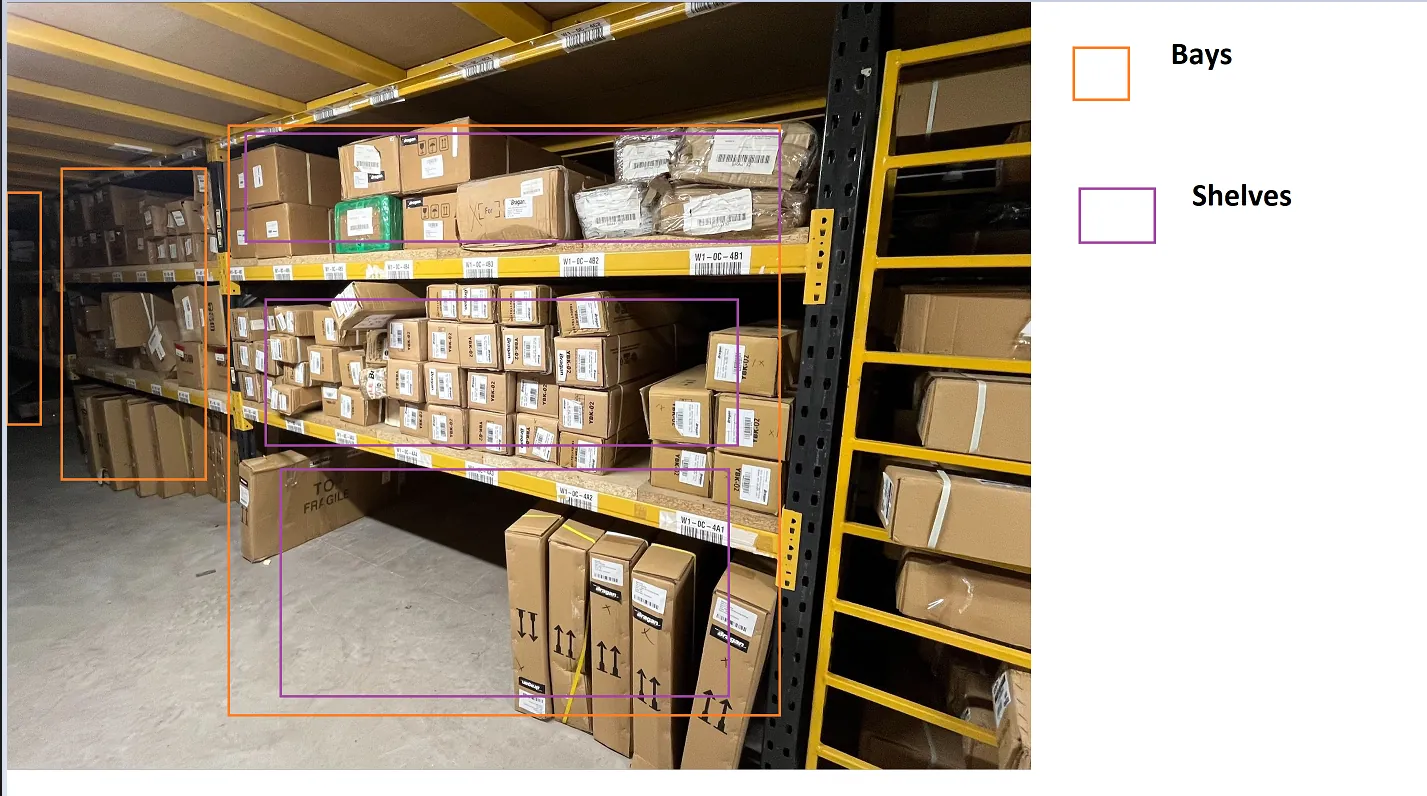
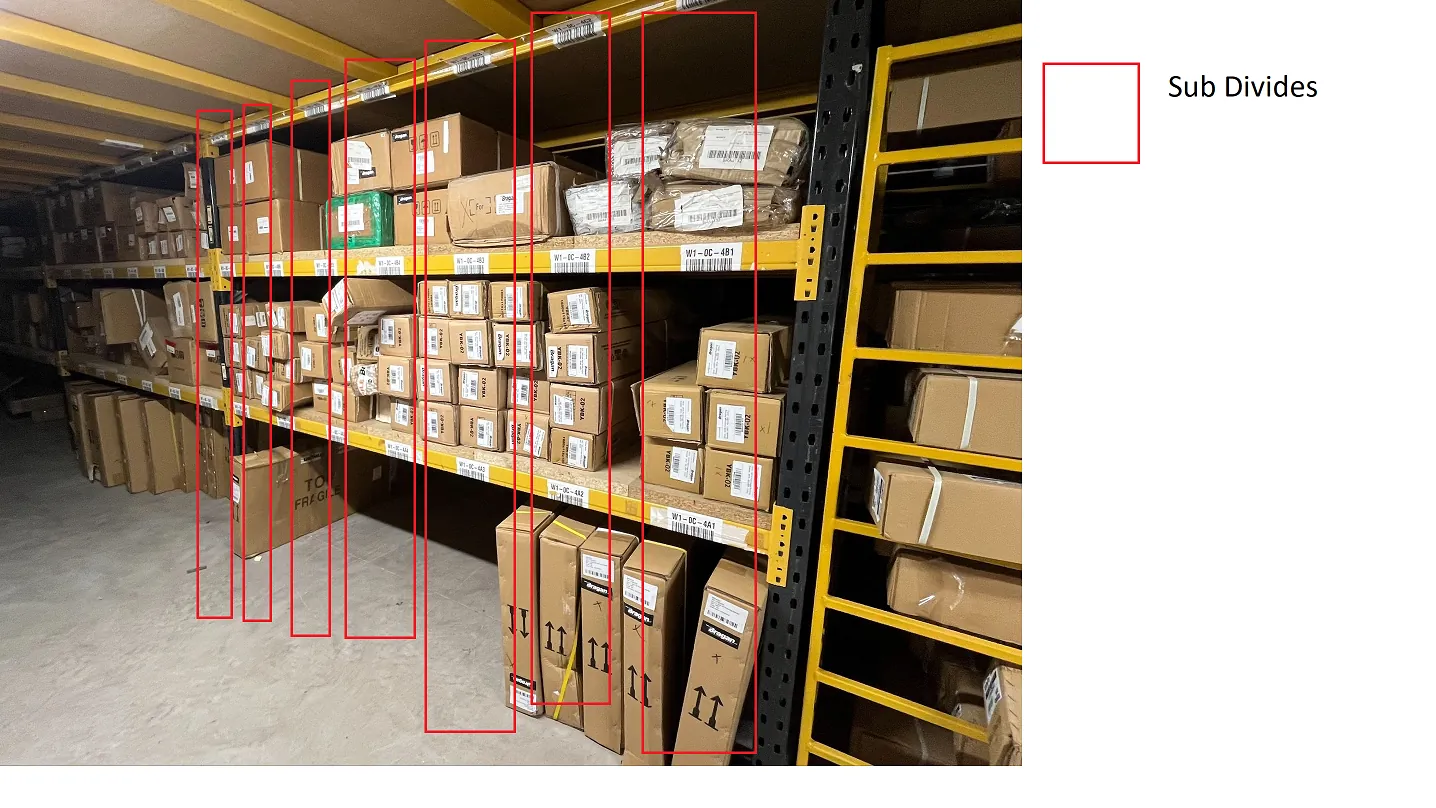
1.7 Map of Location
Please see the below map (FIG1.8) for reference to the locations on the Bragan premises. The locations on the map below will correspond with the location present for each item on the morning picklist (FIG1.9)
1.8 Locations on Pick List
Always pick from the first location(when multiple locations) when you take the last available item from this location do not delete it.
Pick locations should be divided as follows
- CON 1 > CON 37
- New Warehouse - W1
- WH 01
If the item is not in the correct location the stock location must be updated after the pick. This can be done be underlining the location and adding the location where the item was found.
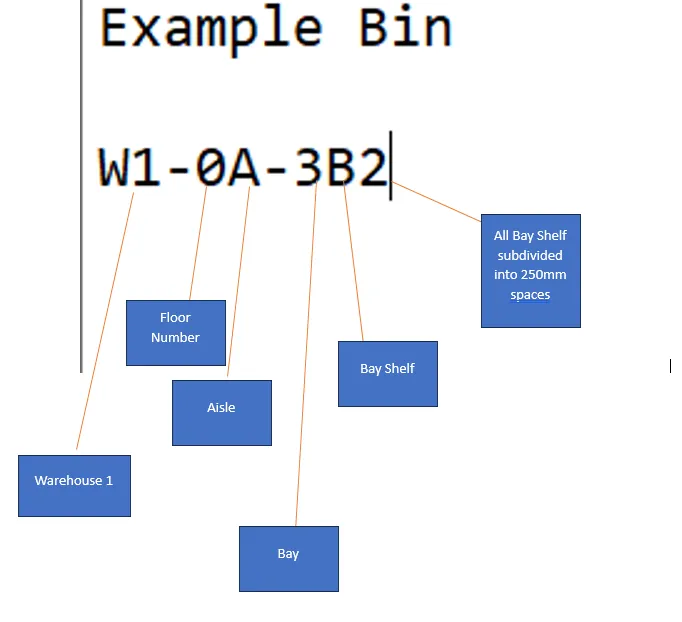
Bin Locations
- Packing Process.
For Packing always follow the below Process#
Pick Order From Stillages (From Paper Pack List)#
Scan Order > Pack Order
When all the items have been picked and placed in the relevant racks the operators should now start the packing process. All operators must select a single order pick from the dropdown menu on the scanners (2.2). The operator will select the courier that they are packing for on the scanner.. (2.3) The operator can find what courier they should be packing for by using the table below.
Easy orders should always be cleared from the pack list firstly, if unsure please ask the team lead on which orders. Easy orders will be marked with a circle to show the operators which orders to focus on first, you can then concentrate on the more time consuming orders when these are all done.
Staff need to familiarise themselves with bragan.net products for better product knowledge. This is a vital part of packing the orders so that the team are fully aware of the product they are sending the customer and thereby reducing the chance of wrong items being shipped out.
For trainee operators, an 0 will have been marked on easy orders by an experienced operator and \ beside all wind deflectors and bonnet guards. The trainee operator will wrap all orders with 0 or \ beside them, under the supervision of the experienced operator. All the orders with circles on them should be packed first as these will be fast straight forward packs, then move on to the more time consuming packs when those are complete.
All FEDEX orders and all Lazer Lamp orders must be packed by the most experienced operator only
Usage of the scanner is mandatory, any operator#
found to be not using the scanner will be
reprimanded and may have their employment at
Bragan terminated. See section 6 - Scanner Brief
SPLITTING OF PACKAGES INTO MULTIPLE LABELS#
MUST BE DONE BY THE MOST EXPERIENCED#
OPERATOR ONLY#
When splitting an order that needs multiple shipping labels, the weight and dimensions must be changed in accordance with the new items. The order processor is the only person allowed to change or split orders.
| Operator 1 | FedEx/ Fastway / Manager |
|---|---|
| Operator 2 | IFS / Fastway |
| Operator 3 | IFS / Fastway |
| Operator 5 | Technician |
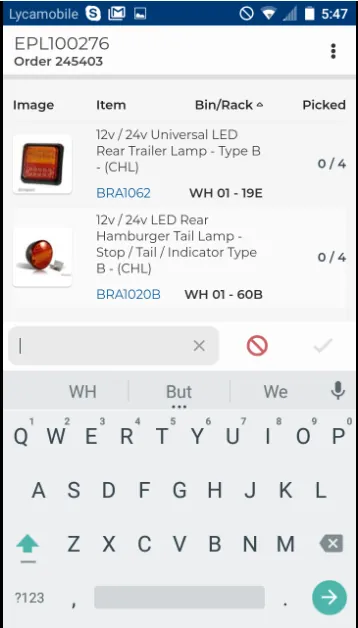
2.4 ePicklist Order Screen
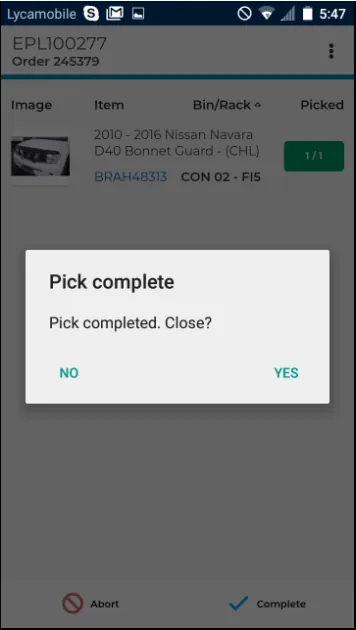
2.5 ePicklist Order Completion Screen
If there is no barcode present on the product, the operator should manually input the SKU to ensure conformity and continue to pack the order. Please advise the warehouse manager, who will assist with inputting this code, the label is to be printed through Linnworks, there are more images on Linnworks to ensure you have the correct item. This also must be urgently reported to the appropriate skype group Dispatch - office coms
Ensure product and product description on the item matches the product description on the scanned pick by visual inspection.
NEVER FULLY RELY ON SCANNERS. THE OPERATOR MUST ALSO HAVE GOOD PRODUCT KNOWLEDGE which includes quantities associated (eg. Roof Bars w/LED normally have 7 LED – 5 white & 2 amber as standard) Please familiarise yourself with the product knowledge SOPs. Click here for the SOPs.
When packing running boards , roof bars and bull bars the operator is to ensure that fitting brackets are present and visible. Ensure the blue foam package is securely attached to the product. For bonnet, guards ensure that including fitting clips are visible inside the package If unsure ask for assistance from the warehouse manager.
When all items from the order have been located and scanned successfully, place the items on the operators’ station and begin wrapping.
Repeat the above process for ALL orders.
2.7 Example of Pack List
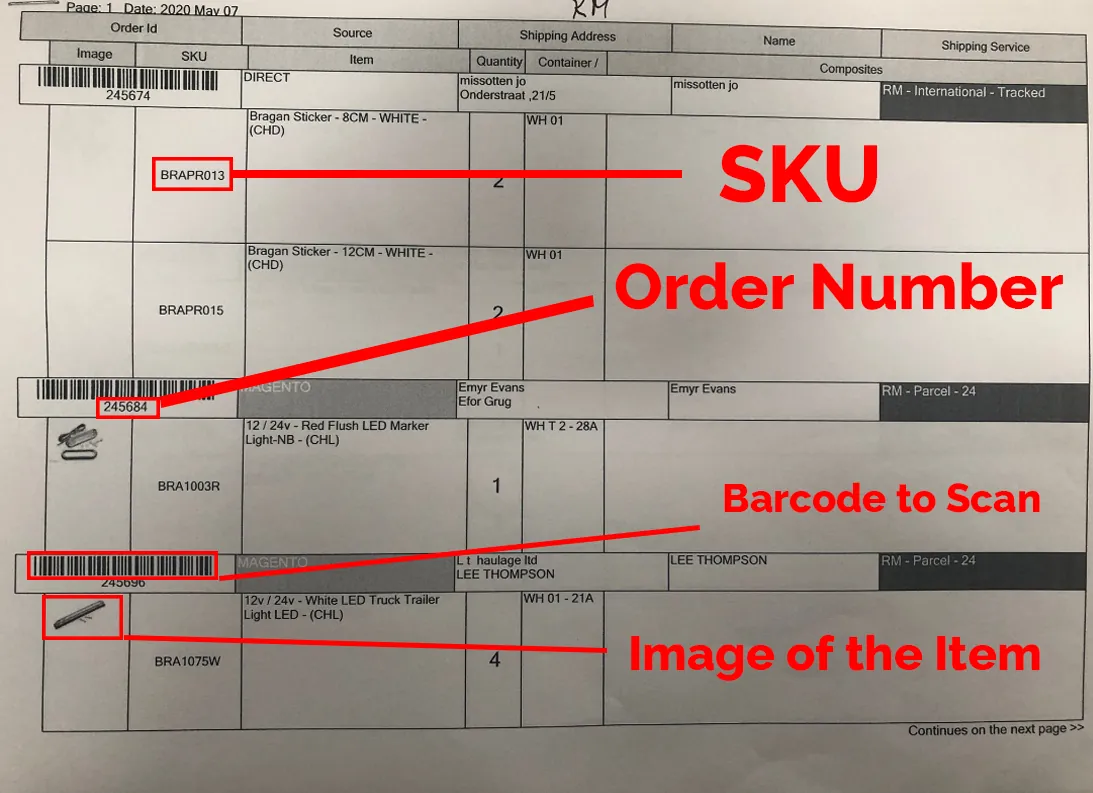
They will use this hard copy of the pack list to check each other’s work and for reference for items that did not dispatch that day. When an operator has completed an order and everything has scanned through successfully, they will pass the hard copy of the pack list to another operator to check all the order is correct and present. The operator that is checking the work will put a checkmark at four main points when they have determined that it is correct (2.7). Checks should occur after the completion of every five orders.
2.8 Example of Check Marks on Pack List
They will check that the SKU code on the pack list matches the SKU code on the item (2.8), they will check that the description on the pack list matches the description on the product (2.9), they will check that the quantity on the pack list matched the quantity that is being packed (2.10), and finally, they will check that the name and address of the customer matched the name and address on the shipping label Fig 20.
2.9 Checked SKU
2.10 Checked Description
2.11 Checked Quantity
2.12 Signature of Operator Who Checked the Order

Once all of the above has been checked and is correct, the operator checking the work should put their initials under the order details and the date that it has been checked as correct (2.11).
OPERATOR 1 and 2 will check each other’s work and OPERATOR 3 and 4 will check each other’s work.
2.15 Procedure for Packing Orders Upon completion of Morning Pick List, all Items required from Container Locations are sorted and placed on Racking System on the appropriate colour coded shelf and clearly marked with a visible colour corresponding sticker.
| RED | IFS |
|---|---|
| YELLOW | Fastway |
| BLUE | FedEx |
| WHITE | Royal Mail & Bragan van run |
NB For pick and pack process operators first choice of an item should be a previously returned item, when shipping previously returned items please ensure the item is correct to label (check images on hyperstock or SKU search on www.bragan.net if needed) and all components are present.
(Operator 2) Please send a message to the Dispatch - Office Comms skype group when the first pack is complete.
- Wrapping Procedure
3.1 The Customer It is important to remember that the most important part of Bragan is the customer. Without the customer and the customer having a good experience, there is no Bragan. For this reason, a special emphasis is placed on quality. Each operator must ask themselves whether they would be happy to receive a parcel in the condition they are sending it. If the answer is anything other than a definite yes, the item needs to be reviewed/rewrapped before sending.
3.2 Packing
Parcel Tape should be broken as per the following pictures and video - this will take some practice but avoids loose ends and loose tape, Thumb finger nail needs to be pressed against finger at edge of tape
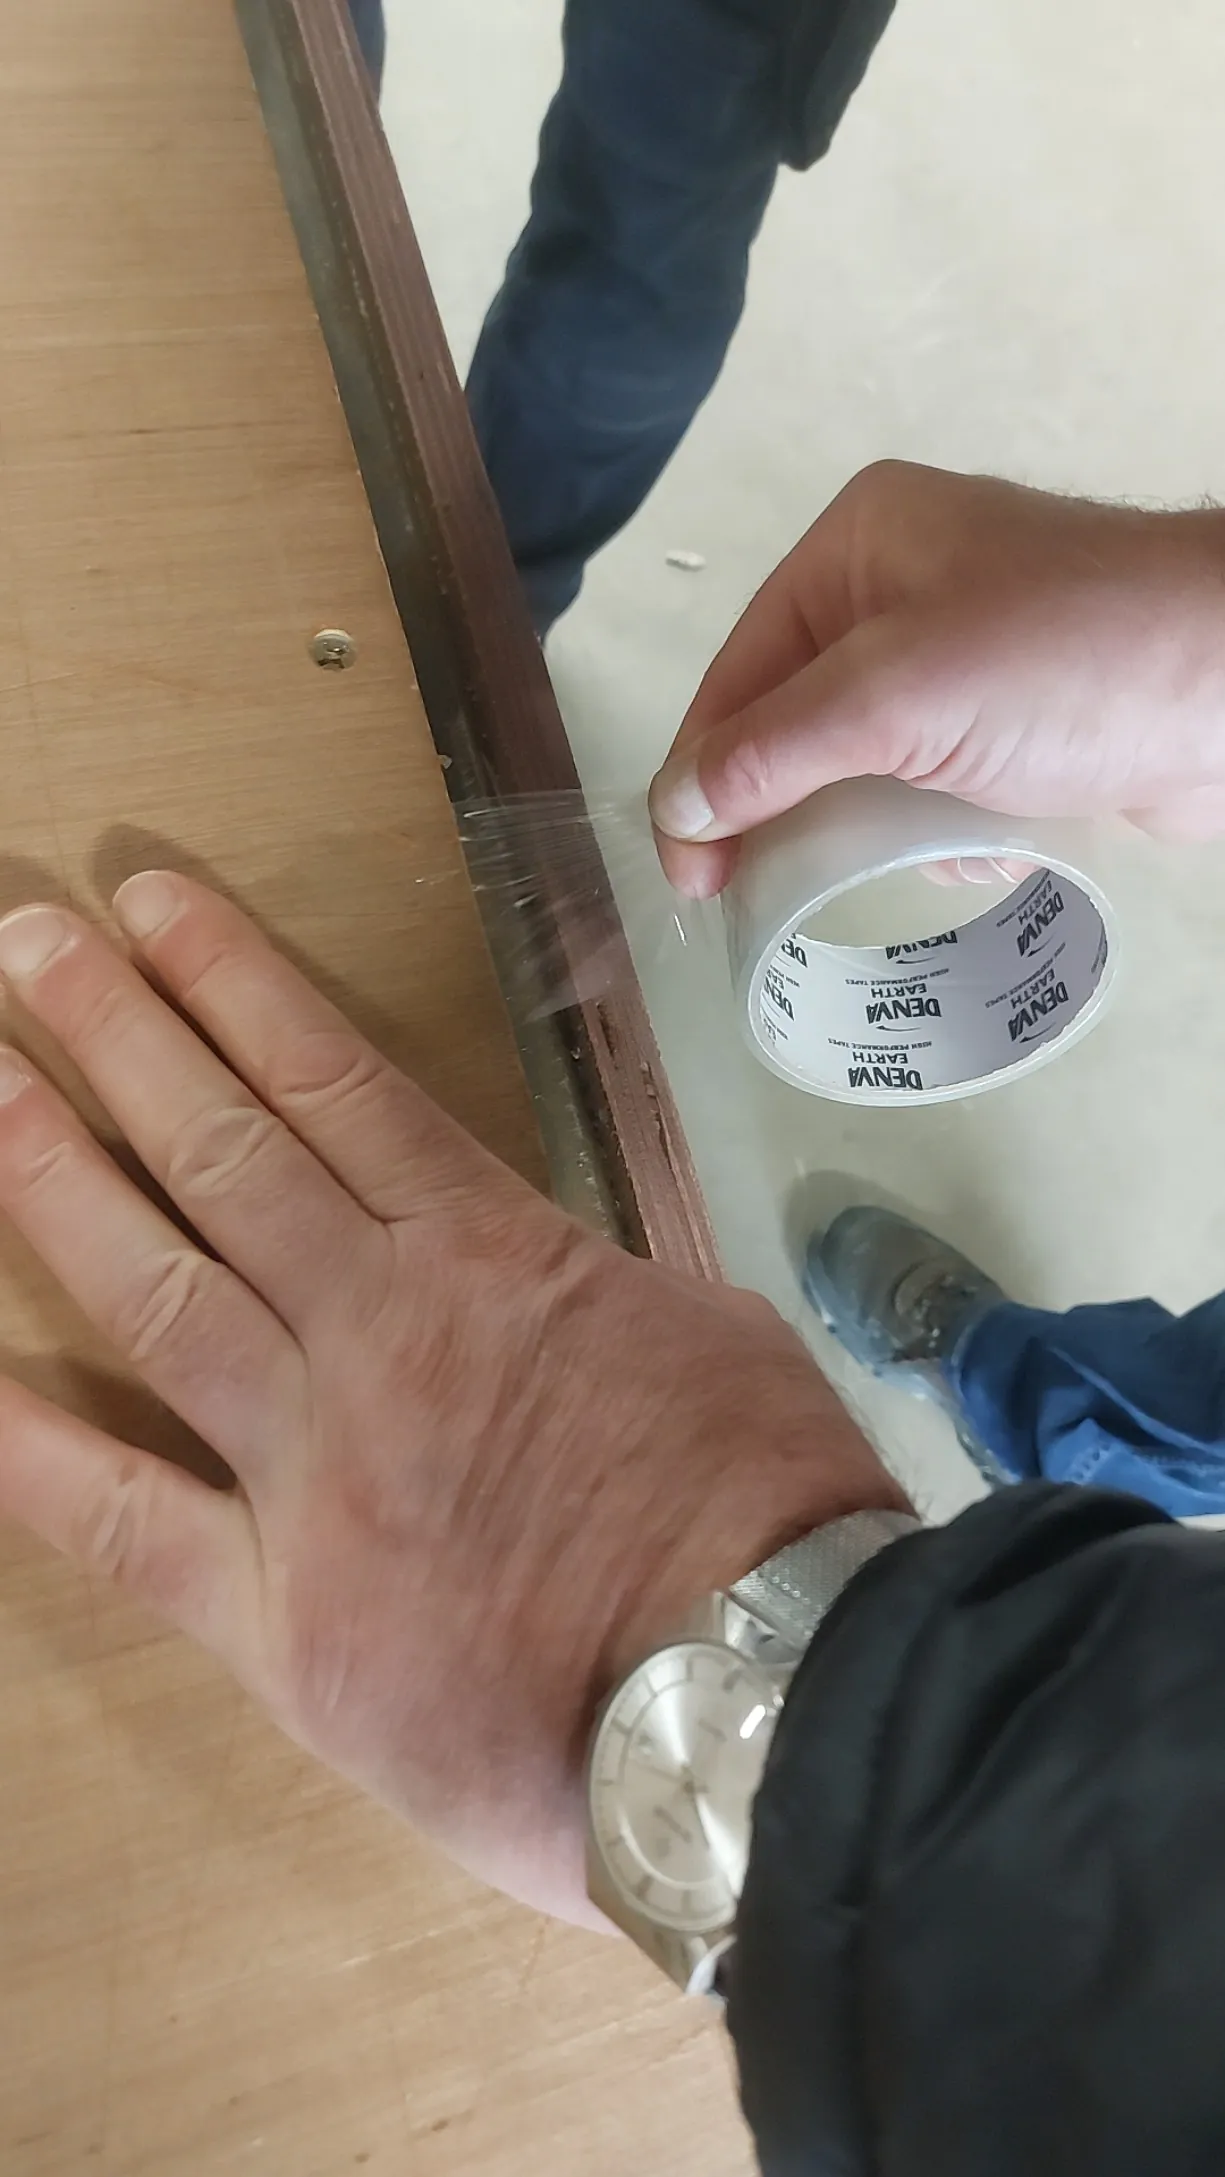
ADD VIDEO LINK HERE#
Items must be wrapped with appropriate cardboard/foam so as to ensure maximum protection. If the cardboard has any writing or markings on it, put this to the inside of the parcel. Additional items such as lights and fitting kits etc. must be secured tightly using packing tape or placed inside the box where appropriate. The front- facing part of an item should be considered most important to protect intelligently – for example, if spot lamps are part of a bulbar order affix them to the front side of the bulbar to protect. Box ends of sidebars/roof rails are prone to damage so additional protection may need to be added there. Always use clear parcel tape
where possible when covering labels so that label is still readable/scannable after the wrap. All orders should include air fresheners and discount flyer.
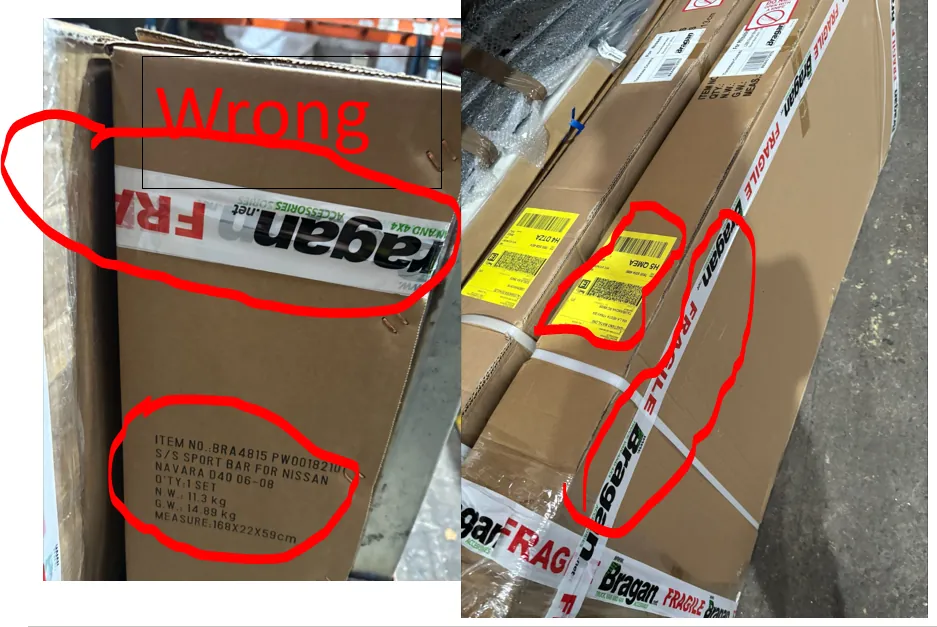
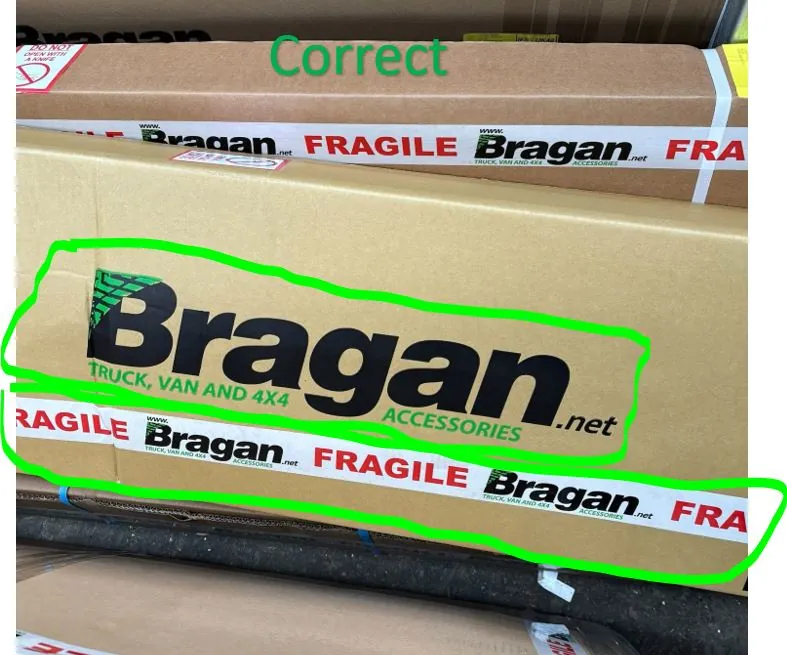
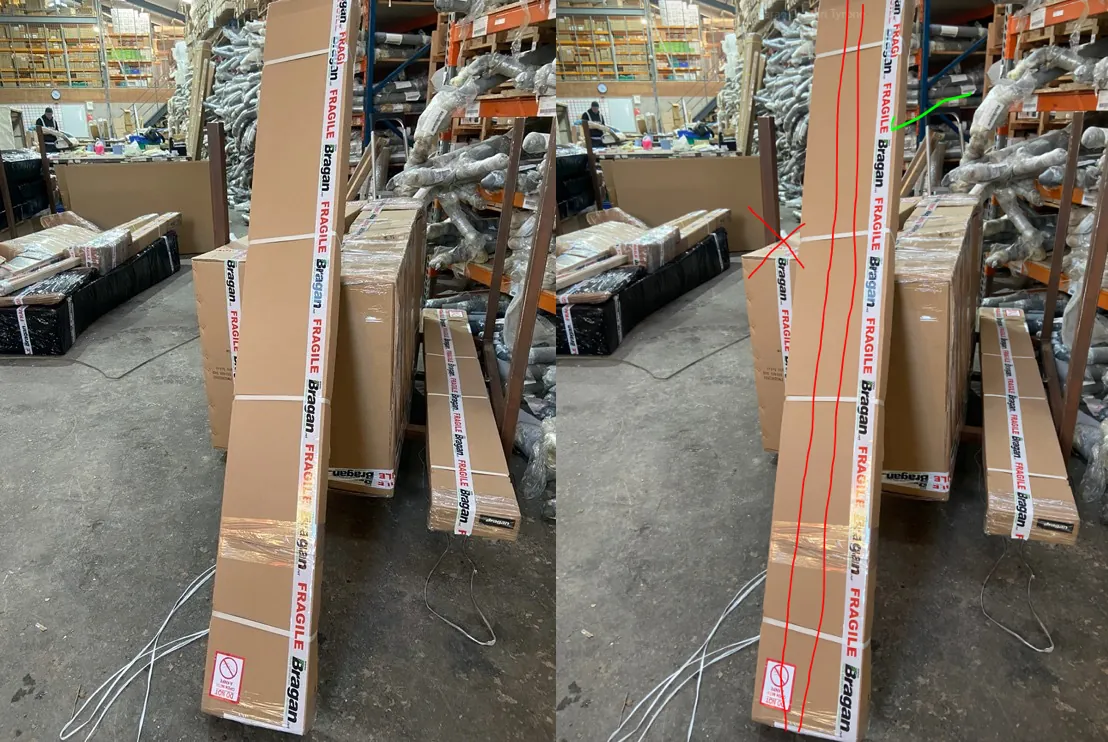
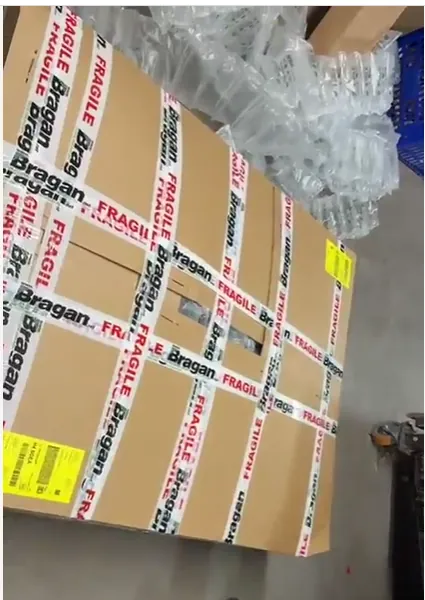
The Package must be marked ‘Fragile’ using sufficient runs of Bragan fragile tape and shipping label placed in an appropriate visible place. The Bragan Fragile tape logo must be in line with any Bragan logos on the packaging and must not face the opposite direction. Press the label to the surface well to ensure it is fixed appropriately and will not come off in transit. Use do not open with knife labels on all boxes. There is a process to breaking tape, do not use your teeth under any circumstance's, this is unhygienic and unacceptable. Pull the tape tight and break with your thumb, ask an experienced operator if you are unsure about this. See fig 3.2.1 and 3.2.2 for the wrong and correct way of apply fragile tape.
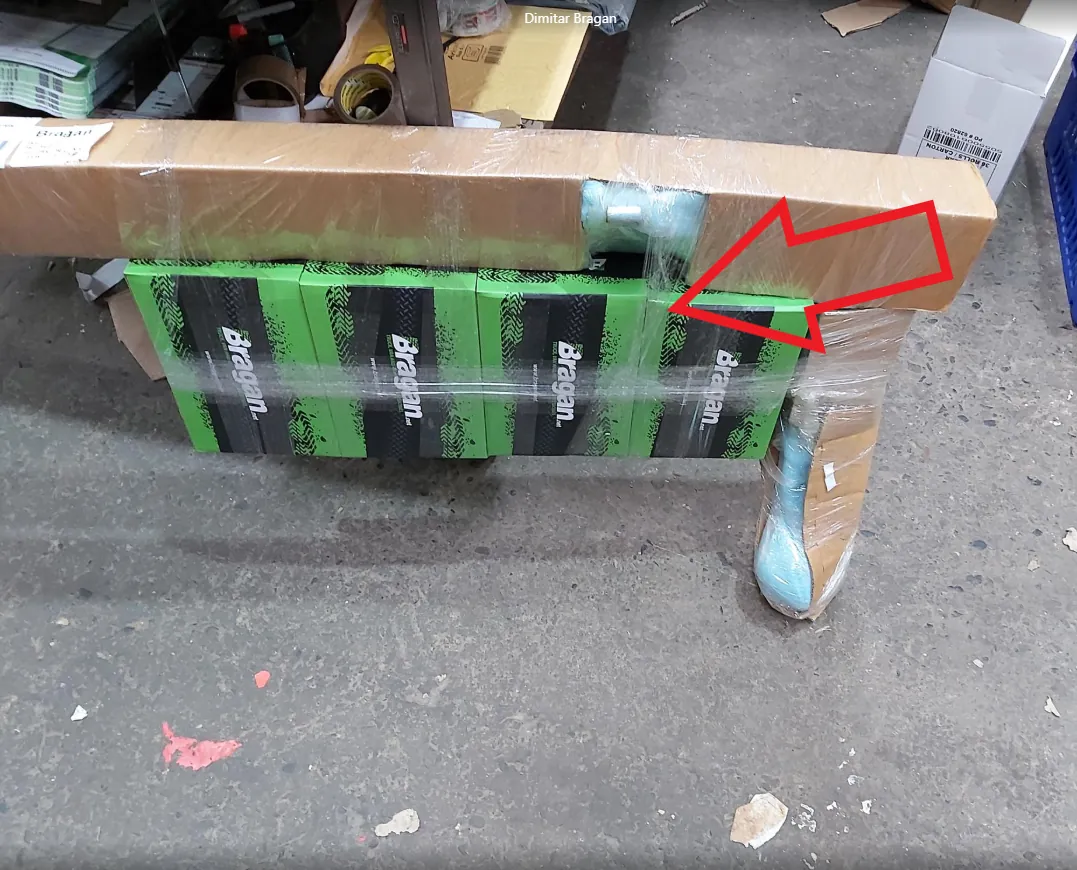
When wrapping any items it is important to keep in mind the shipping cost factor for each courier. With FedEx (Operator 1) – the operator must try to fit as many components into as small a space as possible. This is because we are charged by volumetric weight for each shipment. When wrapping roof bars, for example, the operator should attach all other components to the underside of the bar (4.1) so as to take up as little overall space as possible. The same idea can be followed with the wrapping of all orders. If unsure, ask the warehouse manager.
When wrapping for IFS and Fastway (Operator 2, 3 & 4) the operator must question the length of time it will take them to attach the other components to the bar. If attaching everything together (so as to have the minimum amount if total parcels) can be achieved in under ten minutes then do so, however, if this task will take the operator longer than ten minutes, it is better to request another shipping label, and send the order as two parcels. (4.2)
After the shipping label has been printed and stuck onto the item, the operator must write their initials on the shipping label. Only put your initials on one of the shipping labels but it must be in clear view.
3.3 Packing Images
Please ensure that shipping labels are NOT placed on the centre fold or crease of a box or item, always place the label in the top left on a flat surface to avoid a scanning issue. Always apply the shipping label on the top left of the item, preferred side up, so that the item is stowed on the courier's vehicle correctly. (FIG 3.31)

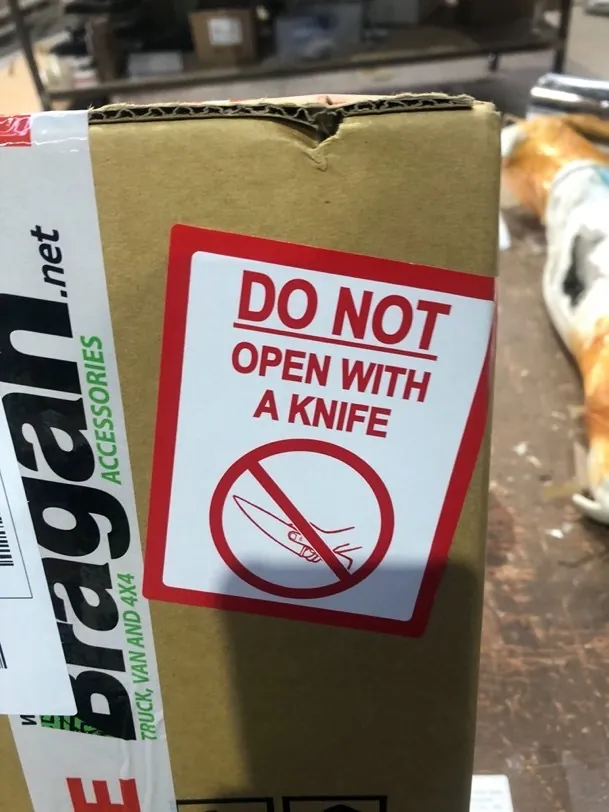
Do not open with knife label (Fig 3.3.2) be present on all packages - no exceptions.
Fragile tape
Add Fragile Tape to the side of the box instead of down the middle to avoid loss of labels.
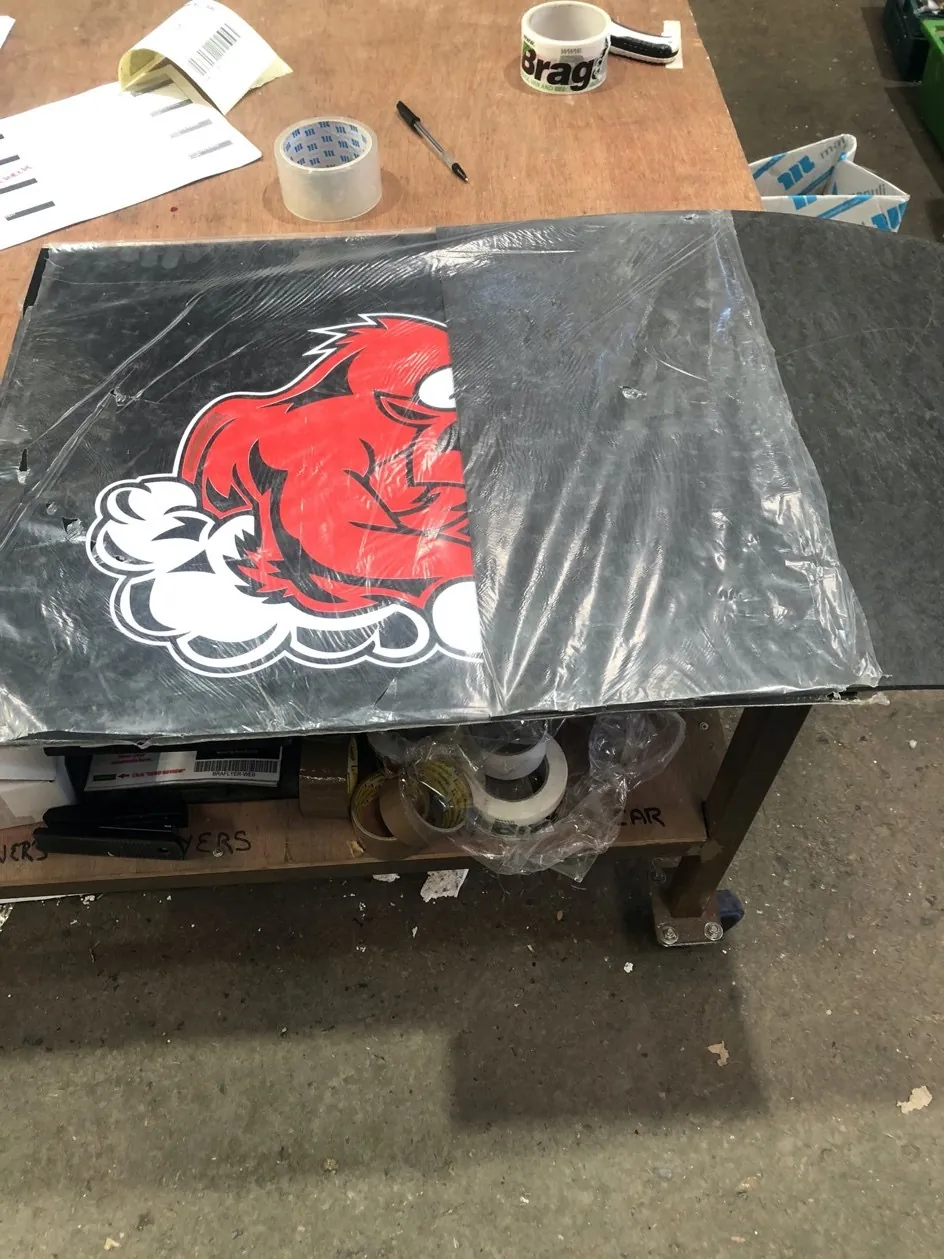
Mudflaps
Should be packed with the logo rolled facing in, or with the logo face to face for multiple items (fig 3.3.4) All mudflaps must be cleaned thoroughly if dirty before packing
Glass Lamps
Should be packed face to face, or with the glass facing inwards to any related product - glass is not covered by Courier claims so all glass items must be protected sufficiently to arrive undamaged.
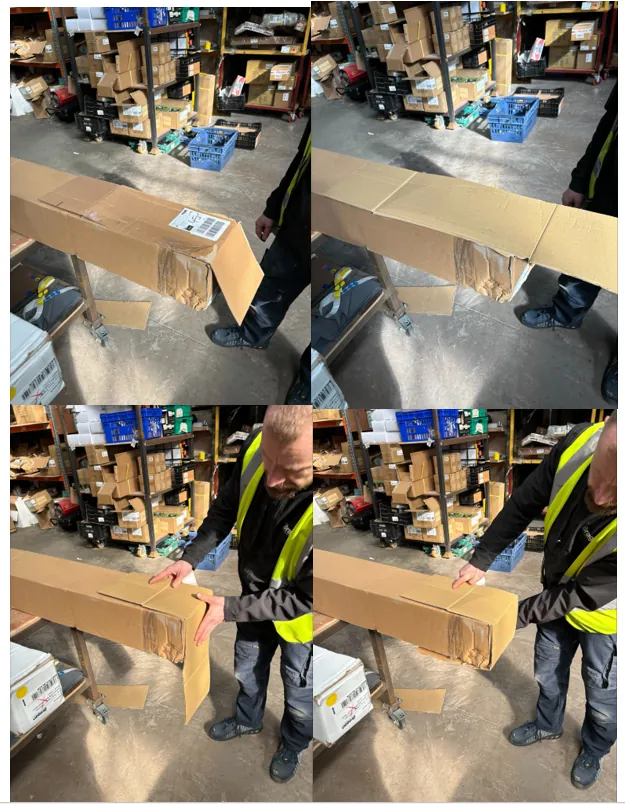
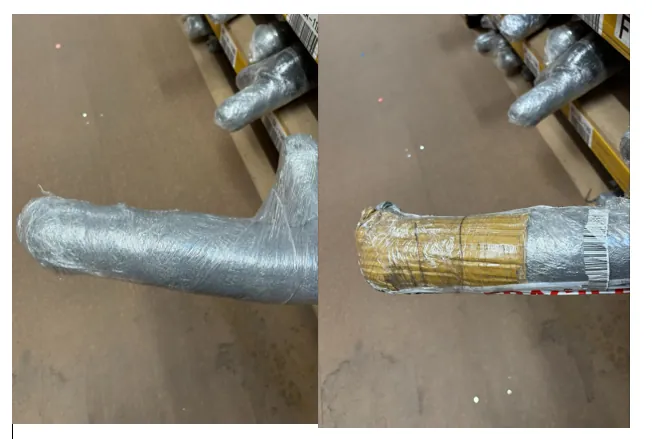
Running Boards and Side Bars
Should first be checked for foam at the ends. If foam is present then the ends will need taped up and the package can be sent. However, if foam is not present the parcels will need to have their ends reinforced as per images below ( operators should ensure running boards have brackets in the box if not included in the composition ) Fig 3.3.5.
Please make sure that any writing on cardboard should be facing towards the item so it cannot be seen.
LED Nameboards
Extra cardboard packaging must be used as these are expensive items, you must also remove manufacturer identification marks from the product and box (Fig 3.3.6)
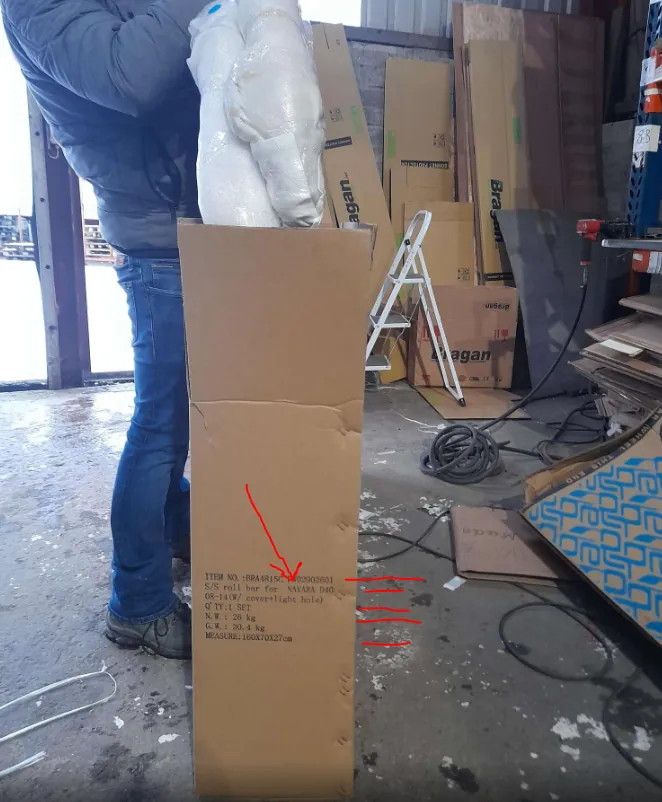
Roll Bars
Please ensure roll bars are placed the right way up in box, In line with the writing on the side of the box FIG 3.3.7 item should be inserted correct way up as otherwise if the main part of the item is at bottom of the box there is more chance that it will be damaged in transit (fig 3.3.8) if the item is not as per text on the box then the text should be removed to avoid customer confusion. If there are additional components (lamps etc) to a roll bar please securing them to the bar itself, do not leave them loose in the box.
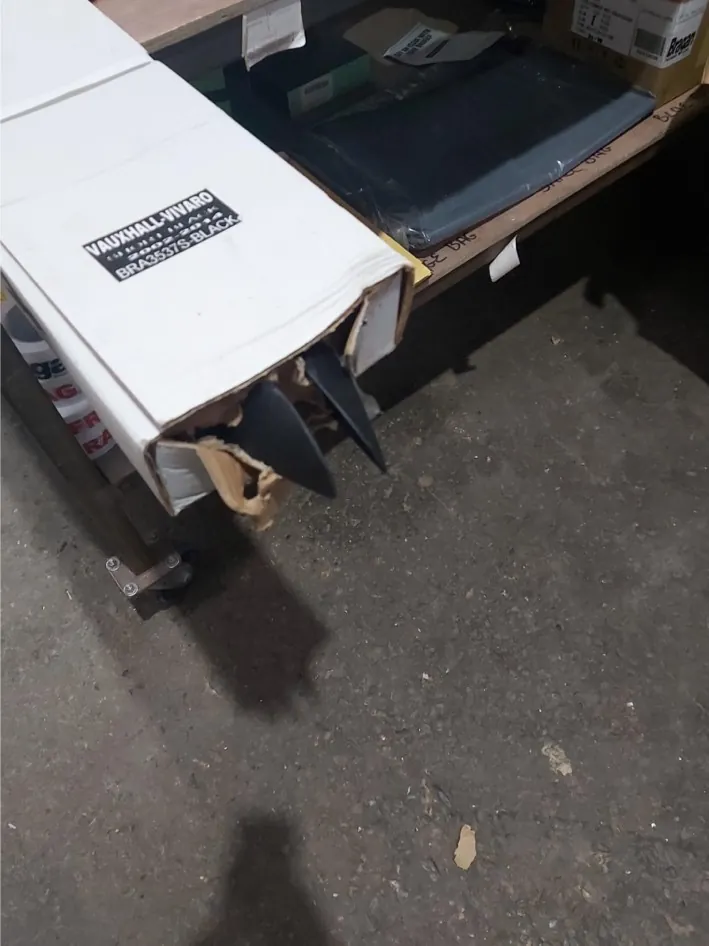
Roof Rails
The boxes below are very weak - please reinforce the ends with extra cardboard.
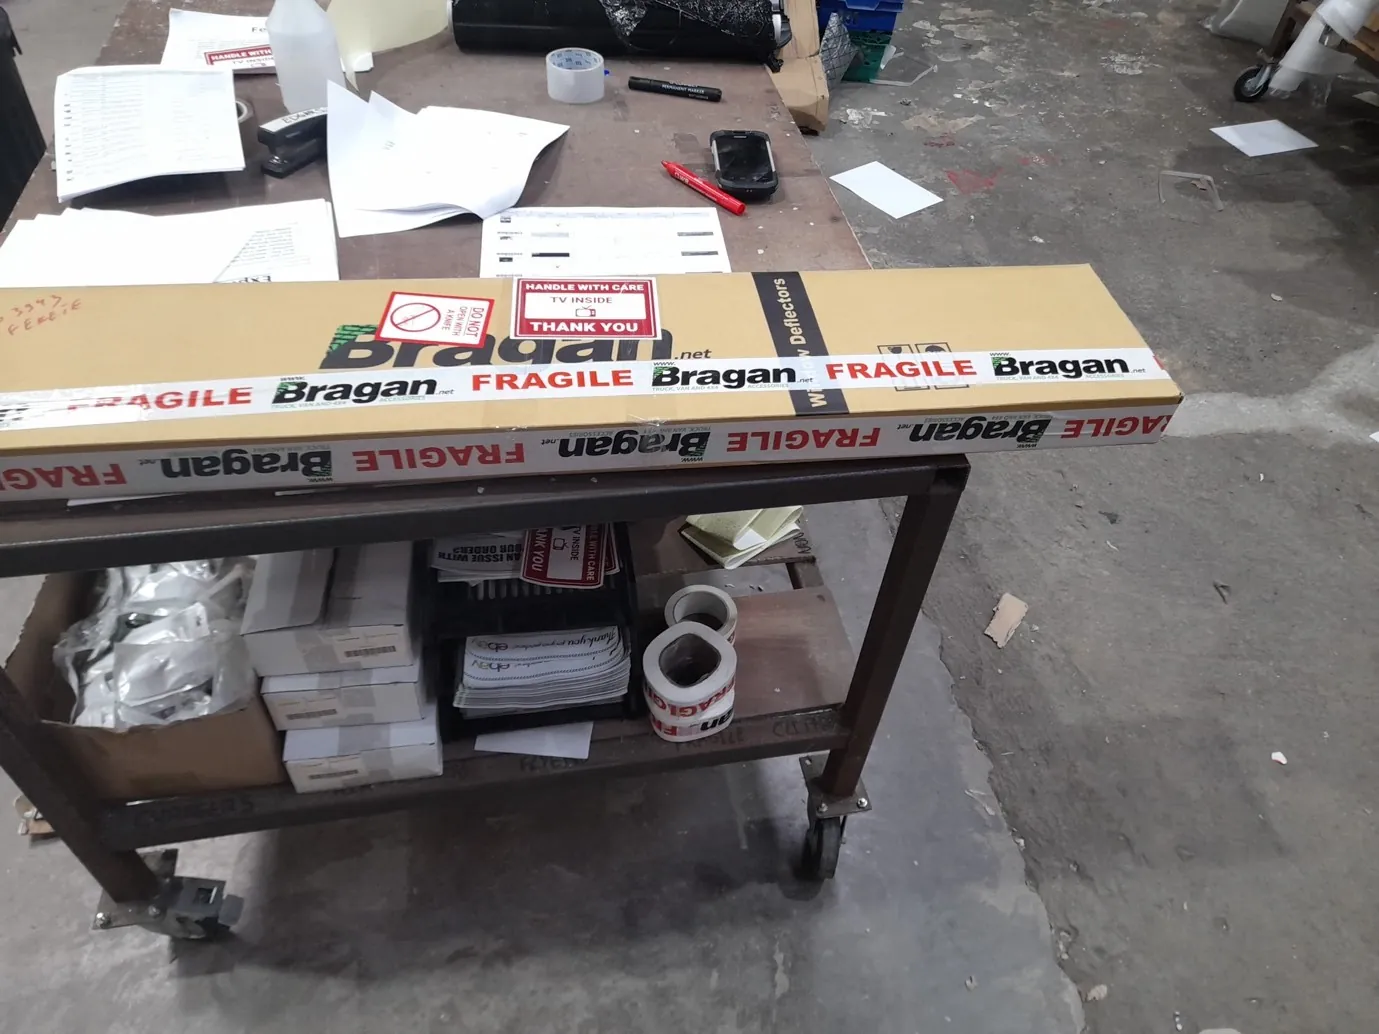
TV Sticker
Wind Deflectors/Bonnet Guards/Sunvisors get the Fragile TV sticker so that couriers may take extra care.
Spoiler Bars
Please tidy up the ends of spoiler bars and make sure the ends are reinforced with cardboard before shipping.
Wrapping Mudflaps and Spoiler Bars
Truck / Van Roof Bars
All roof bars must be checked that brackets are attached before continue packing the order
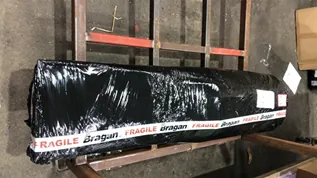
When packing truck roof bars and there is more than one bar in the order they can only be packed in the following situation.
If there are no spot lamps or led bars then two bars can be sent together and then black wrapped ( LED marker lights are ok to include as they are low weight )
If any roof bar has spot lamps or led bars these must be packed as separate roof bar packages
IE
If the order is for 2 roof bars, 12 spot lamps and 4 beacons then it should be packed like below
Package 1: Roof Bar 6 Spot lamps 2 Beacons
Package 2: Roof Bar 6 Spot lamps 2 Beacons
If the order is for 2 roof bars and 18 LED marker lights it can be packed like below
Package 1: 2 Roof Bars 18 LED Marker Lights
When packing roof bars with lamps Ensure that the glass is facing forward - not facing the rear of the bar. ( Glass should be to the inside of the curve of the bar )
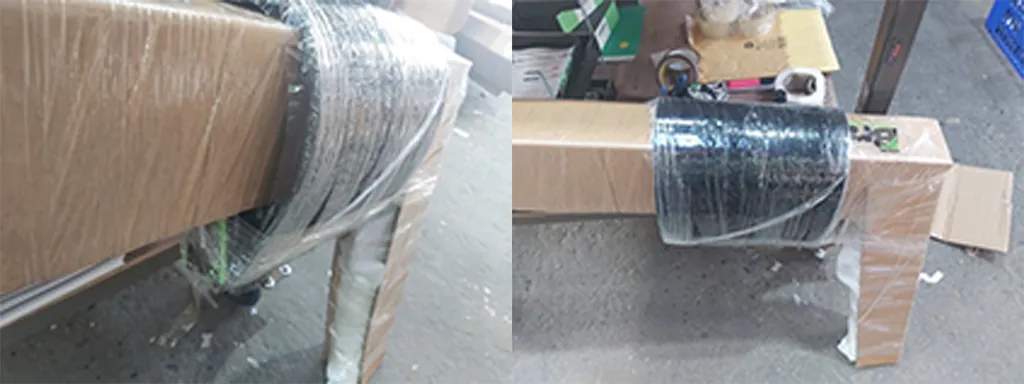
Bullbars
All bullbars must be packed inside a box along with air cushion bubbles, need to ensure brackets are well attached to the bar before putting inside a box if not apply extra clear tape. See photos and video below for packing process Packing Video
- Packing Station Preparation
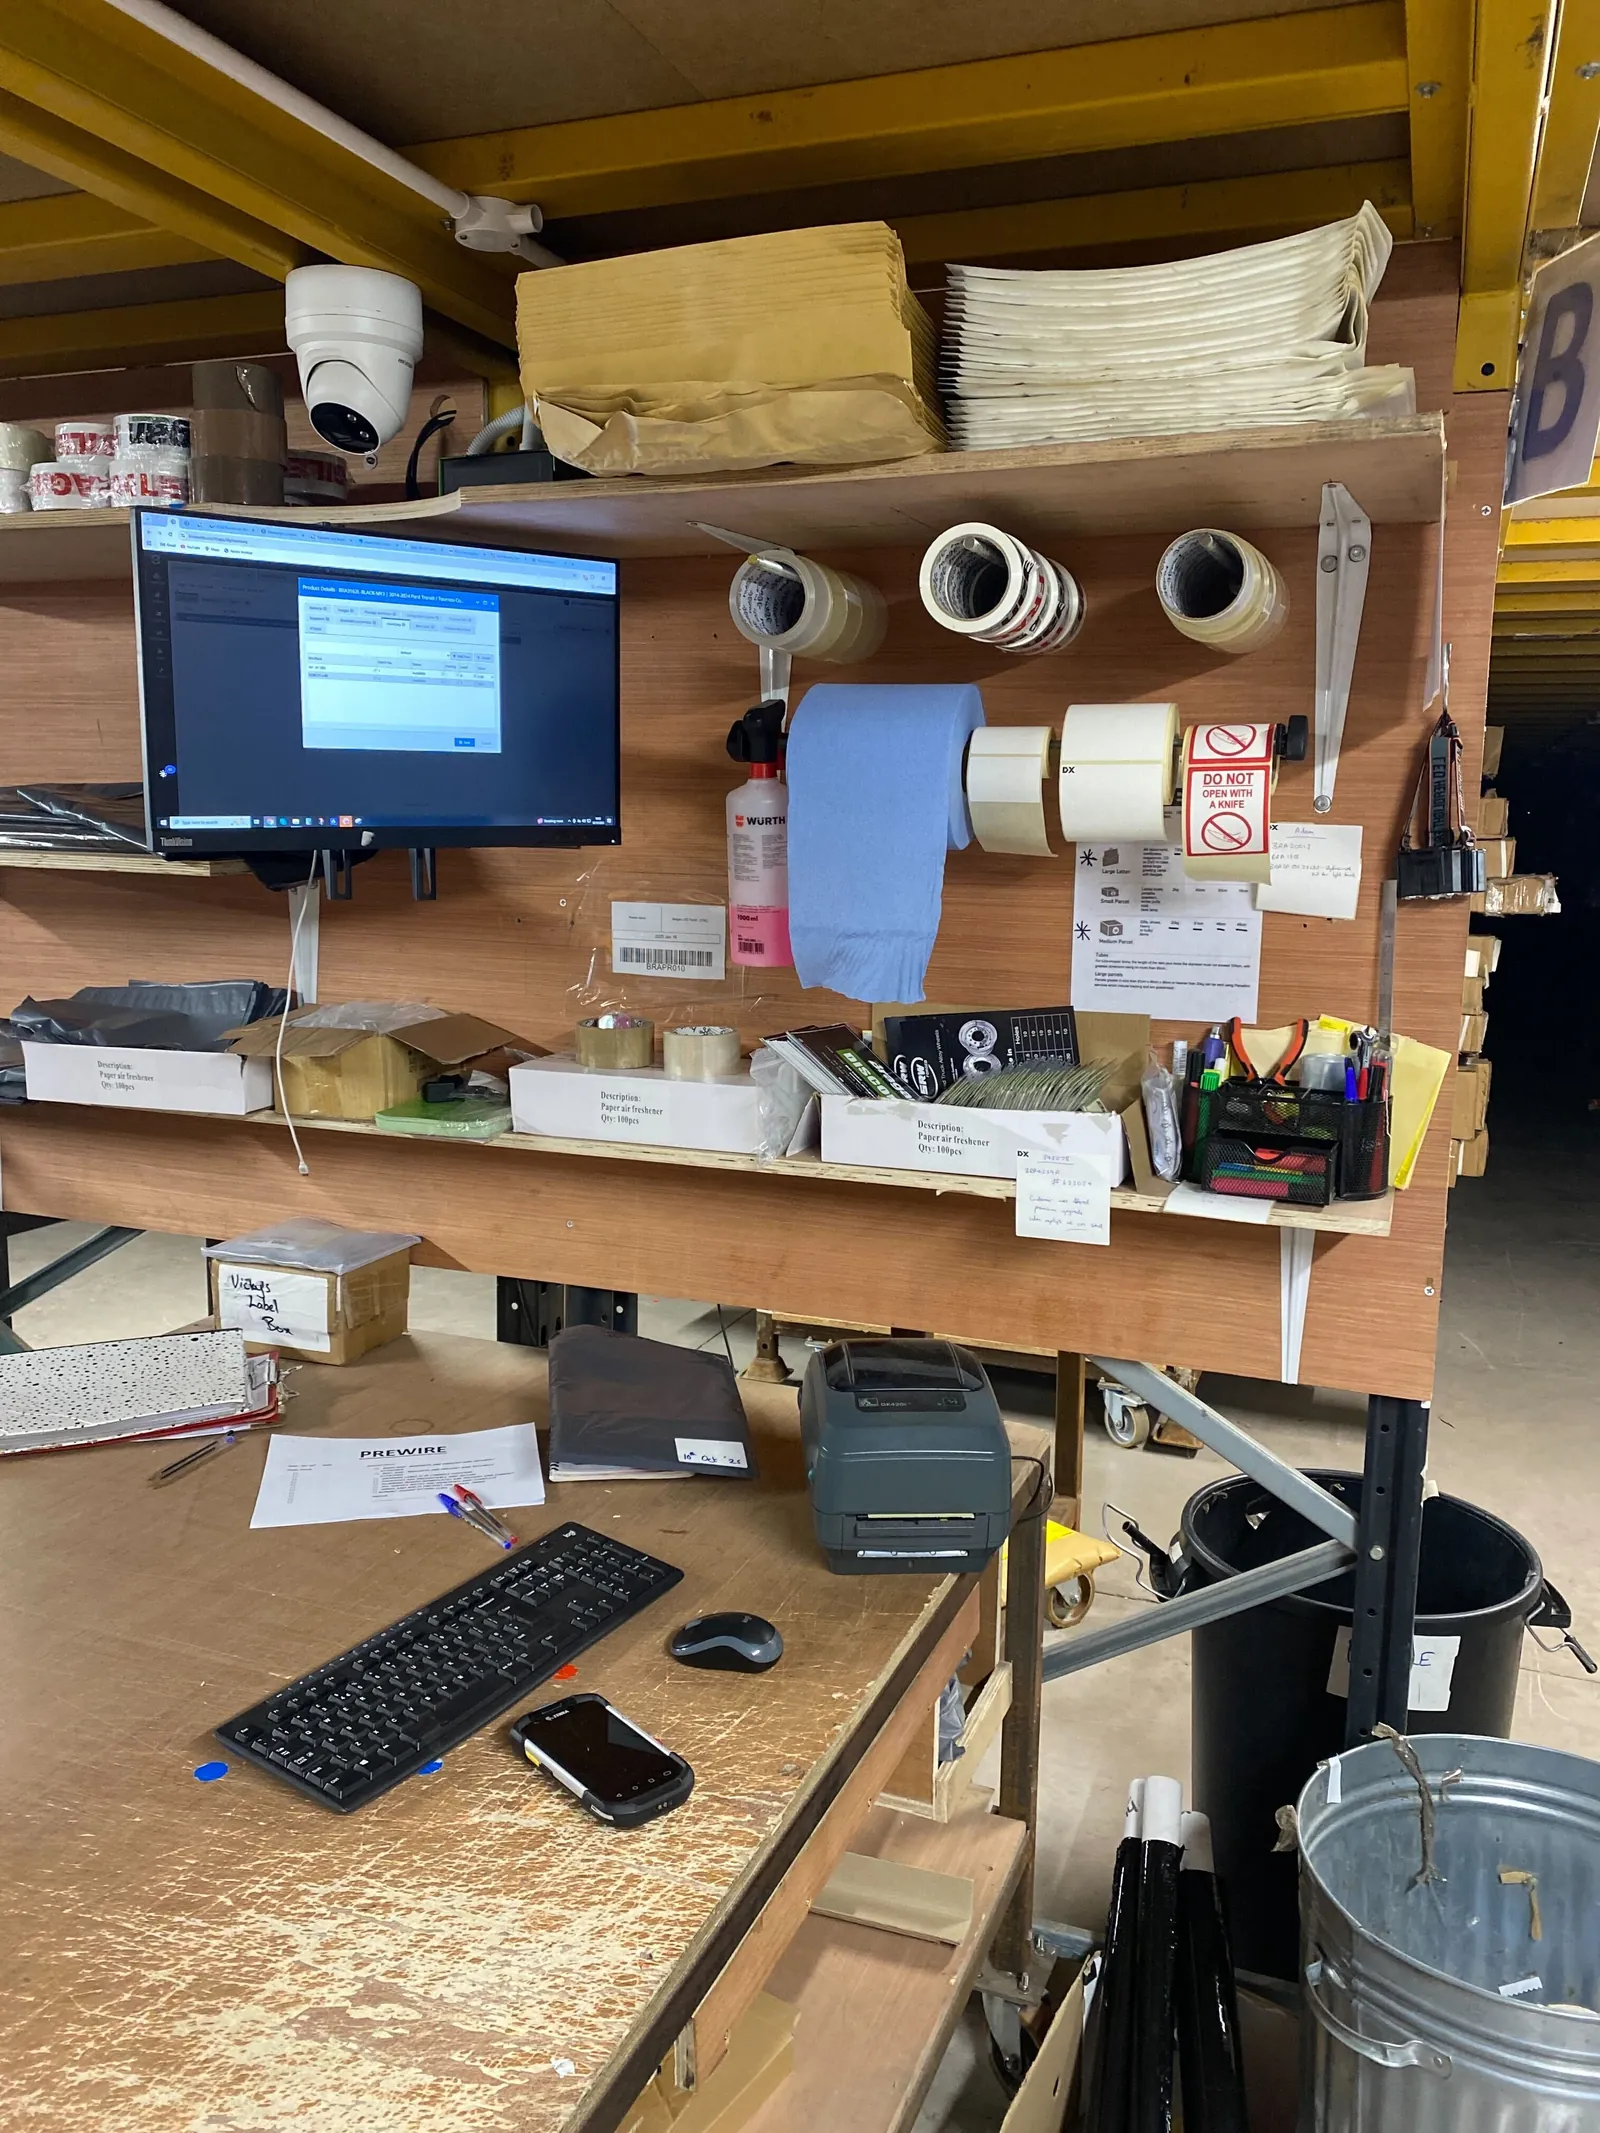
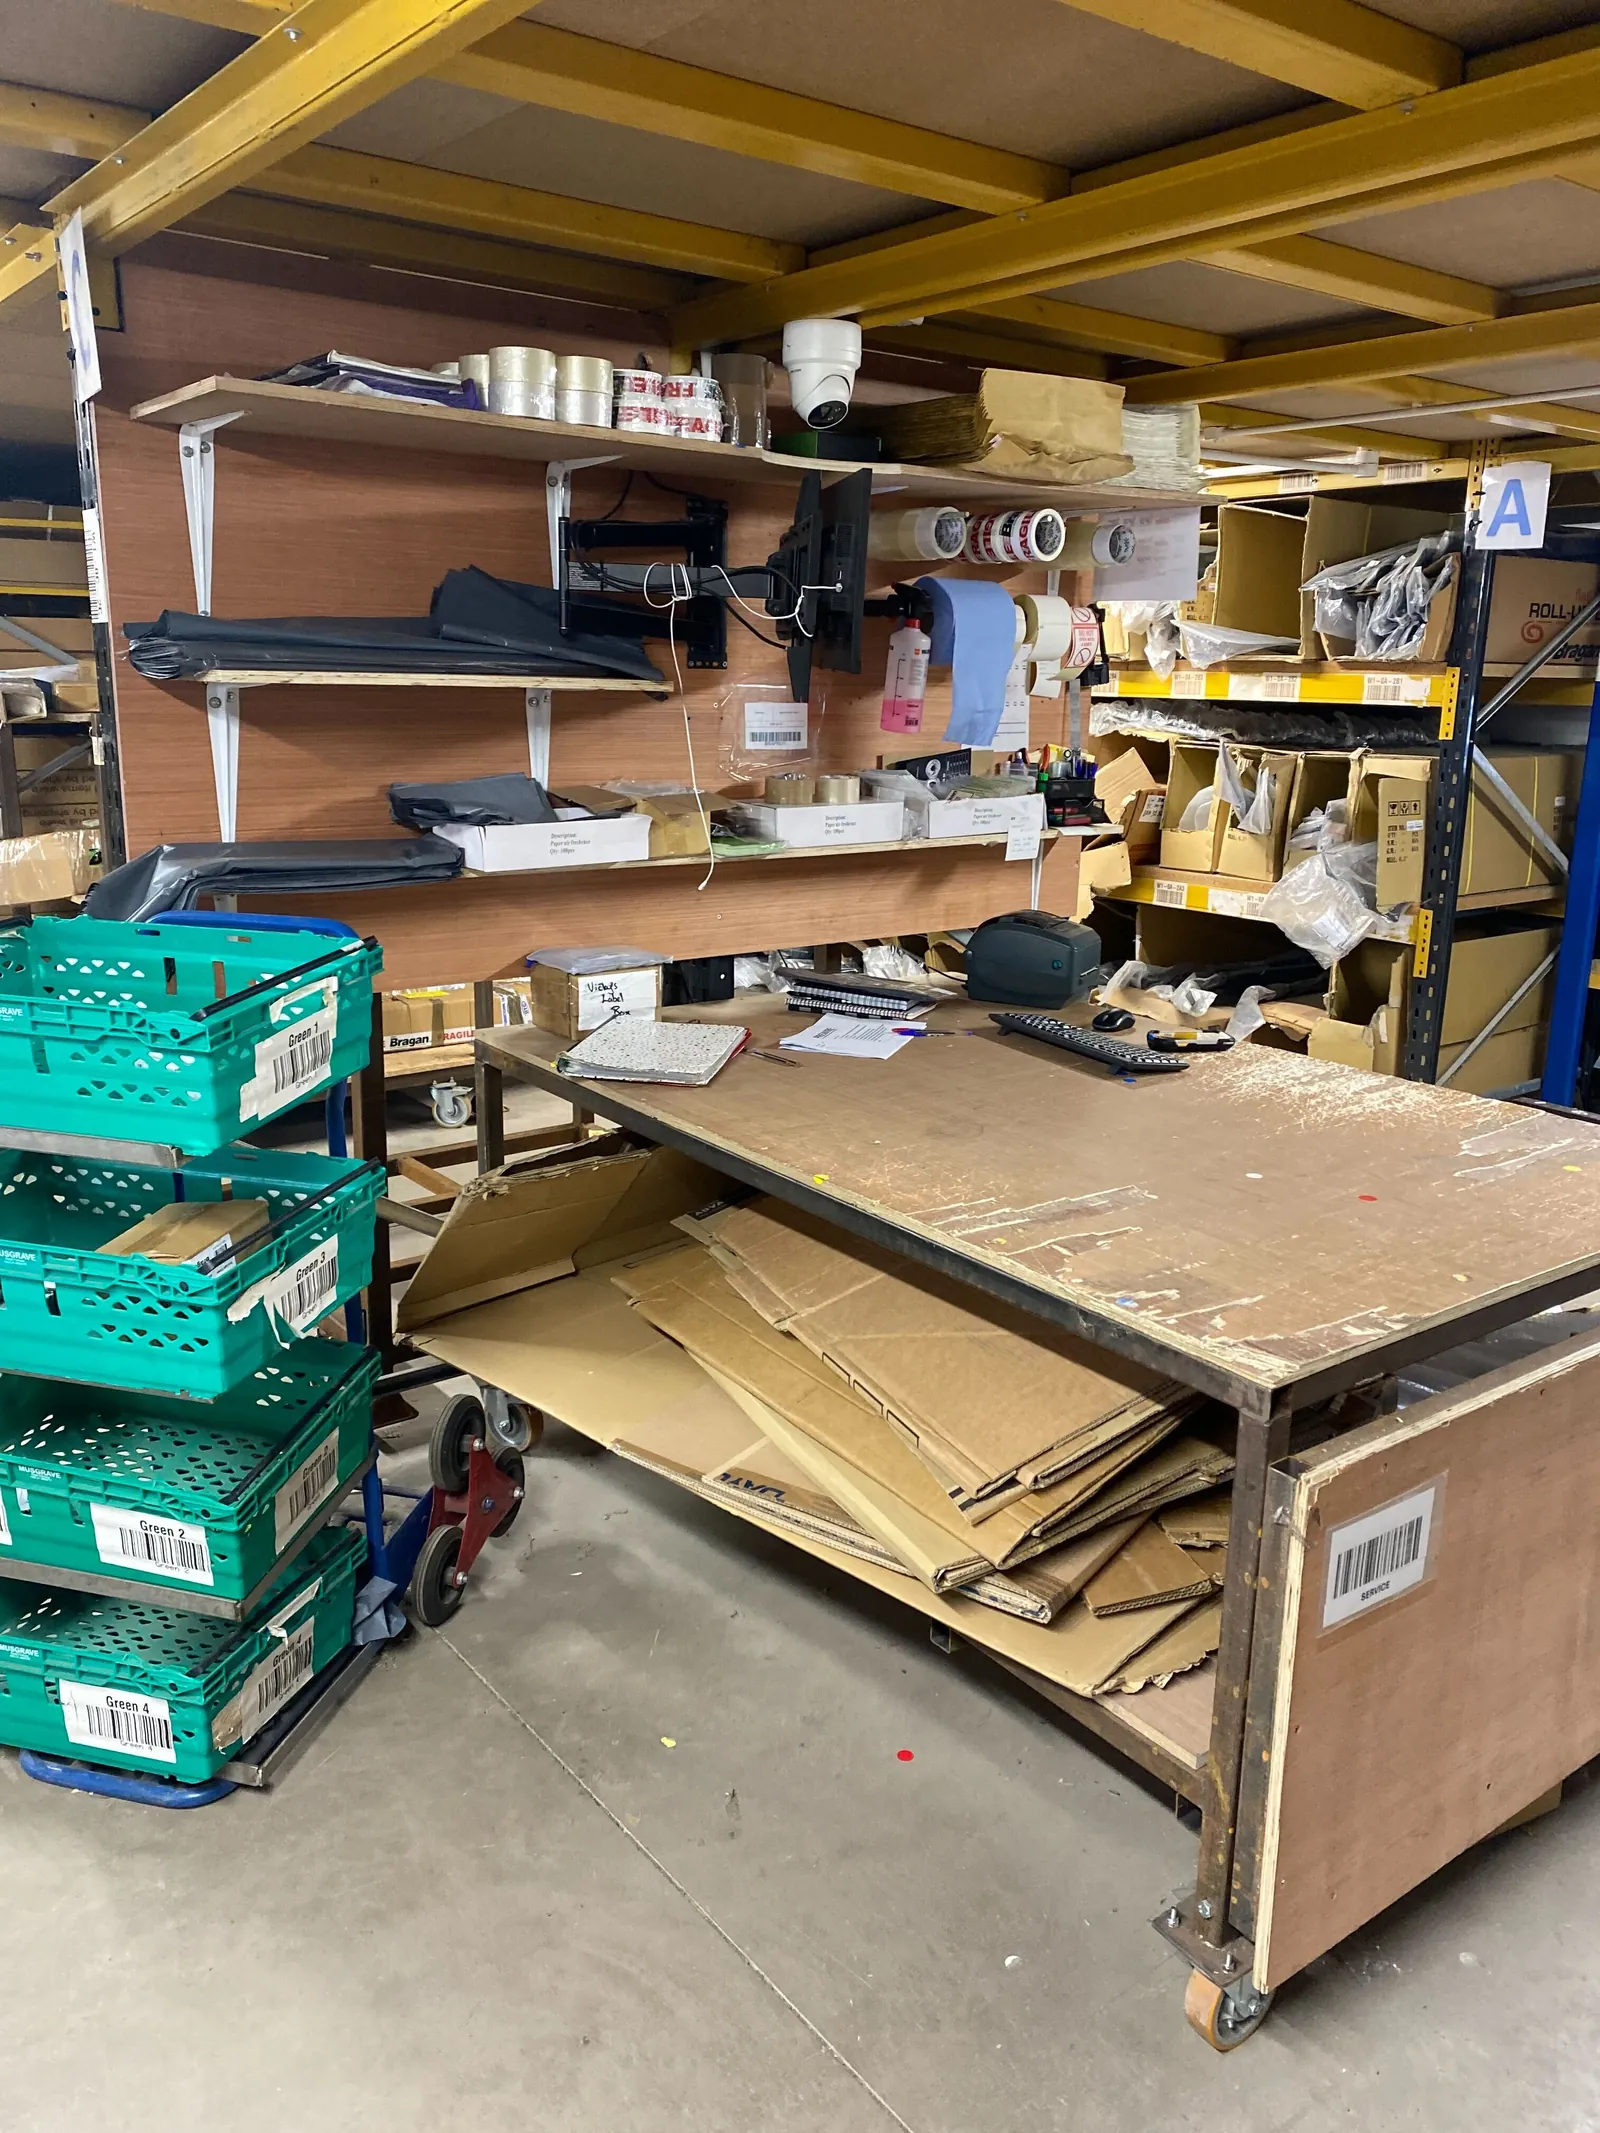
The operator should check the following items are present at the packing station as for (Fig 5.1)
Packing Tape Fragile Tape Knife Colour Coded Marker Bragan Flyer Air Fresheners Small Items Folder Knife
All other non-essential items must NOT be present in the vicinity of the packing station.
Work Stations should be cleaned for 10 minutes after packing is completed - needed tools (list above) should be requested from team lead (and signed for) & Added to Consumables List if needed
- Reference Videos
Packing videos are available on Dropbox, these videos require updating, and operators should video and update all common items that have issues/require additional packaging. Please click here to see how each items are wrapped.
- Break / Lunch Times
Anyone working half day takes 1 break 11.00-11.25. Those working full day take breaks as normal.
Tea Break 10:45-11 & 11-11:15
Lunch break must be staggered so there is always an operator present in the warehouse if a courier should arrive.
First break 1:15-2.00 Second break 2.00 - 2:45
Video & Media#
Notes#
This section is important so Adhoc points and issues can be logged. Also, Q&A can be logged for suggestions for potential issues encountered. Also, log important notes needed for this system. Additional Notes:
Each operator must have their own named and numbered scanner. Scanner Brief Scanners must not be shared among operators, each operator is responsible for their own scanners. USE SCANNER AT ALL TIMES, the operator number must be labeled on the back of the scanner. Each scanner must have Skype installed for communication. Issues with scanners must be reported immediately Tables / Work Stations are assigned as per operator – Table 1 = Operator 1 etc. Each operator is responsible for the tidiness and upkeep of their own work station. Please ensure that the shelf is kept clear above label machines for a box to house barcode labels until end of pack. All members of warehouse staff should have labels, knives, markers and pens should be on their person at all times, especially when going out to containers. Work stations should be tidied and cleaned every day before leaving. Operatives must have a forklift licence and be with the company over one month before they are allowed to operate the forklift. Personal Mobile phones are not to be used during work times at any stage Hi Vis Jackets and Safety Boots must be worn in the warehouse at all times - see Health & Safety SOP for any further H&S requirements. Break times must be adhered to - 15 mins in the morning and 45 minutes in the afternoon, the break schedule will be advised by the warehouse manager.
When clocking in - If you are running late. You must clock in as normal and post clock in time and date date on Warehouse team group so it is searchable. Bubble Machine Settings - S.T 180% A.V 26% Set 0M, both bubble cages should be filled in, preparation for the next day. Operators must ensure the necessary tabs are open and pinned to the top of their PC, Linnworks-one tab for each inventory and orders, Bragan website, system Hub, Trello and courier site ( for label printing )
Potential Issues:
1 - ISSUE ENCOUNTERED: Stuck on Loading
RESOLUTION: Refresh Browser
2 - ISSUE ENCOUNTERED: Broken Links
RESOLUTION: Get the external link as this will allow other people to access the SOP without the need for login credentials and avoid broken links.
3 - ISSUE ENCOUNTERED: Invalid postcode in Linnworks
RESOLUTION: Check the postcode first for obvious issues such as a O being input as 0 or an additional letter. If unsure if the postcode for UK orders is correct you can input the postcode or first line of the address into the following link to verify that the postcode and address match https://www.royalmail.com/find-a-postcode
4 - ISSUE ENCOUNTERED: Error Package has changed
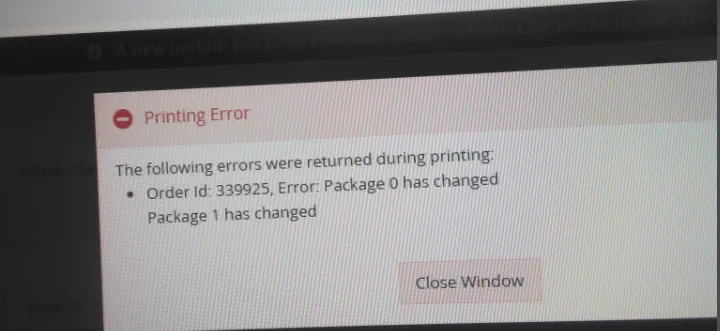
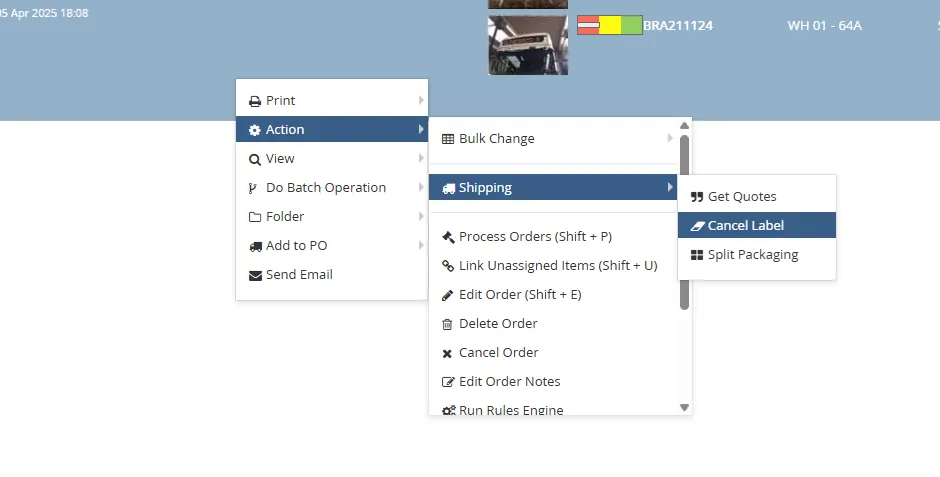
This occurs if you have changed the packaging split or courier after the label has been printed, to resolve this simply cancel the label and reprint
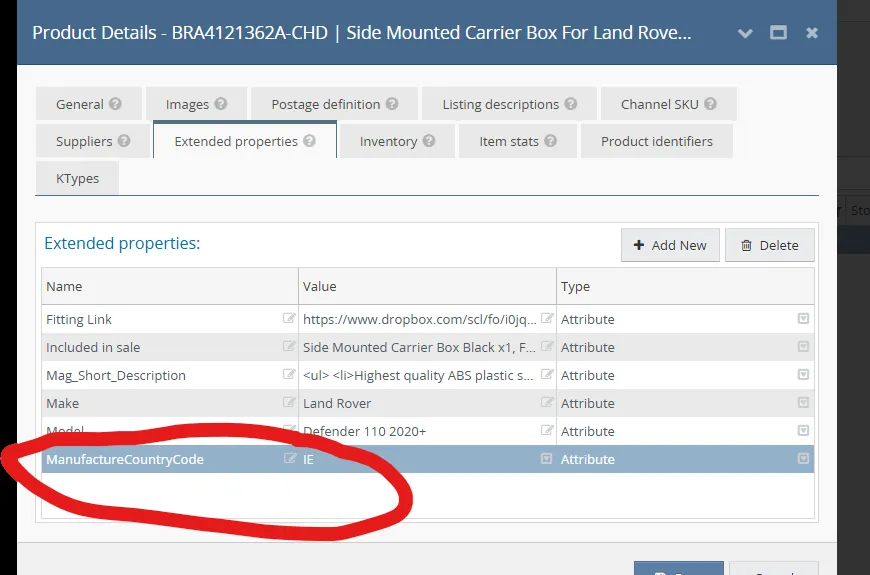
5 - ISSUE ENCOUNTERED: Could not find a country country of origin
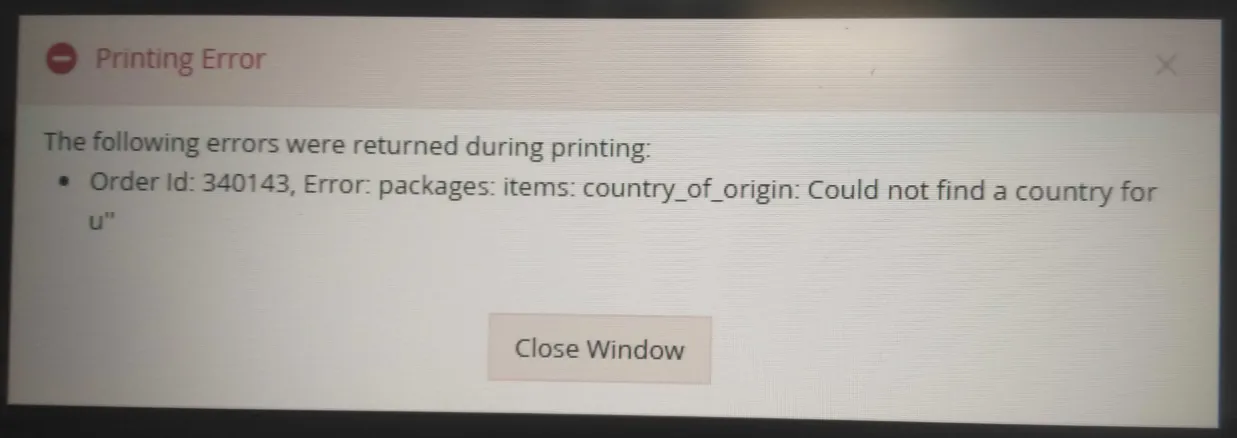
This occurs when one of the items in the order is missing the extended property "ManufactureCountryCode" If this error occurs please request the product listing team to add the extended property "ManufactureCountryCode" with the attribute of "IE"
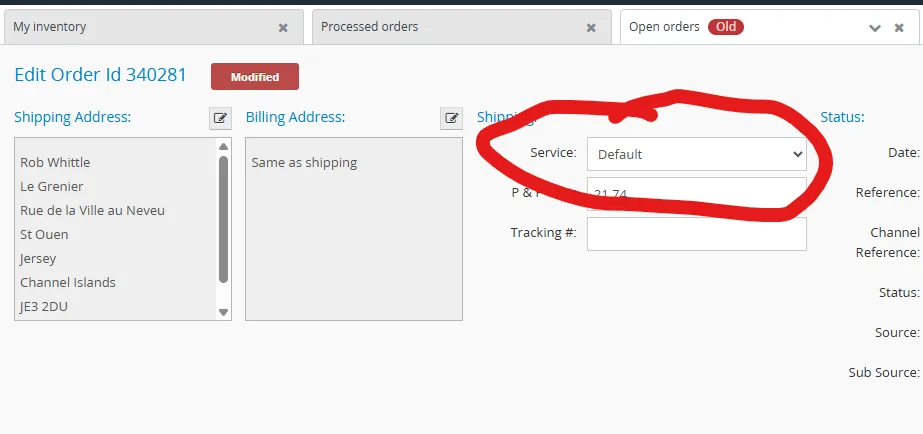
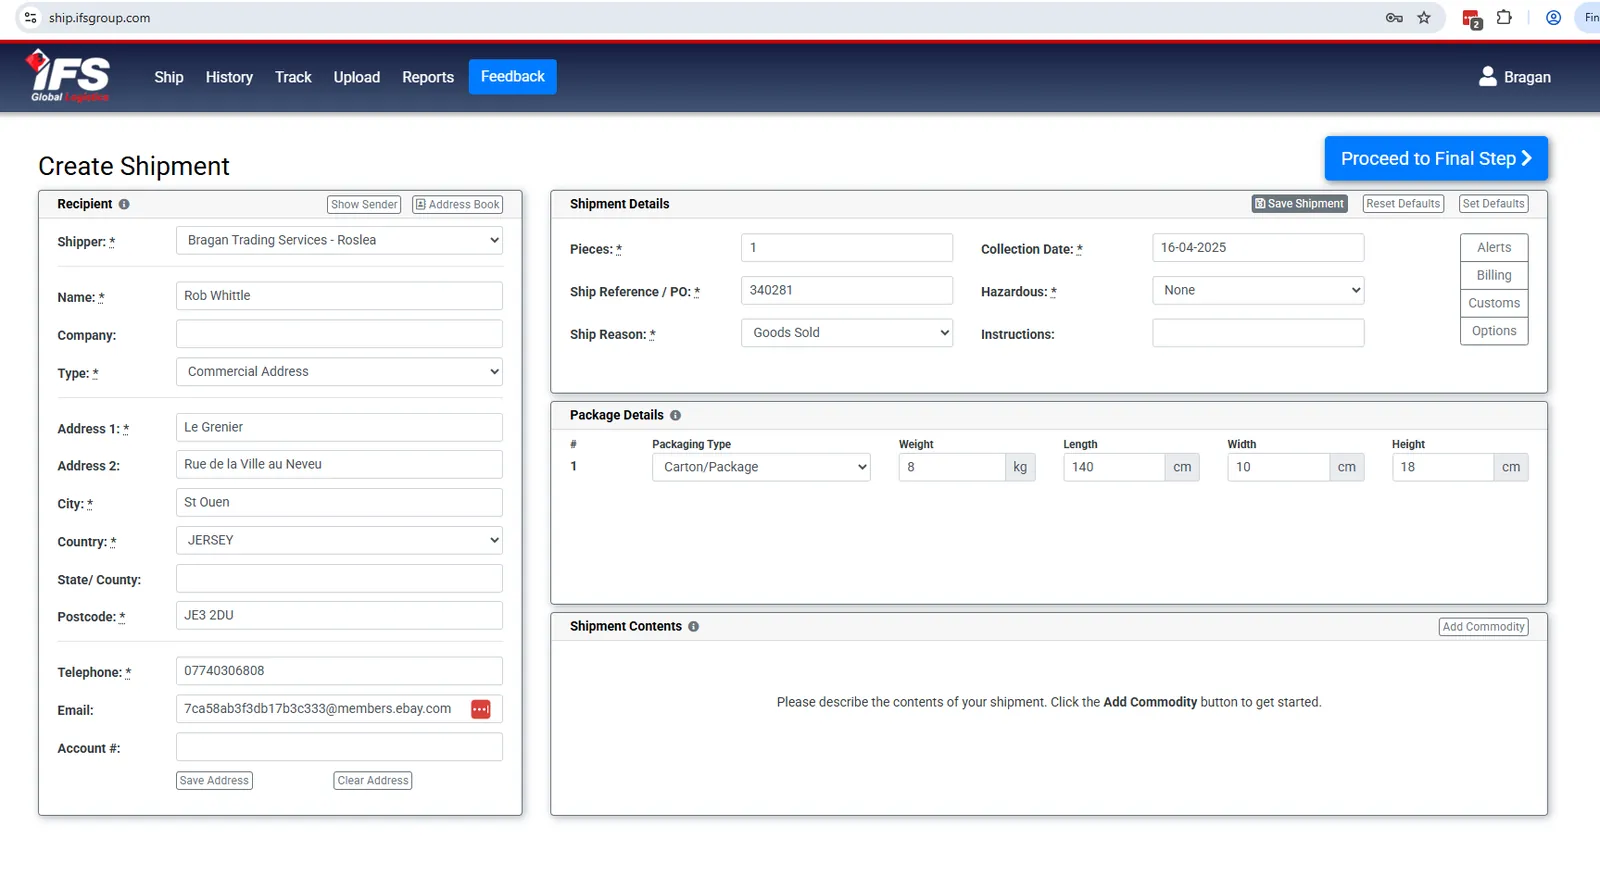
6 - ISSUE ENCOUNTERED: Please add commodity details to your shipment
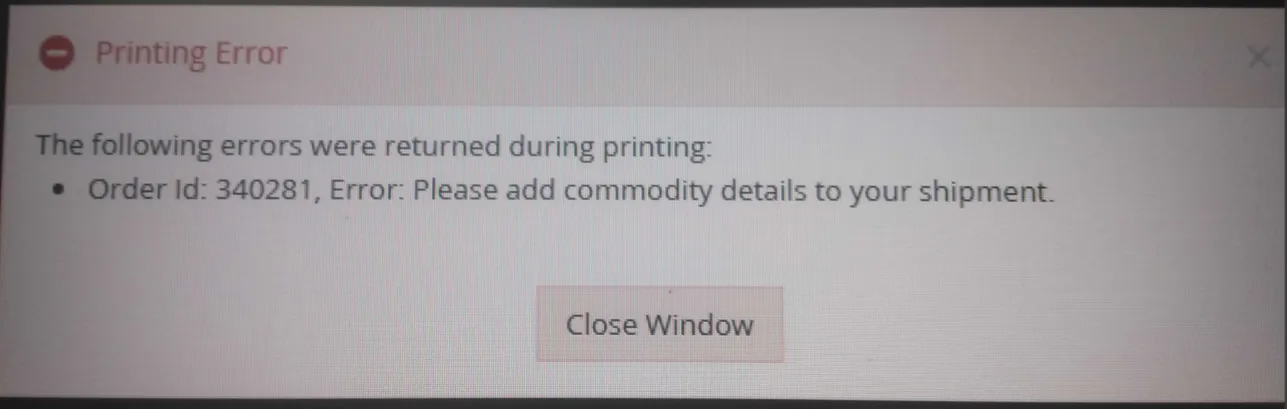
This error occurs when you attempt to print a label for the Channel Islands or Jersey. This label needs to be created manually on the IFS website and the courier on Linnworks changed to Default to process the order. To create the label in IFS follow the process on the following system bragan-net.systemhub.com net.systemhub.com/company/share/system/id/245160/shareCode/YmJmZmU3YjZlZDc 0ODJlYTUxZGM5MzYwNzI2NjcwNDg
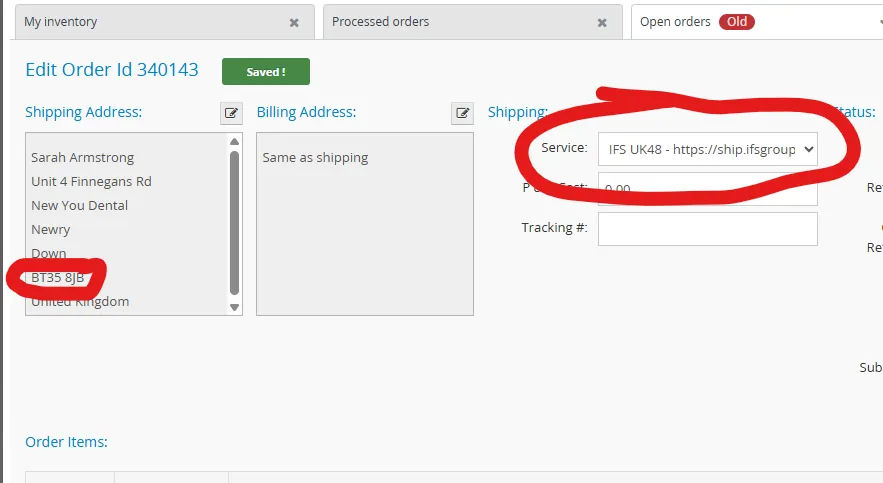
6 - ISSUE ENCOUNTERED: No Carrier Available ( Northern Ireland Postcode)
If you are receiving the no carrier available error when printing a label and the postcode starts with BT change the courier to Fastway WY or DY depending on the product dimensions
7 - ISSUE ENCOUNTERED: The remote server returned an error
This error can occur on two occasions, the first fix is to simply try and reprint the label as it has been a delay in the system when trying to print the label. The second fix is to ensure virtual printer is running on the PC that the label printer is connected to. To check this simply open the start menu and click on Virtual Printer

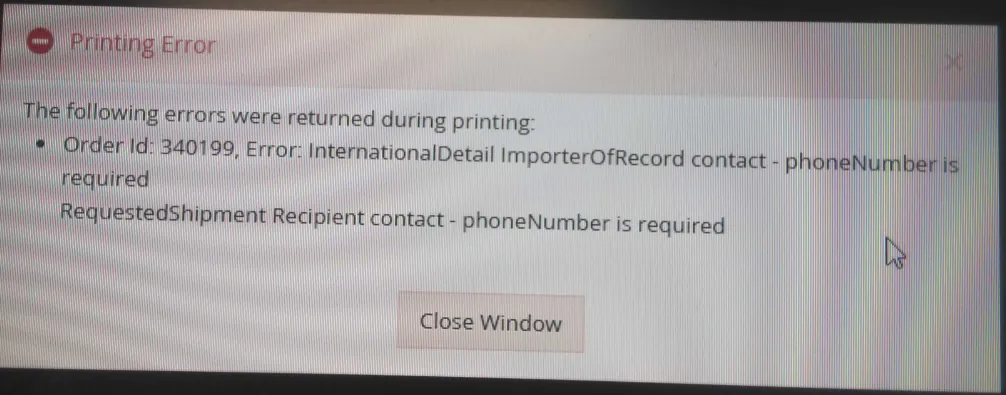
8 - ISSUE ENCOUNTERED: Phone Number is required
This error occurs when the order is missing a contact number, request the office team to request a contact number from the customer and have it added to the order